# Xray Virtuoso App

Is Xray part of your workflow? If so, we have just the right thing for you.
The Xray Virtuoso App automatically synchronizes your Virtuoso projects, goals, journeys, test steps, and executions to your Xray installation.
Xray Test Management for Jira is a test management tool that "provides the structure to organize, plan, and report with accuracy on the progress of testing as well as the readiness to deploy" [1] (opens new window).
For more information on Xray, visit the product page of Xray (opens new window).
Current limitations
- The Xray Virtuoso App does not support required custom fields on Jira issues, nor on Xray Test Steps.
- While we support multiple Jira instance configurations, a Virtuoso project can only be associated with one Jira instance at a time;
# Setup requirements
To set up the Xray Virtuoso App, ensure you have either a Jira Cloud instance equipped with an active Xray Cloud installation or a Jira Data Center / Server instance configured with an active Xray Data Center / Server installation. If you do not have Xray installed, you can follow the Getting Started guide (opens new window) provided by Xray (use the specific guide for your instance).
Xray Issue Types
For Xray to work properly, some Issue Types need to be created and mapped with JIRA. All the info can be found in their Quick Setup (opens new window).
Virtuoso requires the following information to be able to connect to your team's Jira and Xray instances:
# Cloud instance
- Your Jira instance URL;
- The email associated to a Jira account;
- An API token of that same Jira account;
- Specifying that the Jira Instance is
Cloud; - The client ID of the Xray installation;
- The client secret of the Xray installation.
- The region where your Xray data is located. If you're unsure, select
None.
To generate an API token for a Jira account, please use the following guide: Manage API tokens for your Atlassian account (opens new window). To create an Xray API key, please follow this guide: Global Settings: API Keys (opens new window).
# Data Center / Server instance
- Your Jira instance URL;
- The email associated to a Jira account;
- A personal access token of that same Jira account;
- Specifying that the Jira Instance is
Server; - The email associated to a Jira account (can be the same as above);
- A personal access token of that same Jira account (can be the same as above);
- For this instance, the region can be left blank (or select
None);
To generate a personal access token (PAT) for a Jira account, please use the following guide: Using personal access tokens (opens new window). XRay Data Center / Server makes use of the same personal access token as Jira.
Supported Jira and Xray Data Center / Server versions
Officially, Virtuoso only supports Jira Data Center / Server between version 8.20.15 and 10.3.7, and XRay Data Center / Server version 7.4.0 and all its minor upgrades (7.X.Y). Other versions are not guaranteed to work correctly with Virtuoso.
Xray data regions
Your Xray data can be in a specific region, and not selecting the correct region will make the integration fail. Contact your Xray administrator to know where your data is located. This is only relevant for Xray Cloud instances.
Jira permissions and ownership
The user account used for setting Xray Virtuoso App up will be associated with the operations executed, for instance, the app will only be able to list projects that are visible to that user.
Dedicated user in Jira
We recommend that you create a dedicated user in Jira with administrative privileges on the projects you want to see listed.
Xray permissions and ownership
We recommend that you create an Xray API key for the same user as the Jira API token, or use the same PAT (Personal access token) in the case of Data Center / Server.
# Application setup
To install the Xray Virtuoso App follow the steps described in Installing an app.
User permissions
Although it is not mandatory, it is strongly advised that you create a new Virtuoso user dedicated to this application: Virtuoso projects shared with this application user will have the application enabled.
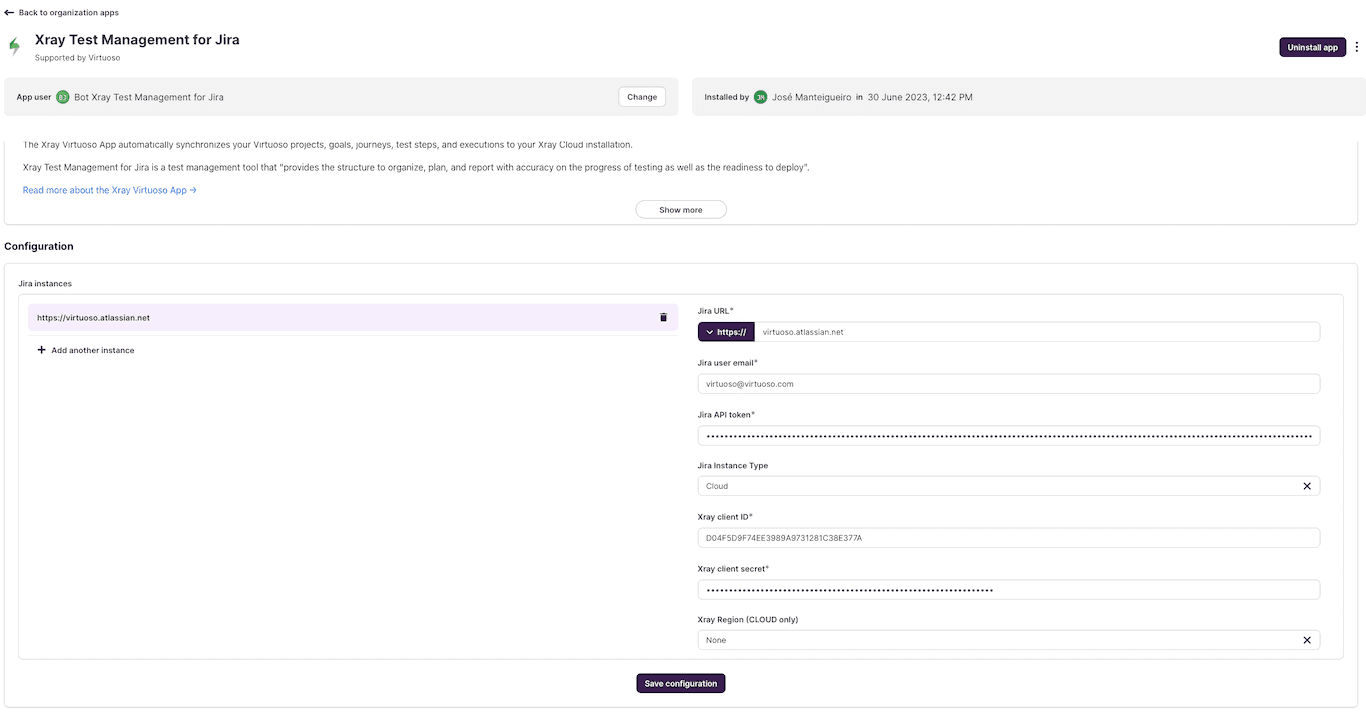
The Virtuoso Xray App supports more than one Jira Instance. To start, click on Add another instance and fill out the form on the right:
- Fill in the Jira URL field with the URL to your team's Jira instance;
- Fill in the Jira user email field with the email of the account you want to link to the operations;
- Fill in the Jira API token field with an API token of the Jira account you want to link, or user PAT (Personal access token) for the case of Data Center / Server;
- Select the Jira Instance Type from the supported instance type dropdown list. By default it uses Cloud;
- Fill in the Xray client ID field with the client ID of the generated API key, or user email for the case of Data Center / Server;
- Fill in the Xray client secret field with the client secret of the generated API key, or user PAT (Personal access token) for the case of Data Center / Server.
# Enabling project integration
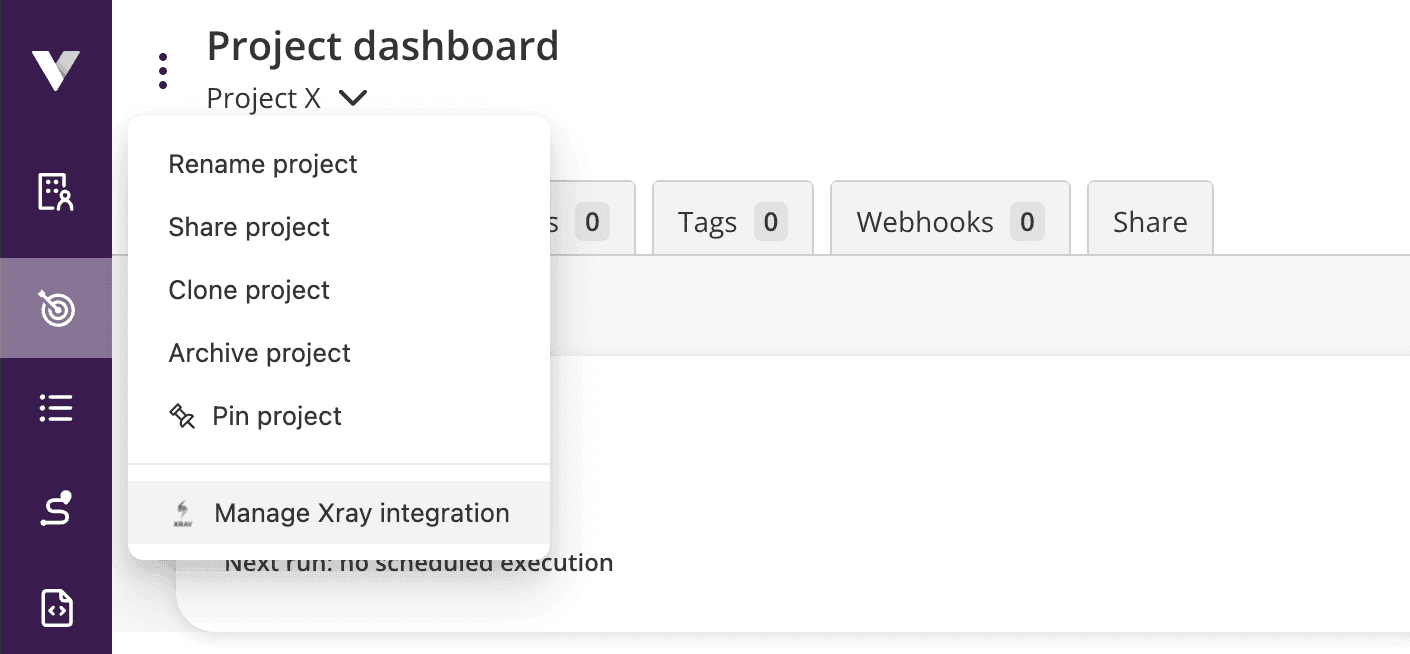
The synchronization of Virtuoso to Xray is configured on a project's basis on a first step, and then goal by goal. To enable the integration for a project, navigate to it and then click on the context menu to the left of the "Project dashboard" title. You should be able to see and click an action called Manage Xray integration.
If the action is not displayed
Please check if the project is shared with the Xray Virtuoso application user, and refresh the page.
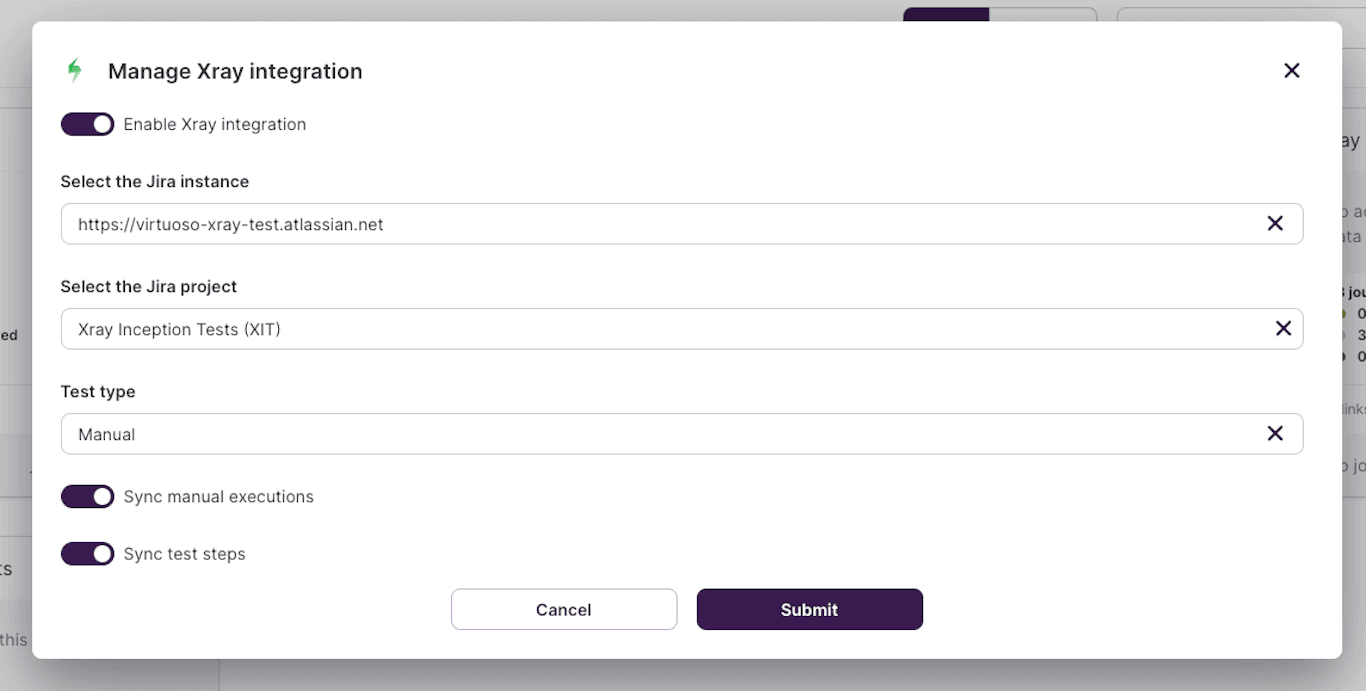
This action opens a modal form with the following fields:
- Enable Xray Integration: enables or disables the integration for the selected project;
- Jira instance: this field lists the Jira instances added to the application's configuration and lets the user choose the one they wish to synchronize to;
- Jira project: this field lists all Jira projects available to synchronize to, filtered by user input;
- Test type: this field lists all Xray test types available to use. Currently, Virtuoso only supports Xray Manual Test types (opens new window), but these can have any name on your project. The dropdown list will only be populated with supported test types. If the dropdown list is empty, verify which test types are supported by your Jira project;
- Sync manual executions: if enabled, every future execution will be imported into Xray, otherwise only executions from Execution Plans will be sent;
- Sync test steps: if enabled, the created Xray tests will include the journeys' test steps.
Fill out the form to link the Virtuoso project to a Jira project of your choice. To unlink a project, disable the "Enable Xray Integration" option and submit the form. If the integration was successful, a remote link shall appear near the project name in the organization dashboard that will take you to the linked Jira Project.
Disabling project integration
Please beware that disabling a project's integration will not delete the issues in Jira, only the links between Virtuoso's entities and their counterparts in Jira/Xray; if you link the project again, Virtuoso will create new issues (Test Sets, Tests, etc.).
Project configuration errors
If there were changes in either Virtuoso's Xray configuration or the Jira/Xray configuration itself, the integration might be unable to properly communicate, and an error message will appear. If this error persists, try disabling and re-enabling the project integration. Be mindful that this will create new issues, as mentioned above.
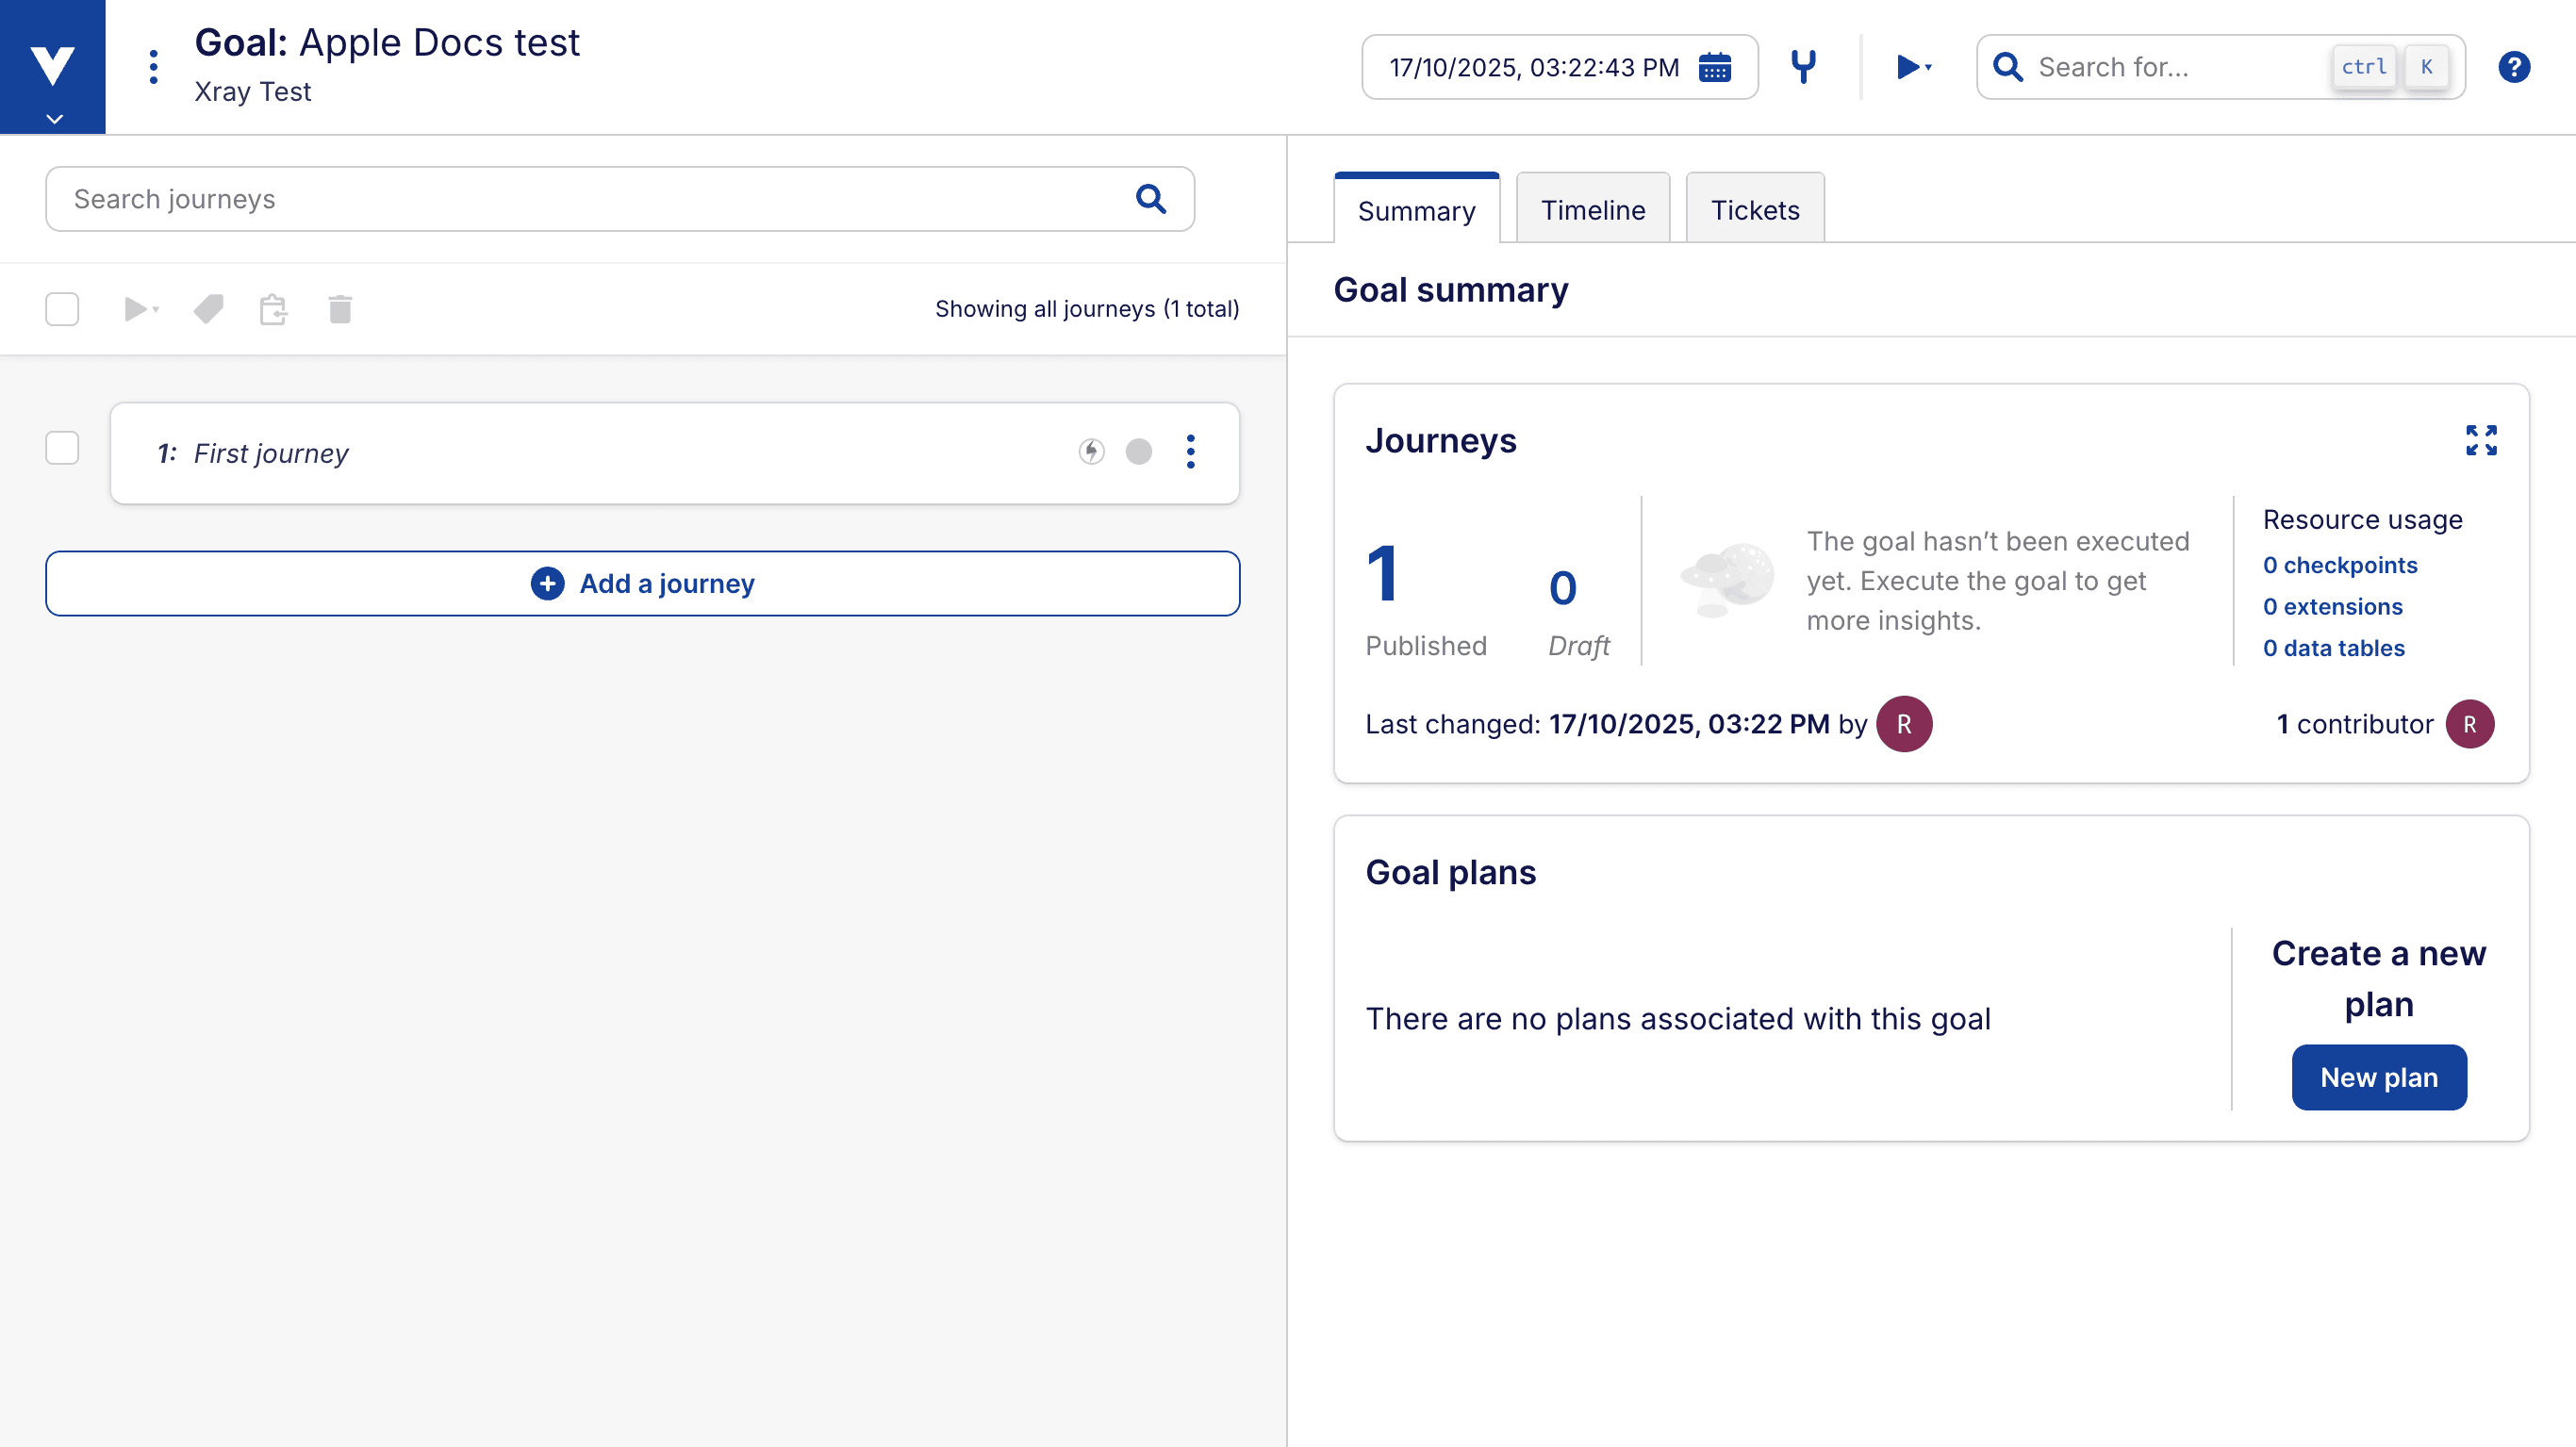
# Enabling goal integration
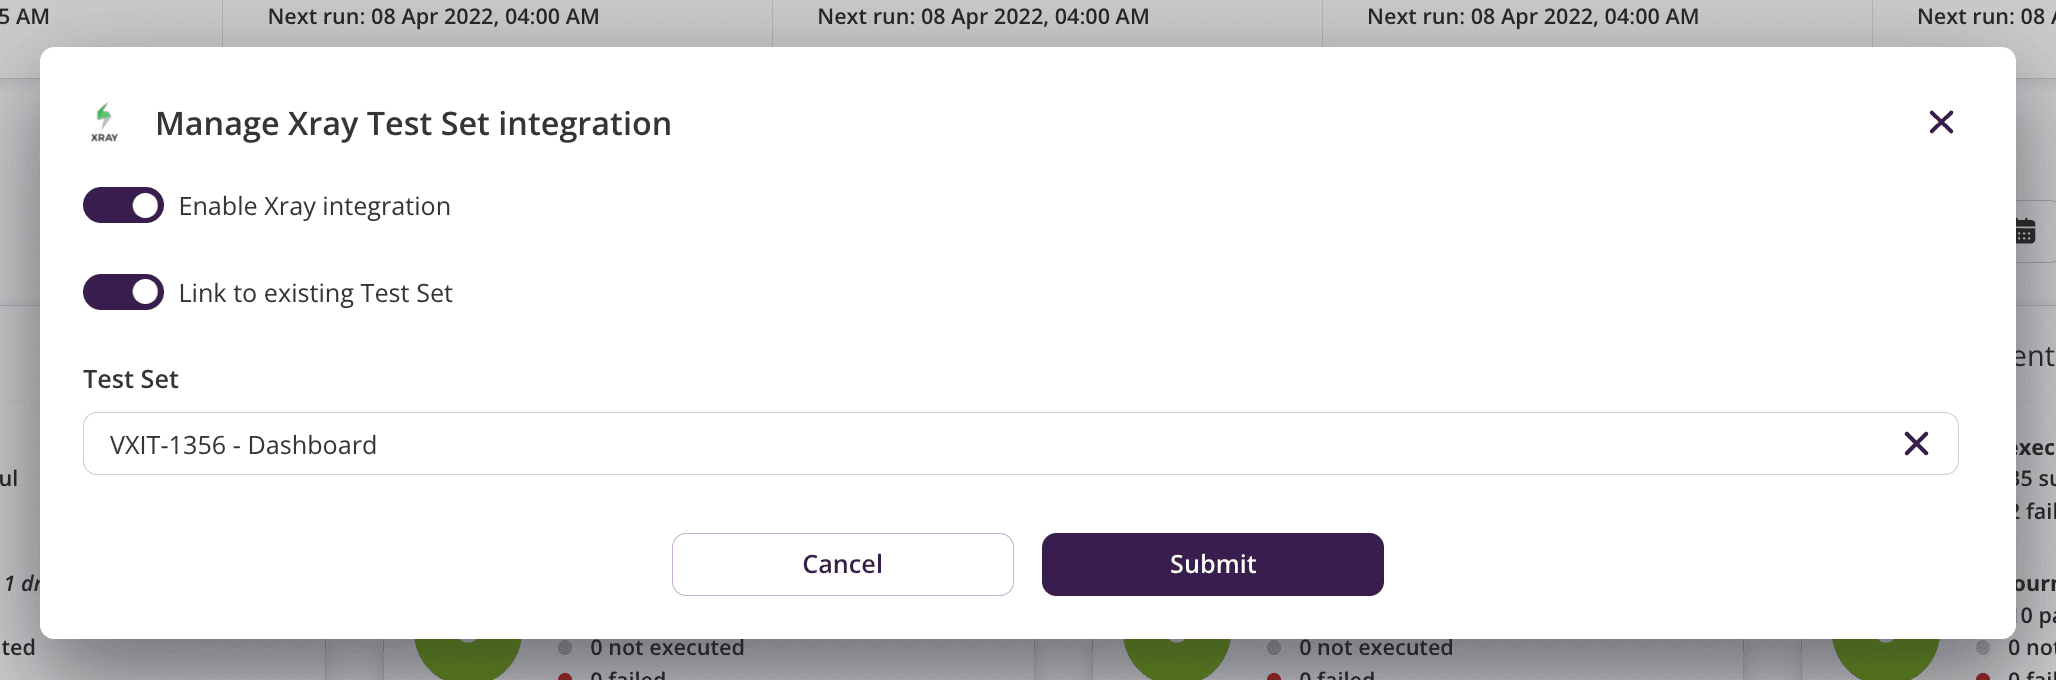
To enable the app for a goal, click on the context menu in its card in the project dashboard, or navigate to it and click the context menu to the left of the title "Goal: goal name". You should be able to see and click an action called Manage Xray Test Set integration.
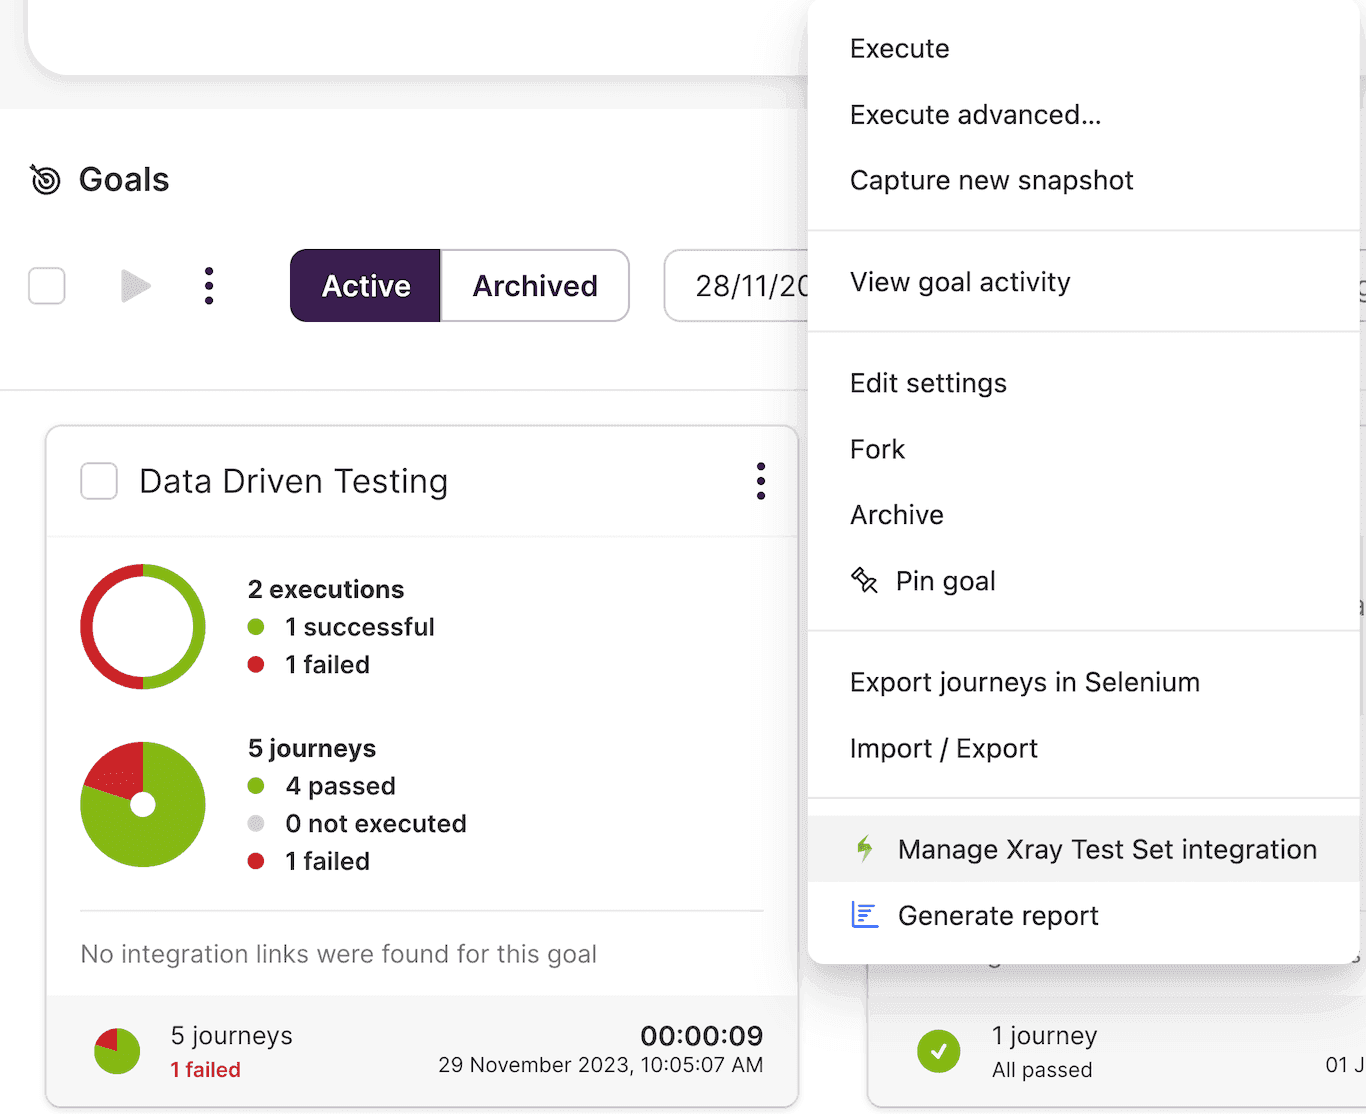
This action opens a modal form with the following fields:
- Enable Xray Integration: enables or disables the integration for the selected goal;
- Link to existing Test Set: if enabled, the goal will be linked to the Test Set provided in the next field, which means that every Test created will be added to a provided Test Set. Leave blank to create a new Test Set;
- Test Set: lists the existing Test Sets, filtered by user input, and allows the user to pick one for the goal to be linked to.
Fill out the form to link the Virtuoso goal to a new Test Set, or to an existing Test Set of your choice. To unlink a goal, disable the "Enable Xray Integration" option and submit the form. If the integration was successful, a remote link shall appear under the goal in the project view, that will take you to the linked Test Set in Xray.
Linking multiple goals to the same Test Set
Please beware that linking multiple goals to the same Test Set is possible, but not recommended, as it may lead to confusion when trying to identify which Test set belong to which goal. In cases where multiple goals are linked to the same Test Set, all Tests created from the journeys of those goals will be added to that single Test Set. The Test set title will be updated to match recently linked/updated goal.
Disabling/Enabling goal integration
Please beware that disabling a goal's integration will not delete any data in Jira/Xray, Only the events related to that goal will stop being synchronized; if you enable the integration again, the existing Test Set will be reused.
After enabling the integration for a goal, the Xray Virtuoso App will start synchronizing the goal with Jira and Xray by creating a Test Set (if the user did not choose to link to an existing Test Set). No steps will be shown until the journeys are executed.
Execution synchronization time
When executing a goal with a large number of journeys or test steps, the synchronization process may take some time before Tests become visible in Jira/Xray.
The synchronization may sometimes not complete successfully due to performance limitations of the Jira API and intermediate network components.
# Links
# Project link
When the Xray Virtuoso App is enabled for a project, a remote link to the linked Jira project will be displayed next to the project name in the organization dashboard.

# Goal link
When the Xray Virtuoso App is enabled for a goal, a remote link to the linked Xray Test Set will be displayed in the goal card in the project dashboard.

# Journey link
When the Xray Virtuoso App is enabled for a goal, each journey associated with that goal will display direct links to their corresponding Xray Test issues. This feature allows users to easily navigate between Virtuoso and Xray, facilitating quick access to test details and results. The links stored in Xray Test issues will always point to the latest version of the journey in Virtuoso.
# Migration of project's existing data to new instance.
Incase you wish to migrate your project's existing Xray data to a new Jira instance, you can do so by following these steps:
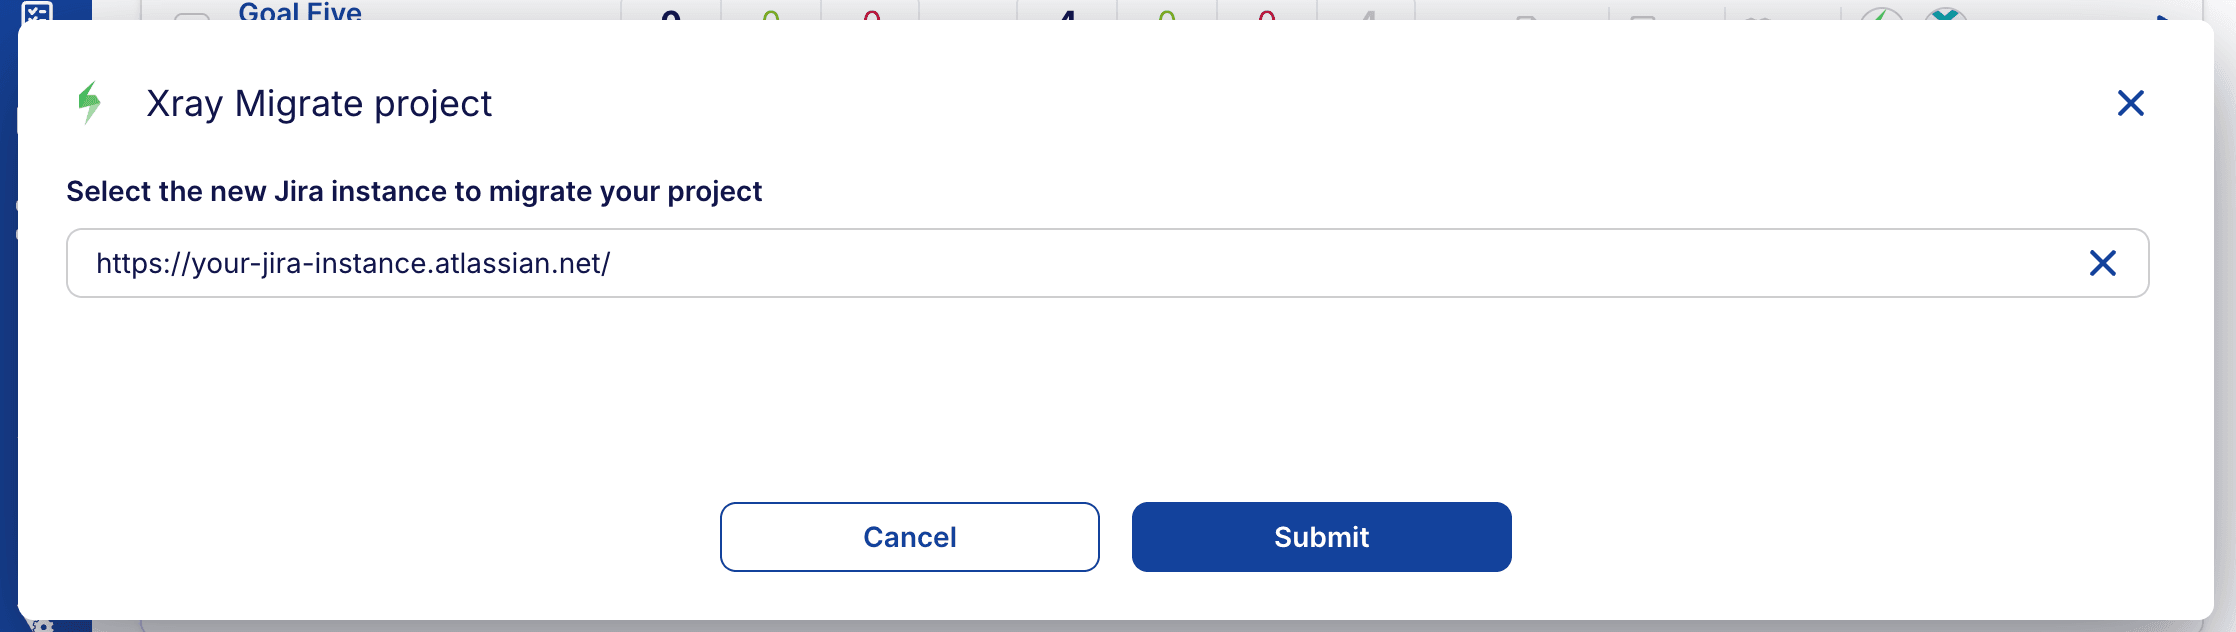
- Open project context menu and click on "Xray Migrate project".
- In the opened modal, select the new Jira instance on which you want to migrate your data.
- Click on Submit to start the migration process.
As soon as the migration form is submitted, the migration process will start in the background. The project will be disabled for event processing during the migration to avoid data inconsistencies. It is recommended to avoid making changes to the project/xray during this time. Depending on the amount of data to be migrated, this process may take some time. Once the migration is complete, all your existing Xray data stored on app will be updated to refer to the new Jira instance.
Migration assumptions
The migration process only updates the Xray data stored on Virtuoso app. The actual issues in Jira/Xray are not modified or moved in any way. It is assumed that the user has already migrated the issues in Jira/Xray to the new instance before performing this migration.
# Migration progress
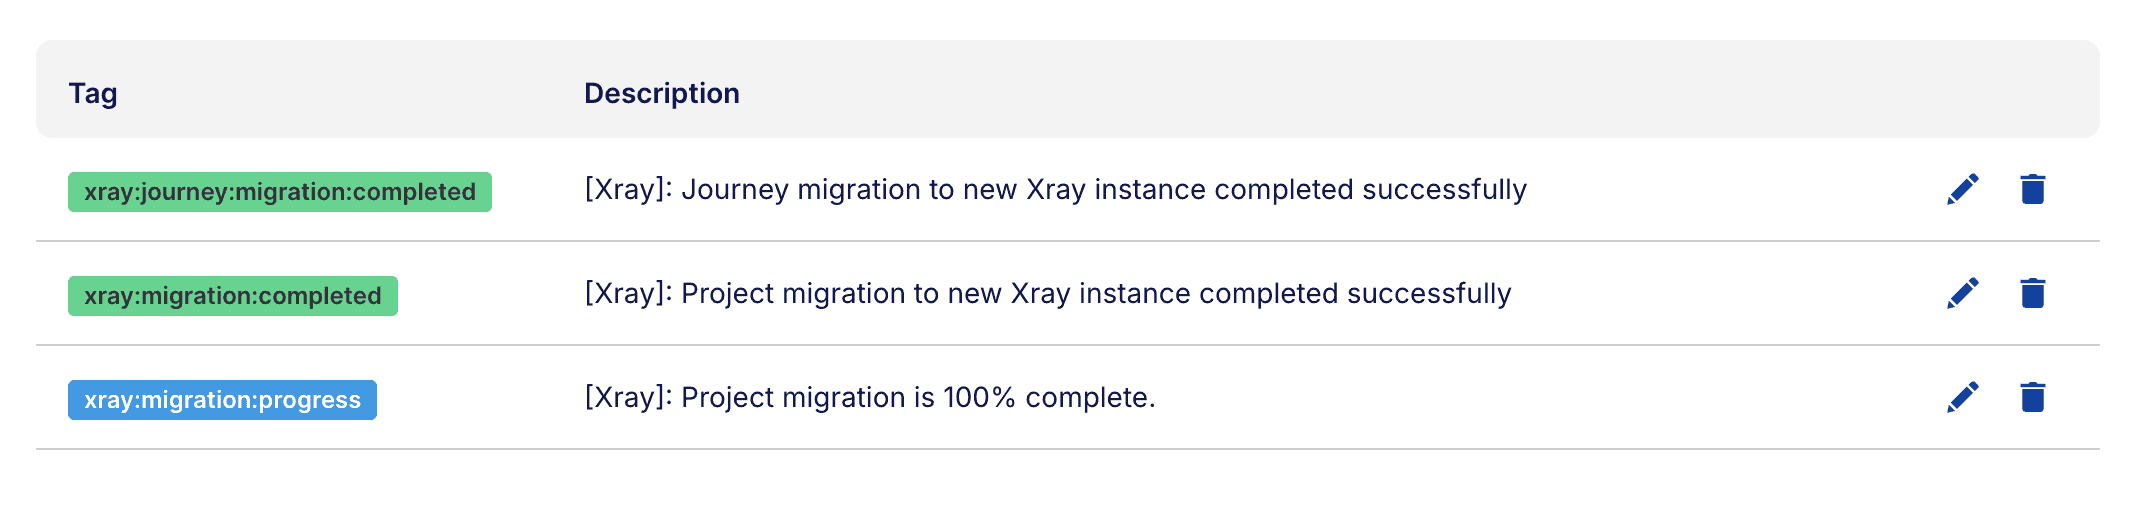
The migration progress can be monitored in the tags page on project dashboard. The Xray migration process uses various status tags to provide detailed information about the current state of migration. These tags appear with different colors to indicate the status level:
xray:migration:preparing- Preparing project data for migration to new Xray instancexray:migration:preparation-complete- Project is ready for migration to new Xray instancexray:migration:preparing-error- An error occurred while preparing project data for migrationxray:migration:error- An error occurred during project migration to new Xray instancexray:migration:migrating-data- Project data is being migrated to new Xray instancexray:migration:progress- Project migration in progress. The percentage of completion is indicated in the tag description and updates in real-time.xray:migration:completed- Project migration to new Xray instance completed successfully
The following tags will be added to journeys during the migration process to indicate their individual migration status:
xray:journey:migration:started- Journey migration to new Xray instance startedxray:journey:migration:completed- Journey migration to new Xray instance completed successfullyxray:journey:migration:error:issue-not-found- Journey migration to new Xray instance failed - linked Jira issue not foundxray:journey:migration:error:unexpected- Journey migration to new Xray instance failed due to an unexpected error
# Tips and FAQ
# How are Virtuoso entities represented in Xray?
| Virtuoso | Xray |
|---|---|
| Project | Project |
| Goal | Test Set |
| Journey | Test |
| Test Step | Test Step |
| Goal Execution | Test Execution |
| Journey Execution | Test Run |
# What happens in Xray when...?
| Virtuoso | Xray |
|---|---|
| Goal integration is enabled | A Test Set is created for the Goal |
| Goal name changes | The Test Set's summary for the Goal is updated. |
| Journey is published | A Test is created for the published Journey (without steps). |
| Execution finishes | Creates or updates the Tests for the executed journeys, and then creates a Test Execution issue |
| Data-driven execution finishes | Creates or updates the journeys executed and then creates a Test Execution issue with Test Runs for each Test. If test step synchronization is enabled, it includes a dataset of the values used for each iteration. The Test Run result will be a failure if any of the iterations failed. |