# Virtuoso Bridge
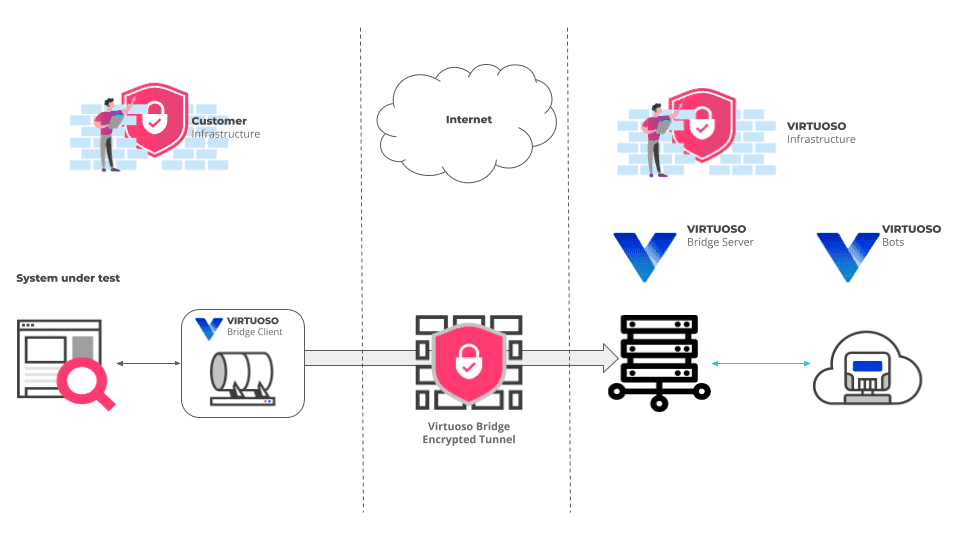
Virtuoso Bridge allows Virtuoso to access your local or private application, without the need of changes on the firewall or routing rules on your infrastructure. This enables seamless usage of Virtuoso on:
- Internal environments behind firewall (e.g., staging and testing environments)
- Applications with restricted access within your organization network (e.g.
https://privateapp.intranet) - Local development environments (see Testing local applications for more details)
This is achieved using two components:
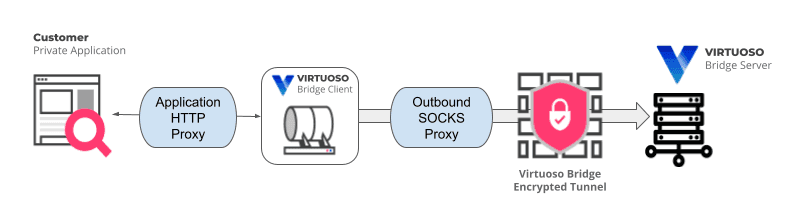
Virtuoso Bridge Client - Establishes a secure connection (TLS-encrypted) to the Virtuoso Bridge Server which is then used as a secure tunnel to forward all requests made by Virtuoso Bots through that specific Virtuoso Bridge Client to your internal network.
Virtuoso Bridge Server - Acts as proxy for all traffic coming from Virtuoso Bots and allows access to all network applications accessible by the machine where Virtuoso Bridge Client is deployed.
The following diagram illustrates this functionality, and the connections between the Virtuoso Bridge components, your internal application and Virtuoso Bots.
The remaining of this section presents the following topics:
- Setting up a Virtuoso Bridge
- Checking available Virtuoso Bridges
- Using a Virtuoso Bridge
- Virtuoso Bridge proxy support
# Setting up a Virtuoso Bridge
To set up a new Virtuoso Bridge:
- Obtain the Virtuoso Bridge client for your operating system (no installation is required)
- Launch it, providing the appropriate parameters:
# Download Virtuoso Bridge client
Use the link that matches your platform:
- Linux client
- Windows client
Using macOS?
A macOS bridge client is not officially supported.
The recommended way of using the bridge client in a macOS system is to use the Linux version in a containerized environment. As long as the virtual machine can reach and use the application under test, the bridge client should allow Virtuoso to interact with the application.
However, if you understand the potential risks and accept running an unsigned binary, we also provide macOS-native builds:
On first run, macOS may block the binary because it is from an unidentified developer. You can follow the steps described in Apple's support site (opens new window) to allow the client app to run normally.
# Launching example
# Replace the example token with a token created from your user profile and the the organization ID with the organization ID where the bridge will be available.

# Linux
chmod +x bridge_client_linux_amd64
./bridge_client_linux_amd64 --token 37d7ec5e-cf57-45a3-8715-7a5c3e8f4115 --organization-id 1

# Windows
bridge_client_windows_amd64.exe --token 37d7ec5e-cf57-45a3-8715-7a5c3e8f4115 --organization-id 1
# Command line parameters
# Required parameters
- --organization-id : The identifier of the organization for which the bridge will be available. The identifier of your organization is the number present in the URL when you visit the Organization Dashboard. If the URL is
https://app.virtuoso.qa/#/organization/1/projects, the organization ID is 1. - -t (--token) : The Virtuoso authentication token. See Creating an API access token on how to obtain it.
Token type
Although you can use a token of type ALL (full-access) to use the Virtuoso Bridge, we strongly recommend you to use a token of type BRIDGE which has a reduced scope of permissions and is designed to work with the Virtuoso Bridge using the minimum permissions needed.
Differences in parameters in the deprecated client version
- In addition to the token, the deprecated client version also supports authentication using email/password (If both token and email/password are provided, token will be used):
- -e (--email) : User email to access Virtuoso
- -p (--password) : User password to access Virtuoso
- In the deprecated client version, depending on when it was downloaded, the organization ID is not supported, requiring the creation of a user that only has access to a single organization.
# Optional parameters:
- -n (--name) : Identifier for the bridge (this will appear as your bridge name on Virtuoso). If not provided, the MAC Address of the default network adapter will be used.
- -l (--log-level) : Specifies the log level using
TRACE,DEBUG,INFO(default),WARNING,ERRORorFATAL. - --tls : Enable TLS encryption to the remote server (default
true). - --checker-sut-url : URL that the connectivity checker will try to resolve (see Performing connectivity check).
- --outbound-socks-proxy : SOCKS5 Internet access proxy used to reach the Virtuoso bridge server ONLY, in the form of
socks5://host:port(see Virtuoso Bridge proxy support). - --application-http-proxy : Application access HTTP proxy (local traffic), in the form
server:port(see Virtuoso Bridge proxy support). - --use-unix-socket : Use Unix domain sockets for proxy backend instead of TCP (only available on Linux) (default
false). - -p (--bypass-proxy-hosts) : Regular expression to match host:port to determine if the application proxy should be used. Must be used with application-http-proxy. For example,
.*:443will bypass the proxy for all HTTPs hosts.virtuosoqa\.com:.*would bypass it for all virtuosoqa.com connection attempts (see Proxy bypass filters). - --host-overrides : Hostnames to bypass DNS for (like /etc/hosts). Specify as comma-separated maps of domain to IP address, e.g.
--host-overrides google.com=1.1.1.1,virtuoso.qa=127.0.0.1(see Host overrides). - --log-format : Specifies the log format using
console(default), orjson.
Differences in parameters in the deprecated client version
The deprecated client version doesn't support the following parameters: --tls, --checker-sut-url, --use-unix-socket, and --log-format.
Also, the deprecated client version has the following additional parameters:
- -o (--out) : Specifies the full path of a log file to be used. If not provided, standard output will be used. Alternatively the value "none" can be used to disable logging completely.
- --max-retry-time : Specifies the maximum time the client will retry connecting to Virtuoso on connection failure before exiting, in the form of
<hours>h<minutes>m<seconds>s(ex: 34m, 1h30m) (default 5m)
Passing parameter values
When passing values for a parameter to the bridge client, make sure to use the correct quotations for your operating system. On Linux, you can use the single quote character ', e.g. --bypass-proxy-hosts '.*\.google\.com:.*'. On a Windows system, you need to use double quotes ", e.g. --bypass-proxy-hosts ".*\.google\.com:.*".
# Using the bridge on other Virtuoso environments
If you are not accessing Virtuoso via app.virtuoso.qa, reach out to our customer support so they provide you with the additional parameters required for your specific environment.
# Performing connectivity check
The bridge client can perform a connectivity check to ensure that the connection to the bridge server is working correctly and that the system under test is reachable. This is useful to diagnose issues with the bridge connection.
To perform a connectivity check, use the check command and the --checker-sut-url parameter. For example:
./bridge_client_linux_amd64 --application-http-proxy my-proxy.local:8080 check --checker-sut-url http://myapp.local
If you are using a proxy to access the application, and you forget to provide it when launching the client, the checker's output will be similar to the following:
./bridge_client_linux_amd64 --application-http-proxy my-proxy.local:8080 check --checker-sut-url http://myapp.local

Virtuoso Connectivity Checker
-------------------------------------------------------

ℹ️  Checking DNS Resolution to Virtuoso
👍 Found IP for bridge2.virtuoso.qa => 3.248.29.248
-------------------------------------------------------

ℹ️  Checking Connectivity to Virtuoso
👍 Connected to bridge2.virtuoso.qa on port 443
-------------------------------------------------------

ℹ️  Checking connectivity to the SUT at http://myapp.local
🛑 Could not connect to myapp.local on port 80
⁉️ Cannot connect to the SUT are you using a proxy?
The bridge client supports http proxy to connect to the SUT.
To specify a socks proxy use the --application-http-proxy flag in the bridge client.
The connectivity check is not supported in the deprecated client version.
# Updating the client
Changes to the bridge server are made in a way to be backwards compatible, which means that an old client version (not the deprecated one) will still work correctly when connected to a new server version. However, to take advantage of new features or bug fixes, it is recommended to use the latest client version.
When a client connects to a server, either because you are launching it or because the client is automatically connecting to a new and recently deployed server version, it logs a message indicating whether the versions match.
This way, you can check if you are using the latest client version, as indicated by the following messages:
11:33:21 INF Authentication response message: Bridge connected component=client
11:33:21 INF Client version matches server version: 1738683826_b25538c_main component=client
Or not, as indicated by the following messages:
10:01:26 INF Authentication response message: Bridge connected - Client version (local) does not match server version (1738683826_b25538c_main) component=client
10:01:26 INF Client version (local) does not match server version (1738683826_b25538c_main) component=client
# Checking available Virtuoso Bridges
You can check the available bridges in an organization by going to the Organization Dashboard and clicking the Bridges tab at the top.
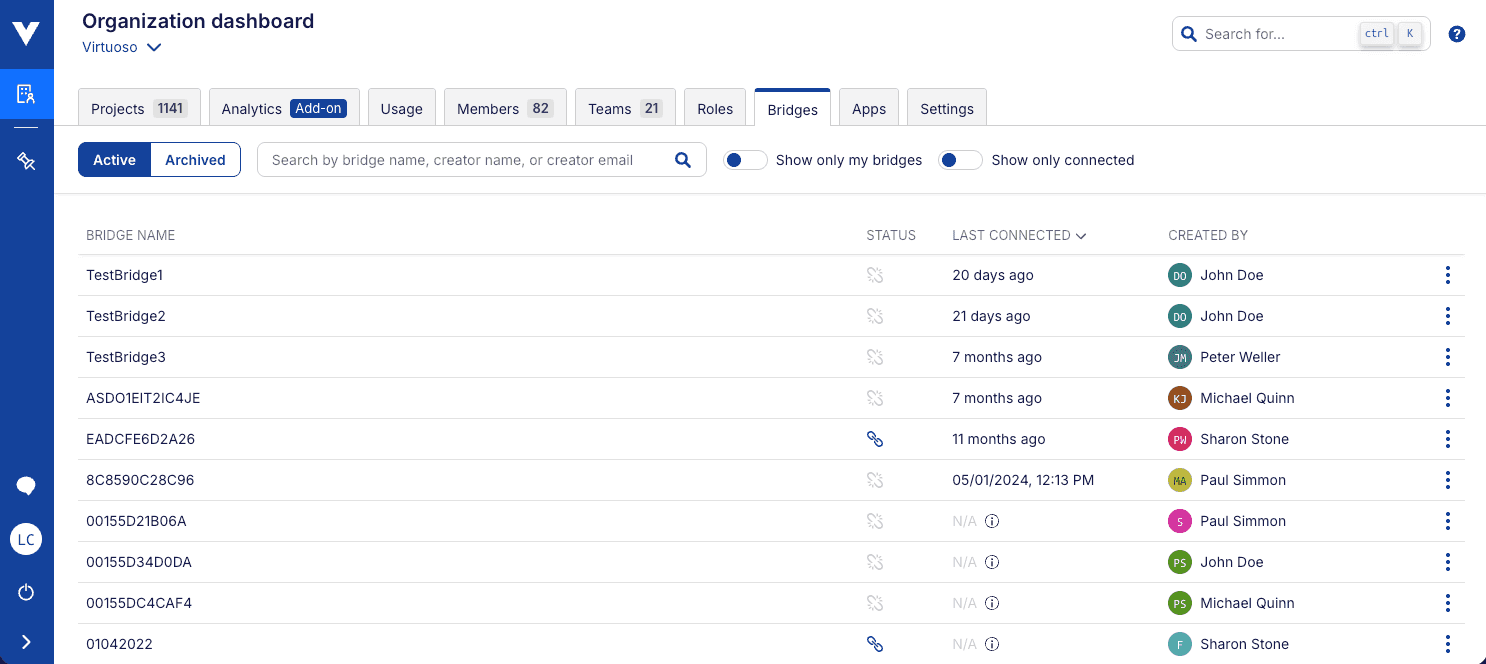
After a bridge client has been launched, it should appear on the Bridges section of the organization dashboard, under the MAC address of the network adapter or the name it was given using the -n / --name parameter.
# Bridging Management
In this section, you can manage the bridges available in your organization. It shows you:
- The name of each bridge
- The status of each bridge (connected/disconnected)
- The last time the bridge was connected
- Who created the bridge
You can also archive a disconnected bridge, if you click on the three dots on the right side of the bridge entry.
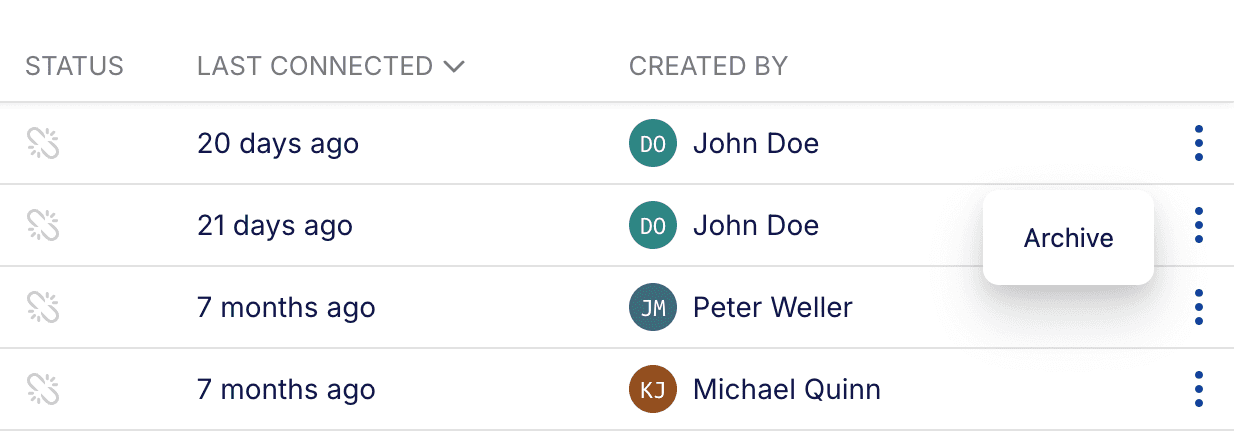
Archiving a bridge will remove it from the list of available bridges. Only disconnected bridges can be archived. A bridge is automatically restored if it is reconnected.
Other than that, filtering, searching and ordering the list of bridges is also possible.
# Using a Virtuoso Bridge
To use a previously set Virtuoso Bridge, set it up on the "Environment" settings section of a Goal, through the Default environment selector:
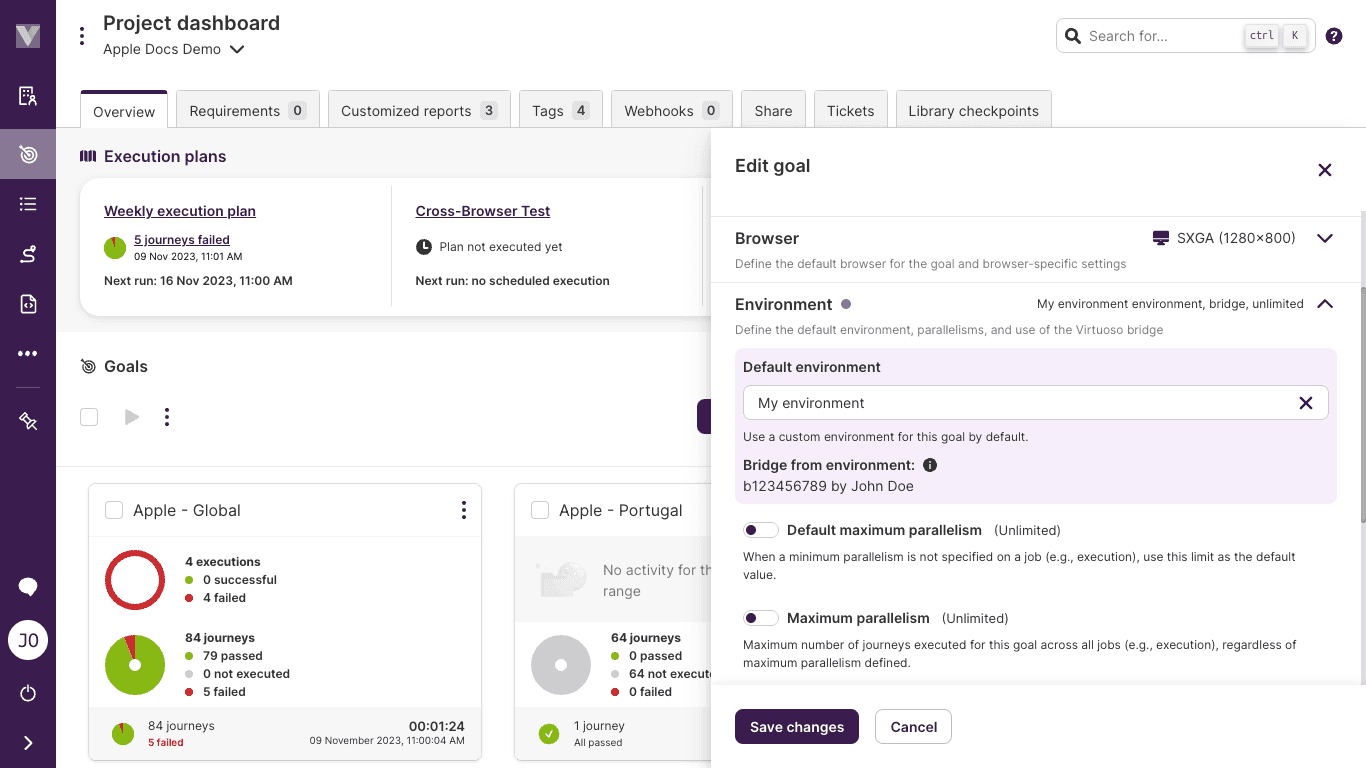
The dropdown options will list all available environments and their associated bridges.
Connection capacity at the bridge client
With the bridge, the bandwidth available to Virtuoso will be limited by the capacity of the connection to the bridge server from the client, and from the client to the application under test.
By default, Virtuoso will not limit the number of concurrent sessions sharing the bridge. Bandwidth capacity through the bridge is limited by the capacity of the internet connection (and VPN if in use) of the host running the client, both to the bridge server and to the application under test.
If your goal has many journeys or the bridge client is running over an unstable or limited-bandwidth connection, this can lead to request timeouts which in turn cause journeys to fail part-way through or in some cases a blank screenshot on the first step.
When this happens, you can use the maximum parallelism setting on goals and plans to limit the maximum number of bots testing at the same time. If possible, avoid running the bridge client on machines that require a VPN to access the target application by running the client on a host within the network instead.
Multiple bridge clients on the same machine
Running multiple Bridge clients on the same machine can cause conflicts and reduce performance, as they share the same network adapter and rely on the host system's resources (e.g., number of connections established).
Recommendation:
Deploy each Bridge client on a separate machine and use the -n parameter to assign a unique identifier to each client.
# Testing local applications
Due to Chrome browser limitations, it is not possible to direct requests to "localhost" or "127.0.0.1" through Virtuoso Bridge. To overcome this, the configuration should be adjusted to access an alternative address / IP. To support this, on bridge client launch the alternative options available will be presented:
|
| For access to localhost applications, in Virtuoso please replace localhost by one of the following:
|
| myhostname
| 192.168.1.104
| 192.168.122.1
|
| Example:
| http://localhost:8080 -> http://myhostname:8080
|
| For more details please check documentation at:
| https://docs.virtuoso.qa/guide/advanced-topics/virtuoso-bridge/#setup-a-virtuoso-bridge
|
On the goal configuration url and any navigate test steps, localhost should be replaced by one of the presented options.
# Saving client logs to a file
By default, the bridge client logs output to the console. In some cases, you might want to store the client logs in a file to be shared or viewed later. Setting the log format to JSON allows it to be more readable when outputting to a file.
The below commands will output the bridge client logs to a file called log.txt in your current directory.
# Replace the example token with a token created from your user profile and the the organization ID with the organization ID where the bridge will be available.

# Linux
chmod +x bridge_client_linux_amd64
./bridge_client_linux_amd64 --token 37d7ec5e-cf57-45a3-8715-7a5c3e8f4115 --organization-id 1 --log-format json > log.txt 2>&1

# Windows
bridge_client_windows_amd64.exe --token 37d7ec5e-cf57-45a3-8715-7a5c3e8f4115 --organization-id 1 --log-format json > log.txt 2>&1
# Virtuoso Bridge proxy support
Depending on your network architecture or connectivity requirements, it might be needed to use Virtuoso bridge with one or two proxies:
If your application can only be accessed through a http proxy or if you require that all traffic targeting the application is directed through a http proxy, you can use the following parameter:
--application-http-proxy [http proxy], the proxy value should be provided in the form of<proxy_address>:<proxy_port>(e.g.,10.0.0.2:8081). This proxy must be aHTTPproxy.
On the other hand, your Virtuoso bridge might not be able to reach our Virtuoso servers directly, and it needs a proxy connection too. For these cases, you can use this parameter to configure where the bridge client should point to reach external networks:
--outbound-socks-proxy [socks proxy], the proxy value should be provided in the form of<proxy_address>:<proxy_port>(e.g.,10.0.0.5:8082). This proxy must be aSOCKSproxy to properly communicate with Virtuoso.
# Proxy bypass filters
The bypass-proxy-hosts option uses a regular expression to filter hosts that should bypass the proxy. This allows specific ports or hostnames to be filtered out, including wildcards. Please speak with Customer Success for assistance with writing these expressions. Some examples include:
--bypass-proxy-hosts google\.com:443will bypass the proxy server only for google.com on port 443 (HTTPS). The \. characters correspond to a literal . instead of the regular expression any-character matcher, meaning a host like “googleacom” does not match.--bypass-proxy-hosts '.*:443'will bypass the proxy server for any connection to port 443 (the dot character is necessary). You may need to use quotation marks to avoid the * character being interpreted by the command line.--bypass-proxy-hosts '.*\.google\.com:.*'will bypass the proxy for any host that ends in .google.com for any port.--bypass-proxy-hosts '.*\.google\.com:.*' --bypass-proxy-hosts '.*\.apple\.com:.*'will bypass the proxy for any host that ends in .google.com or .apple.com for any port.
# Host overrides
The host-overrides option uses a list of host=IP pairs, separated by commas. For example the argument test.virtuoso.qa=34.223.124.45,testserver123.example=10.0.0.1 causes test.virtuoso.qa to resolve to 34.223.124.45 and will redirect testserver123.example to the local IP 10.0.0.1. IPV6 is not supported.
Any host matching either the proxy bypass rule or a host-override will not transit the application proxy. Where rules overlap, precedence is given to using the host-override setting.
# Using OWASP® Zed Attack Proxy (ZAP) with Virtuoso Bridge
One of the use cases for Virtuoso bridge proxy support is to integrate with OWASP ZAP (opens new window) tool for security auditing your application via Virtuoso. This can be achieved by using ZAP proxy functionality, and setting up Virtuoso bridge to use it as application proxy (--application-http-proxy parameter).
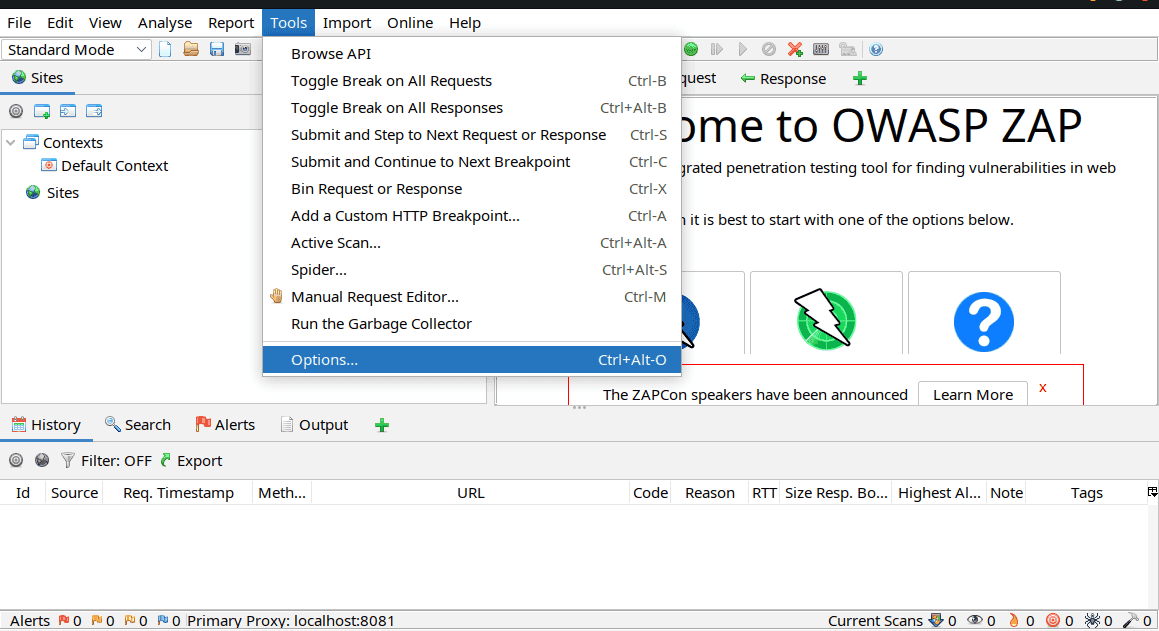
To obtain the ZAP proxy info using the GUI, launch it and from the menu select Tools->Options:
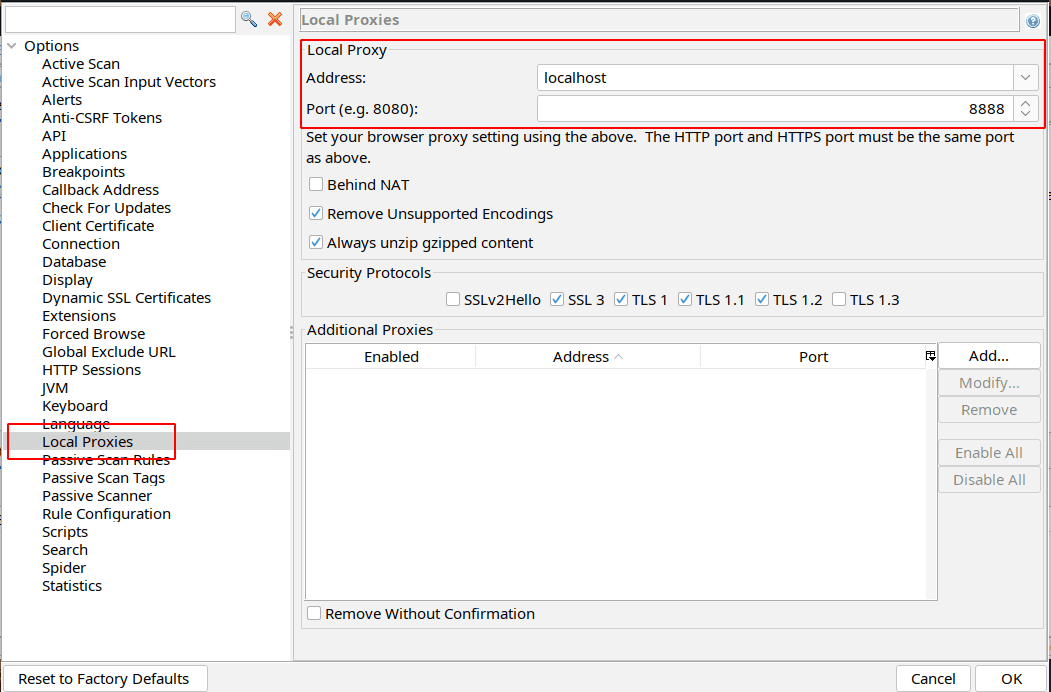
From the options window select Local Proxies to view or change the ZAP proxy info:
This info is also shown on the ZAP window status bar:

If you are running ZAP in daemon mode, check for the log message with the proxy info:
[ZAP-daemon] INFO org.zaproxy.zap.DaemonBootstrap - ZAP is now listening on localhost:8888
This is the value you should use while starting the Virtuoso Bridge to allow all traffic to be directed through ZAP. Using the information from the above example it should be:
bridge_client_linux_amd64 --token <TOKEN> --organization-id <ORGANIZATION-ID> --application-http-proxy localhost:8888
Then all tests executed within a Goal setup to use this bridge will be directed to ZAP and subject to analysis:

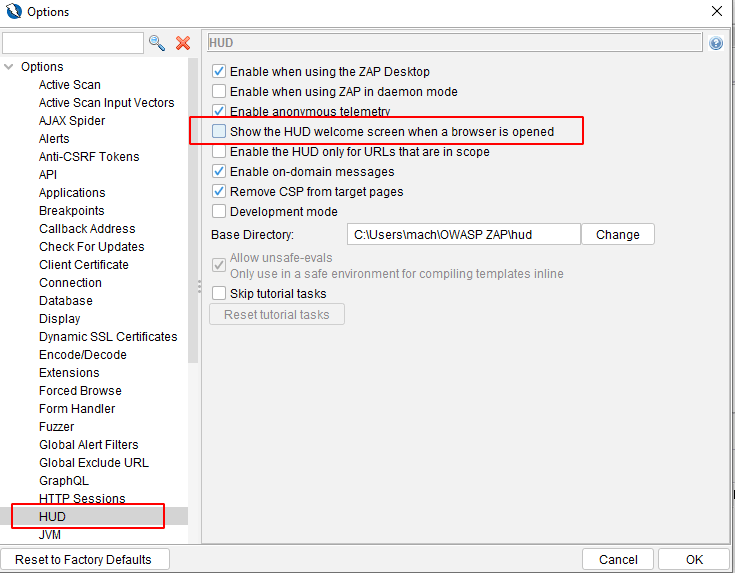
When using ZAP the new HUD functionality should be disabled so ZAP does not change the website and affect the journeys/screenshots captured by Virtuoso. To do so, on the options screen select HUD and ensure that Show the HUD welcome screen when a browser is opened is unchecked:
For more details on using ZAP see the official documentation (opens new window)