# Virtuoso Tests
Tests on Virtuoso are presented in natural language and can be augmented in a plain English syntax.
Test steps that target page elements use selectors to find the element Virtuoso should interact with. Currently, the following selectors are available: Hint, Xpath, ID, CSS, and JS path.
Read more about how to write advanced test targets.
# Natural language syntax
In this section we will list the different commands that can be used, along with examples of different phrases that the parser can understand.
# Available commands:
- Navigate to a URL.
- Click on an element.
- Write text into an input field.
- Select an option from a dropdown.
- Wait for an element or a fixed amount of time.
- Mouse actions such as up, down, over, etc.
- Store a value into a global variable.
- Switch to frames (e.g.,
<iframe>) or tabs. - Scroll to a position, element or offset.
- Upload a file in a file input field.
- Cookie manipulation such as adding, removing or updating cookies.
- Window actions such as resize.
- Execute JavaScript code on the page (ES6 compatible).
- Dismiss alerts, confirmations and popups.
- Press keyboard keys inside the page or a target element.
- Assertions to validate your expectations.
- Comments to leave information on the journey that does not affect its execution.
- API call to be executed
# Navigate
To navigate to a URL, the commands browse, go, navigate and open can be used.
Examples of valid phrases:
go to https://google.com
open https://amazon.com
browse http://spotqa.com
navigate to https://duckduckgo.com
You can also start the navigation in a new tab by adding in new tab.
navigate to "https://google.com" in new tab
open "https://amazon.com" in new tab
# Click
To click on an element, use the click command. It must be followed by an element identifier
with or without location hints.
Examples of valid phrases:
click on bottom "Submit"
click "search"
click in "Name"
click $variableTarget
Dynamically clicking elements
You can use variables (e.g., $name) to target elements dynamically. This works for every command that has elements. For example: click $name
Force-clicking
After executing a click step, you will sometimes see a step side effect of Failed to directly click on element; the element was force-clicked.
This means that Virtuoso was unable to use a regular browser interaction to click the element (using the WebDriver), and instead resorted to executing the JavaScript command <element>.click() in order to perform the interaction.
Automatic tab switch
When a click action results in a new tab being opened, Virtuoso will attempt to automatically switch to it. However, if the new tab is opened after a delay (e.g., as a result of executing a javascript function), the execution of the click step may have already finished, making it impossible to automatically switch to the new tab.
If you notice a flaky behavior for the automatic switch, you can replace the click step with a mouse click step followed by an explicit switch to next tab command.
# Write
To write values in input fields or text areas, use type, enter or write, the value to write, and the element to write in.
Examples of valid phrases:
write "Joe" in "First name"
type "24" in "Age"
# Select
To select a value from a drop down list, use select or pick. The element identified
accepts location hints.
Examples of valid phrases:
select "March" from "Month"
pick "March" from "Month"
You can also select options by their index either through ordinals up to ten (e.g., pick third option), last item (e.g., pick last option), or to specify it (e.g., pick option five, pick option 42). Note that dropdown indexes start at 1, and negative indexes indicate reverse selection order (-1 means last item).
pick second option from "list"
pick last option from "Month"
pick option 7 from "Addresses"
# Wait
To pause a given time period or to wait for an element to appear on a page, use the wait or pause command.
This is quite versatile, and will understand various forms of input. The intervals can be specified in milliseconds, seconds or minutes, and will be internally converted to the canonical time unit (seconds).
Examples of valid phrases:
wait 1
wait one second
pause two minutes
wait 500ms
wait three seconds for "Logged in!"
wait for "Welcome"
Default and maximum timeout
Waiting for an element without specifying the time causes Virtuoso to wait for up to 20 seconds or until the element appears. The maximum wait time Virtuoso can execute is currently 10 minutes (if you enter a value higher than this your test will fail during its execution).
# Mouse actions
To perform mouse actions, use mouse, the action to perform, and the element to interact with. Valid actions are split into two categories: actions requiring an element, and actions requiring a position. Actions up, down, enter, over (short hand command available hover), out, leave, click, right click and double click require an element to perform the respective action on. The action move requires coordinates. The action drag can take either coordinates or an element.
Examples of valid phrases:
- Targeting elements:
mouse double click "Element"
mouse right click "Element"
mouse enter "Name"
mouse over "Categories"
hover "Categories"
- Targeting coordinates:
mouse move to 100, 400
mouse move to coordinate $myVariable
mouse move by 10, 40
mouse move by coordinate $myVariable with default "-10, 40"
- Without elements (use current position of the mouse):
mouse click
mouse right click
mouse double click
Mouse coordinates
move to accepts absolute x and y integer values to move the mouse to, while move by accepts relative x, y values. x refers to horizontal movement, while y refers to vertical movement.
Negative coordinates are accepted for the case of relative movement. For example move by -10, 40, moves the mouse backwards on the horizontal axis and forward on the vertical axis.
The target coordinate can be provided as a variable using the coordinate keyword. The variable must contain values for x and y in one of the following formats:
"10, -10"[10, -10]{ "x": 10, "y": -10 }
Click vs Mouse click
click and mouse click are separate commands, where the former performs a natural user click with several intelligent mechanisms such as popup auto-dismiss, fallback to alternative mechanisms, automatically switching to opened tabs, etc. while the latter performs a simple mouse click on the position.
Prefer to use the click command for general cases of clicking elements, and only use mouse click when you wish to cover a special interaction such as clicking on specific mouse coordinates.
Mouse interactions and native browser components
Some mouse interactions result in rendered elements that are not visible in execution screenshots. Examples are:
- Mouse over an element that has a title attribute;
- Right-click on an element that has no customized context menu.
This happens because the tooltip containing the title and the browser's default context menu are elements that are rendered by the browser itself, not by the browser engine.
However, you can still assert the presence of the title by using the store element details command to extract the title attribute. You can also assert the title presence indirectly, by using it as the hint selector in any of the test steps that target page elements.
# Drag and drop
You can drag and drop using the commands drag to and drag by. The former drags the mouse from its current position to either a target element or coordinate, and the latter drags the element by relative coordinate values.
mouse drag to "target element"
mouse drag to 240, 402
mouse drag to coordinate $myVariable
mouse drag by 0, -50
mouse drag by coordinate $myVariable with default "100,-100"
To drag and drop from one element (A) over another (B), you can achieve this like the following:
mouse over "A"
mouse drag to "B"
Mouse coordinates
Similarly to move to and move by, drag to is absolute movement and drag by is relative movement. Drag commands also accept target coordinate provided as a variable using the coordinate keyword. Contrary to move to, drag to also accepts negative coordinates.
iOS support
Drag and drop is not currently supported on iOS
# Store
To store the details and content of an element, or an exact value into a variable, use the store command. Note that a variable must start with a $ and can contain letters, numbers and underscore, but must always start with a letter.
Examples of storing the contents of an element:
store element text of "password" in $user_pass
store element details of top link "login" in $login_link
And storing literal values in a variable:
store value "Hello World" in $myVariable
store text "John Smith" in $user_name
Store element details
Store element details allows you to make sure you use the element on further test steps. For example using the $login_link above:
assert $login_link.url ends with "/login"
assert $login_link.text contains "login"
click on $login_link
You can also use this store to check specific properties of the element:
Store element details of button "add more" in $button
Assert $button.disabled equals "true"
Available element details can be seen by executing the journey with the store test step, and looking at variable contents in the side effect panel associated to the test step.
Read more about using variables →
# Frames and tabs
To change the active frame (<iframe>) or browser tab, use the switch command. For frames, provide an ID, a target element specification, or parent. For tabs, provide an order integer index (starting at zero), next, or previous.
Examples of switching frames:
switch frame to "search"
switch iframe to id "menu-bar-frame"
Parent frame
Note that by using switch to parent frame, you return to the immediate parent frame of the current frame and not the top-level frame.
And examples of switching tabs:
switch to previous tab
switch to next tab
switch tab to 0
switch to tab 3
Traversing tabs
The meaning of previous and next relates to the order of tabs displayed and not to when they were accessed.
For example, when on 3rd tab and switching to 2nd, then calling switch to previous tab will end up on 1st tab
instead of the 3rd that was previously accessed.
Frame context reset on tab switch
Switching a tab always resets the context to the main frame, so if you switch back to a tab that had its last interactions within an iframe and want to continue interacting with elements inside it, you will need to switch to that iframe again.
# Scroll
To scroll the page to a certain element, coordinate, page position, or to scroll relative to where you are, use the scroll command. When a target is provided, the target element will be scrolled to the center of the window.
Examples of valid phrases:
scroll to page top
scroll to page bottom
scroll to "search"
scroll to 20, 40
scroll by 20, 40
Scroll input
scroll to accepts absolute x and y integer values to scroll the browser window to, while scroll by accepts relative values
# Upload
To upload files via file input fields, use upload, providing the URL of the
file to upload, and the element to interact with. The URL should be a direct link to any file that is publicly accessible online, and the target element should be either the file input box, an element near the file input box, or the area that a file should be dragged to start the upload.
Examples of valid phrases:
upload "http://www.mypersonalpage.com/resume.pdf" in "Résumé:"
upload "https://www.myhomepage.com/me.jpg" to "Drop image here"
Upload compatibility
Due to browser limitations, upload is not supported in the following environments:
- Edge 15
- All Safari versions
- Mobile devices
# Cookie management
To manipulate browser cookies, use cookie. You can add and remove one or more cookies.
Examples of valid phrases:
cookie "login" set to "username"
cookie create "login" as "username"
cookie remove "login"
cookie wipe all
# Window
To resize and manipulate the active window, use window.
Examples of valid phrases:
window resize to 640, 480
# Execute (extension execution)
You can execute a language extension script you have previously created using the extensions manager.
You can provide arguments to your extension either as exact values (e.g., "some data" as inputName),
or use variables defined in the context (e.g., $fullName as fullname). The as varName denotes which function argument would receive the data.
You can also store the result of your script execution (e.g., the result of an ajax call) into
a variable in the context by adding returning $nameOfVariableToStoreOutputIn.
For example:
execute "my script name"
execute scriptName using "Jon Snow" as name, 42 as counter and $age as age returning $result
You can also call extensions simply by their names (without specifying execute), and provide their input arguments in order:
checkBrokenLinks
validateElement ("#my .element-selector")
sumNumbers ($price, 42) returning $total
Extensions can also be implicitly defined without using the extension manager. You can simply write your script in-line, or via the properties panel. See example below for details.
execute "return document.querySelectorAll(mySelector).length" using "div.specialSelector" as mySelector returning $numberOfElements
execute "document.querySelector('h1').textContent = count" using $numberOfElements as count
Data format
- Script input will always be passed as text, so you may need to deserialize it in your extension.
- Script output should be either text, primitive object/value, or a DOM element. Otherwise, the serialization result can be unexpected.
- The
toString()andJSON.stringify()methods can come in handy when returning the output. For example: Usenew Date().toString()instead ofnew Date().
# Dismiss
To dismiss browser's alerts, confirms and prompts, use dismiss. Note that it's important to
distinguish in the command whether the native alert is a basic alert or a confirm(Ok/Cancel)
or a prompt (provide some text or cancel).
Examples of valid phrases:
dismiss alert
dismiss confirm reply ok
dismiss confirm respond cancel
dismiss prompt respond "text to write"
dismiss prompt reply cancel
Live authoring preview
Dismissing alerts, confirms and prompts is not supported in live authoring sessions while the interactive preview window is open. For more information, see Live authoring: Limitations and differences.
Conditions
Conditions are not supported in test steps using the dismiss command, because we have to dismiss dialogs first to be able to evaluate conditions. It means that the dialog is no longer visible when executing the dismiss command itself, resulting in a failure. As a workaround, instead of adding a condition, you should mark the step as "Continue and raise warning". This way, if the dialog is shown, the dismiss command will work fine. Otherwise, the journey will continue, resulting in the same behavior as if the step was skipped.
If you want to ensure the content of the dialog in the scenarios you expect the dialog to be shown, also add a conditional assert step checking the content of LAST_NATIVE_DIALOG_TEXT, a variable that is automatically defined when native dialogs are shown (e.g. Assert $LAST_NATIVE_DIALOG_TEXT equals "Are you sure?").
# Press keyboard keys
To press individual or groups of keyboard keys, use press.
Note that keys separated by underscore _ indicate that they'll be held down together (this is only possible with keys such as CTRL, COMMAND, SHIFT, ALT).
You can also supply pieces of text to be entered in one sequence, by separating them by space character " ", e.g., S p o t SHIFT_Q A for writing SpotQA.
In order to write the space character, you need to explicitly provide SPACE, for example Sp ot SPACE QA becomes Spot QA.
Examples of valid phrases when targeting elements:
press ENTER in "Search"
press SHIFT_A in "target"
press 'H E L L O SPACE W O R LD' in "Element"
press $variable
Note that special keys (e.g., ENTER, SHIFT, CTRL, SPACE, UNDERSCORE, COMMAND) need to added in ALL CAPS case.
Examples of valid phrases when targeting active element:
press TAB
press CTRL_SHIFT_X
press X
press '1 2 3 4'
press "Hello SPACE world"
press 'TAB First Name TAB Last N a m e TAB ENTER'
notice that you can use any keys including Tab to switch to following elements.
Default target
Press commands that do not specify a target will target the active element, to perform a press on a field you have to specify it.
If you wish to specifically target the body, you can pass the body selector as target element, e.g., press F1 in 'body'.
Expressions: Press command currently does not support expressions. To use expressions first
store value ${expression} in $varand then use the variable in the press command.
One of the most common use cases for the Press command is to interact with the browser clipboard; read more about using the browser clipboard.
# Assertions
There is a large subset of assertions that can be used to verify that items or values on a page are as expected. These are described below:
# Assert Exists
This command will verify if an element exists on a page. look for and assert exists are ways to invoke this command.
Examples of valid phrases:
look for "Submit"
see "Submit"
assert exists "First name"
see element $var
Tip: You can assert elements dynamically by using variables, for example
assert exists $foo
# Assert Not Exists
This command will verify that an element does not exist on a page.
Examples of valid phrases:
assert not exists "Please confirm you are not a robot"
assert not exists element "Request failed"
Matching only text
By default, information provided will match any property of elements in the page (including non-visible information on the element). If you want to match only visible text of the elements you can use an xpath expression when creating the test step.
For example, the test step assert not exists "//*[text()='Dashboard']" will only match elements with the text Dashboard, ignoring other properties. In this case, lock the element explicit selectors, since any additional selectors added by the healing will not be as specific.
# Assert Equals
This command will verify that an element on a page has a given value.
Examples of valid phrases:
assert "First name" equals "John"
assert that "Last name" is equal to "Smith"
assert that "Age" == 25
assert "age" = 25
# Assert Not Equals
This command will verify that an element on a page does not have a given value.
Examples of valid phrases:
assert "First name" not equals "John"
assert that "Last name" is not equal to "Smith"
assert that "Age" != 25
assert "age" <> 25
# Assert Less Than
This command will verify if an element on a page contains a value less than the indicated value.
Examples of valid phrases:
assert "age" less than 18
assert "age" < 18
assert that "age" is less than 25
# Assert Less Than Or Equal
This command will verify if an element on a page contains a value less than or equal to the indicated value.
Examples of valid phrases:
assert "age" less than or equal to 18
assert "age" <= 18
assert that "age" is less than or equal to 25
# Assert Greater Than
This command will verify if an element on a page contains a value greater than the indicated value.
Examples of valid phrases:
assert "age" greater than 18
assert "age" > 18
assert that "age" is greater than 25
# Assert Greater Than Or Equal
This command will verify if an element on a page contains a value greater than or equal to the indicated value.
Examples of valid phrases:
assert "age" greater than or equal to 18
assert "age" >= 18
assert element "age" >= 18
assert that "age" is greater than or equal to 25
# Assert Matches
This command will verify if the value of an element matches a given regular expression. The regular expression is indicated by placing it between '/' characters.
Examples of valid phrases (no claim is made that the regular expressions are any good):
assert that "First name" matches /[a-zA-Z]*/
assert "Email" matches /^[a-zA-Z0-9._%+-]+@[a-zA-Z0-9.-]+\.[a-zA-Z]{2,}$/
assert "//title" matches "My page title"
assert "#parent > .selector" matches /Price:\s*42.11/
# Assert Selected
This command will verify if a given drop down list has the specified value selected.
Examples of valid phrases:
assert that "March" is selected in "Month"
# Assert Checked
This command will verify if a checkbox or radio button is checked.
Examples of valid phrases:
assert "Male" is checked
assert "I agree" ticked
# Assert Variable
Enables you to validate data stored in variables. Different comparison options are available: equals, not equals , contains, starts with, ends with, less than, less than or equal, greater than, greater than or equal, matches (for regular expression comparison).
Examples of valid phrases:
assert $result equals "expected value"
assert $foo is less than 4
assert $bar is less than or equal 100
assert $pi is greater than 3.14
assert $var starts with "expected start value"
assert $sample contains "some text"
You can also use expressions in your assert statements, for example:
assert ${1 + 2} equals "3"
assert ${$var1 == $var2} equals "true"
assert ${42 + $var1 * $total == $price} equals "true"
assert ${document.title} contains "Virtouso"
Additional examples can be seen in Using expressions to compare variable values.
# Comments
You can leave a comment on your tests by starting a test step with //. With this you can leave informative text to help contextualize the surrounding steps (for yourself or other users that visit/author the checkpoint). The comment text is limited to 500 characters, will never change the executions' outcome, and steps starting with TODO and FIXME are highlighted.
Examples:
// FIXME: add some assertion to make sure the login modal is shown
Click on "Login"
Write $username in field "username"
// TODO Button implementation is not ready yet
// Click on button "Continue"
Emphasize specific comments
You can emphasize your comments starting them with TODO or FIXME, this highlights the comment.
# API call
The API call command enables the user to perform API requests within a journey execution. The command follows the following format where input and output arguments were already defined as part of the API test definition.
To provide input arguments to your API call you can use exact values (e.g., "some data" as someParameter), or use variables defined in the context (e.g., $someVar as someParameter).
If you wish to use the result as a variable you can either return everything into a single variable (e.g., returning $result) or use the defined output mapping entries (e.g., returning $token, expire as $expireDate).
Examples of valid phrases:
API call "folder.apiTest"
API call "virtuoso.users.listUsers" returning users as $users
API call "virtuoso.users.deleteUser" using $id as userId
API call "virtuoso.login" using $password as password returning token as $token
API call "virtuoso.login" using $password as password returning token as $tokenName, $result
You can also provide the input arguments using the shorter syntax:
API call "virtuoso.users.deleteUser" ($id)
API call "virtuoso.login" ($password) returning token as $token
As an alternative valid syntax, you can just use api:
api "folder.apiTest"
api "virtuoso.users.listUsers" returning users as $users
# Defining target elements
As mentioned above, test steps take multiple type of selectors (e.g., css, xpath, guess) for their target elements. Selectors are used by the order they are presented and the first selector that returns a valid element is used by Virtuoso.
# Guess (hint) selectors
Given a case-sensitive, guess selector, Virtuoso attempts to intelligently find an element to interact with. This can be as simple as writing: click on "Login"
Selectors on natural language tests
Each test created through natural language, that targets a page element (e.g., click), will automatically create a Hint selector based on the target's element text.
You can improve the accuracy of your hint by providing more context to Virtuoso.
# Disabling healing
In certain circumstances, e.g., when dealing with dynamic elements, it is preferable to rely only on Virtuoso's intelligent element selection, rather than the healing mechanism.
In these cases, you can lock the explicit element selectors on the step details panel.

Locking the explicit selectors can be useful when the element needs to be matched containing the provided text, as traditional selectors match elements by page structure and element classes.
# Relative position
You can provide top, right, left, bottom hints (or a mix such as top right)
to distinguish between multiple elements. For example: Click on top "Login"
# Element type
When multiple elements of different types can match your query, you can provide more context to Virtuoso to make the better decision. Available element types are:
link: Links such as<a>elementsbutton: Buttons such as<button>or<input type="submit">elementsinput: Input elements such as<input>or<textarea>elementsimage: Image elements such as<img>elementsdropdown: Dropdowns such as<select>elementsfile: File input elements such as<input type="file">elements or file drop zones
Position ordering
Note that in the natural language, the type always comes after the position. For example: click on top right button "Login"
# Standard selectors: CSS and Xpath
When writing a natural language test step, you can use the standard commonplace selectors as before. For example:
click on ".btn .btn-large"
click "/html/body/div[2]/div[5]/a"
click on "#elementId"
click '[href="https://spotqa.com/contact-us"]'
You can also guide Virtuoso by adding more selectors to the target elements.
Test step properties
You can open test step properties by clicking on the eye icon while editing test steps. This will show more detail associated with the test step, e.g., active selectors of the target element.
# Advanced selectors: JS path
Sometimes the use of Hint or Xpath might not cover some specific use cases. For example, when dealing with elements inside a shadow DOM things can get a bit more complicated because of the nature of shadow DOM (opens new window).
Typically, the way to target an element inside a shadow DOM is through some JavaScript selector (e.g., document.querySelector(...)). Although you can use pure JavaScript (e.g., using inline scripts), the Virtuoso recommended way is to use JS path selectors:

Using this type of selector works similarly to other Virtuoso selectors, this is that you just add one or more JS path selectors to your step through the test step editor.
You can use this type of selector for any kind of target and not only shadow DOM, however, but there are also easier ways for those cases such as using a simple Hint. Aiming for simplicity, try to limit the use of JS selectors to specific cases like shadow DOM.
# Using variables in your tests
Test steps that take a value also optionally accept variables. Variables enable you to store and re-use values across your test steps in a journey.
Variables are denoted with a dollar symbol (like $fullName), and you can define them in different ways, by storing them:
- Explicitly:
store value "hello world" in $message - or Implicitly:
write $message with default "hello world" in "input"
For example, you can store a variable in one page, and use it later on another page:
write $fullname with default "Jon Snow" in "Enter full name:"
click on button "Submit"
assert ".titleElement" matches $fullname
If a variable contains JSON data, you can use a JavaScript-like lookup syntax to lookup the inner data:
GET ("https://api.url/path") returning $data
write $data.user.firstName in "First Name"
click "Submit"
assert exists $data.user.firstName
When dealing with JSON data using spaces or hyphens in the keys, you have to use square bracket notation and treat it as an expression:
GET ("https://api.url/path") returning $data
write ${$data.user["first name"]} in "First Name"
click "Submit"
assert exists ${$data.user["first name"]}
Using big variables
When using variables, keep in mind that the size of the variable can affect the execution performance, as they have a global scope throughout the journey execution. Consider wiping out big variables that are no longer needed, by overwriting them:
store value "" in $bigVariable
# Variable source representation
When you see steps that involve variables (e.g., click on $button), you will notice that these variables are highlighted with distinct colors. This color coding makes it easy to identify the origin of variables at a glance. Each color represents the source of the variable:
- Variables declared within the journey (e.g., output of
storecommand such asstore value "test" in $var) will be denoted with yellow; - Variables declared in a test data table will use blue;
- Variables coming from a project environment will use green;
- Variables coming from data provided while triggering the execution (e.g.,
Advanced execution→Initial data— thus, only visible in executed steps) will use orange; - Unknown variables will use red, indicating either an authoring typo, a journey under maintenance, or a journey that can only execute successfully when triggered with initial data.

Also, by hovering over the variable name, you can see more information, such as the environment or data table name. If the source is an environment, data table, or initial data, the value for the variable/attribute is also shown. For data table attributes, only the value from the first row is shown.
# Using the color code to understand variables precedence
Let's consider a scenario where you have a variable named $name defined in the project's default environment. When you use this variable in a step, such as look for $name, you will notice that the $name variable is highlighted in green. This color indicates that the variable's source is a project environment.
Now, imagine you have a data table variable named $button. If you use this variable in a step, such as click on $button, you'll observe that the $button variable is highlighted in blue. This color signifies that the variable's source is the data table.
Finally, consider a situation where you have a variable named $email defined both in your environment and a data table. If you use the variable in a step like write $email in input "email", you will observe that the $email variable is highlighted in blue. This is because data table variables take precedence over environment variables in such cases. As you can see, in cases of naming clashes, the color-coded highlighting ensures clarity regarding which variable Virtuoso will effectively use.
Here is another example, illustrating a name clash involving an environment variable and a local variable:

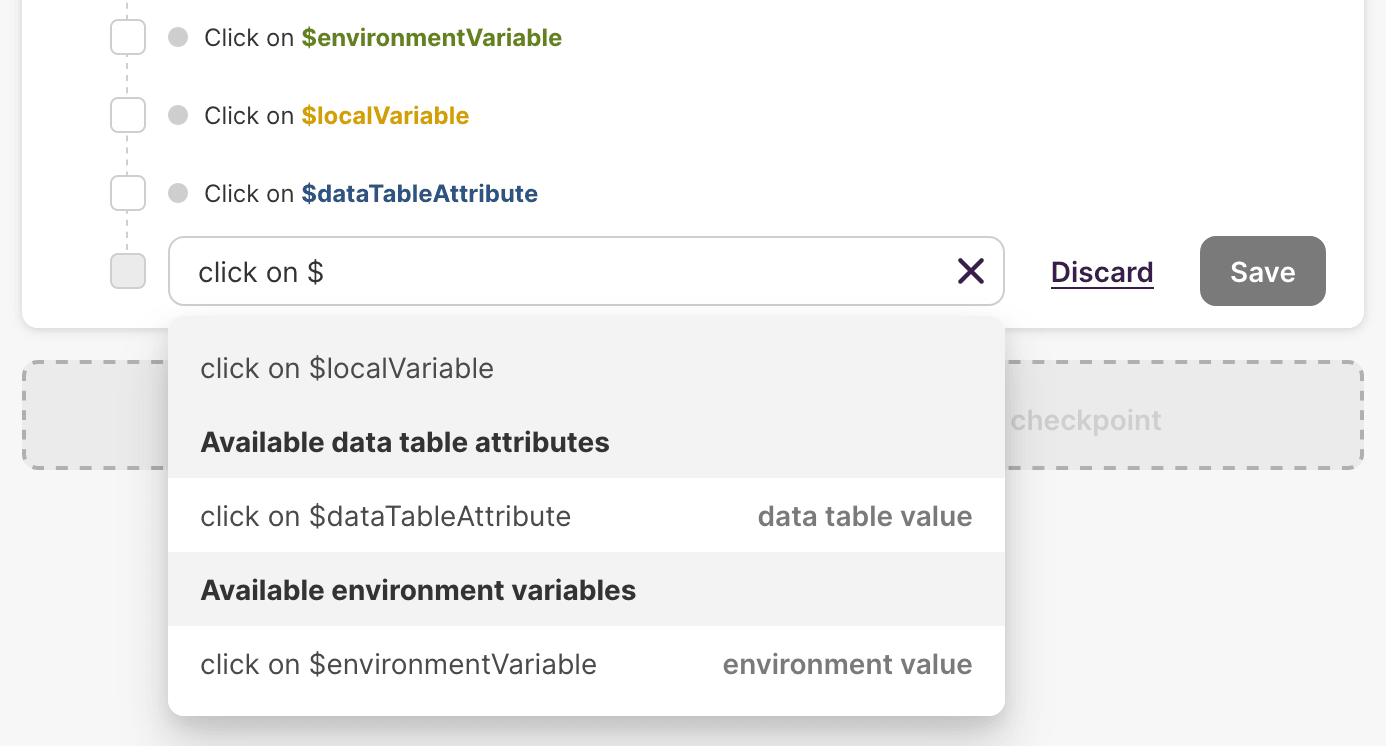
# Smart variable suggestions
While writing steps, you'll get helpful suggestions showing all available variables grouped by type. You can see these suggestions once you type $ in the step editor. For environment variables and data table attributes, the dropdown even shows the value of each variable. Once you start typing out the variable, the suggestions will be filtered.
# Clicking using variables
When executing the Click command, it is possible to provide a variable to control what is clicked on. To do this,
first create a test step and provide a descriptive name for the element to be clicked:
Click "New Document"
Next, open the Test step properties for this test step, and click on More hint options (underneath selectors). The following modal will appear:

Inside the Variable field, type the name of the variable storing the hint to be used by Virtuoso to find the element to interact with, you do not need to include $.
Now when the test executes, the value inside the Hint field will be replaced with the value of the
given variable.
# Data-driven element selection
Given that you can identify an element in a page using variables, and you can assign variables in data-driven tests from test data tables, it is possible to identify and locate elements in a page using a test data table. To see how to make a test data table, see Data-driven testing.
To do this, assuming that you have a table column productTitle, you can write:
click $productTitle
An alternative approach is to do this by explicitly assigning data table attributes. We need the following test steps:
Store value "foo" in $var
// if you want to have a default value for the variable
Click "New Document"
// OR otherwise
click $var
Next, open the Click test step properties , and click on More hint options (underneath selectors).
Inside the Variable field, type the name of the variable storing the hint to be used by Virtuoso to find the element to interact with, you do not need to include $.
Now we need to associate the test data: click on the context menu next to the journey name and press "Manage test data", select the appropriate test data table, and tick the checkbox next to the Store test step.
From this point when the journey is executed data-driven, the variable will be assigned to the values of the test data table, and the Click hint selector each value on the variable.
Default value of dynamic elements
Since the guess selector of an element is data-driven, note that the hint's value becomes the value if the variable is empty or missing.
# Variables with default value
Sometimes you may wish to use a variable value if available, and if not available, use a default.
The with default and as keywords indicate to the bot to use the variable if available, if not, use the
default text value provided.
_Note: that if the variable was not defined, the default value will be set on the variable as well.
For example, take the following two test steps:
1. Write $var with default "foo" in "text1"
2. Write $var with default "bar" in "text2"
Line 1 will observe that var does not exist, and place the default text "foo" inside the variable var. Then,
on line 2, var does exist so instead of typing "bar" in text2, the value of $var ("foo") will
be used instead.
As another example, assume we want to type the current timestamp into a text field called time. This would
need the following two test steps:
1. Execute "return new Date().getTime();" returning $currentTime
2. Write $currentTime with default "default value" in "time"
Because the variable currentTime is defined on line 1, line 2 uses the value stored inside currentTime
instead of the hard coded default value.
Tip: Variable with default shorthand
As a shorthand for $var with default "default value you can write "default value" as $var.
# Variable containing downloaded files
If a file is downloaded as a side effect of an executed test step (for example, clicking a download link), the file is automatically stored in Virtuoso to make it easy to validate later. Virtuoso exposes this information through the following variables:
For single file downloads:
LAST_DOWNLOADED_FILEallows access to the file in any test step where a URL can be used;LAST_DOWNLOADED_FILE_DETAILScontains additional details about the downloaded file (e.g., outcome of the operation, original name, and file size). The information available can change depending on the website from which the download was triggered. For example, some websites may not provide the original filename.
Additionally, only for multiple file downloads:
LAST_DOWNLOADED_FILES_DETAILScontains an array of file details objects when multiple files are downloaded at once. Each element in the array has the same structure asLAST_DOWNLOADED_FILE_DETAILS.
Single file variables in multiple file downloads
When multiple files are downloaded, LAST_DOWNLOADED_FILE and LAST_DOWNLOADED_FILE_DETAILS always refer to the most recently downloaded file.
File download restrictions
File download is only supported by the Virtuoso Chrome browser (not available for cross-browser testing), and the download is limited to 20 MB files.
After the download is triggered you will be able to see a LAST_DOWNLOADED_FILE_DETAILS in the side effects with a JSON content similar to:
{
  "outcome":"SUCCESS",
  "originalName":"file_example_CSV_5000.csv",
  "extension":".csv",
  "size":284042,
  "hash":"1b3583123b56fe56fcf36cb854e42cffcb115476b3d797d54c90a105fd160c72",
  "filename":"1b3583123b56fe56fcf36cb854e42cffcb115476b3d797d54c90a105fd160c72.csv",
  "url": "https://s3-eu-west-1.amazonaws.com/virtuoso-downloaded-files/1b3583123b56fe56fcf36cb854e42cffcb115476b3d797d54c90a105fd160c72.csv"
}
You can then use these variables to perform other test steps:
upload $LAST_DOWNLOADED_FILE in "input"
// Or to use the more complex object
assert $LAST_DOWNLOADED_FILE_DETAILS.originalName equals "my_file_123.zip"
When multiple files are downloaded, you can use LAST_DOWNLOADED_FILES_DETAILS with array operations:
// Check the number of files downloaded
Execute "return JSON.parse(LAST_DOWNLOADED_FILES_DETAILS).length" using $LAST_DOWNLOADED_FILES_DETAILS as LAST_DOWNLOADED_FILES_DETAILS returning $numFiles

// Filter files by name or extension
Execute "return JSON.parse(LAST_DOWNLOADED_FILES_DETAILS).filter(f => f.originalName === 'report.pdf')[0]" using $LAST_DOWNLOADED_FILES_DETAILS as LAST_DOWNLOADED_FILES_DETAILS returning $specificFile

// Access individual file details
assert $LAST_DOWNLOADED_FILES_DETAILS[0].originalName contains "document"
assert $LAST_DOWNLOADED_FILES_DETAILS[1].extension equals ".pdf"
To learn more about how to use these variables in extensions, take a look at our example in the extensions document.
# Execution context details
Virtuoso provides a special VIRTUOSO_CONTEXT variable that is available throughout the execution, allowing easy access to the goal name, journey name and journey number of the currently running journey. For cross-browser executions, the operating system family and edition (for desktop devices) are also available. Examples:
assert $VIRTUOSO_CONTEXT.goalName equals "Goal name"
assert $VIRTUOSO_CONTEXT.journeyName equals "Journey name"
assert $VIRTUOSO_CONTEXT.journeyNumber equals "Suite 1"
assert $VIRTUOSO_CONTEXT.osFamily equals "Windows"
assert $VIRTUOSO_CONTEXT.osEdition equals "11"
Use cases
One particularly beneficial use case of this feature is to enter some data into your application that can be easily traced back to the journey while debugging, e.g. write $VIRTUOSO_CONTEXT.journeyName in field "input".
Another use case is to conditionally execute steps depending on the operating system, which is useful to address known limitations in cross-browser executions.
Journey number
The journeyNumber for a journey is subject to change and might not be preserved during import/export. Keep this in mind when using journeyNumber in your tests.
# Using expressions in your tests
Test steps that take a value also optionally accept expressions in similar fashion as variables work. Expressions allow you to use multiple variables, to access the browser context and to combine both.
Expression are denoted with a dollar symbol followed by braces containing a Javascript expression (like ${$variable + $anotherVar.toLowerCase()}), The expression might refer to any defined variable, by using its name preceded by $.
The expression is evaluated in the current page's context, so you can access its DOM and properties. Examples of valid expressions are:
write ${'user' + $userName} in "login"
select ${new Date().getDate()} from "day"
write ${'name-' + new Date().getTime().toString(36)} in "input"
click ${document.querySelector('.user').innerText}
# Using expressions to compare variable values
Using expressions you can compare the values of two or more variables. Using the following test steps with expressions:
// compare two numbers to be equal
assert ${ $number1 == $number2 } equals "true"

// assert $num1 is smaller than $num2
assert ${ $num1 < $num2 } equals "true"

// validate variable $text1 contains all the text in $text2
assert ${ $text1.includes($text2) } equals "true"

// validate that $var2 starts with text in $var1 (also trims whitespace on the texts)
assert ${ $var2.trim().startsWith($var1.trim()) } equals "true"
# Using the browser clipboard
You can use the browser clipboard the same way you would do with your own laptop. This means that you can effectively use the commonly used keyboard key combinations:
- Select all:
Press CTRL_arepresentsCTRL + A; - Copy:
Press CTRL_crepresentsCTRL + C; - Cut:
Press CTRL_xrepresentsCTRL + X; - Paste:
Press CTRL_vrepresentsCTRL + V.
Learn more about Press keyboard command.
So, to copy the content of a field and then paste it into another field:
press CTRL_a in field "from field"
press CTRL_c
press CTRL_v in field "to field"
Command key on macOS
When writing tests to run on a macOS, you might want to replace CTRL by COMMAND. In this case, the previous example becomes:
press COMMAND_a in field "from field"
press COMMAND_c
press COMMAND_v in field "to field"
If your application has a Copy to clipboard button, and you want to paste the content in another field:
click on "Copy to clipboard"
press CTRL_v in field "another field"
Using the right letter casing in your press command
When using the key combinations explained above, the keyword CTRL must be always typed using uppercase to represent the key CTRL of the keyboard, and then the extra key (a, x, c, v, etc) must be always typed using lowercase.