# Managing plans
Virtuoso provides the ability to create Plans to aid in testing, allowing quick or scheduled execution of a specific scenario with the same configuration. The execution planner lists plans associated with your projects, allowing you to view configurations and perform a set of operations.
Plans for your project can be access by clicking on the plans icon in the sidebar.
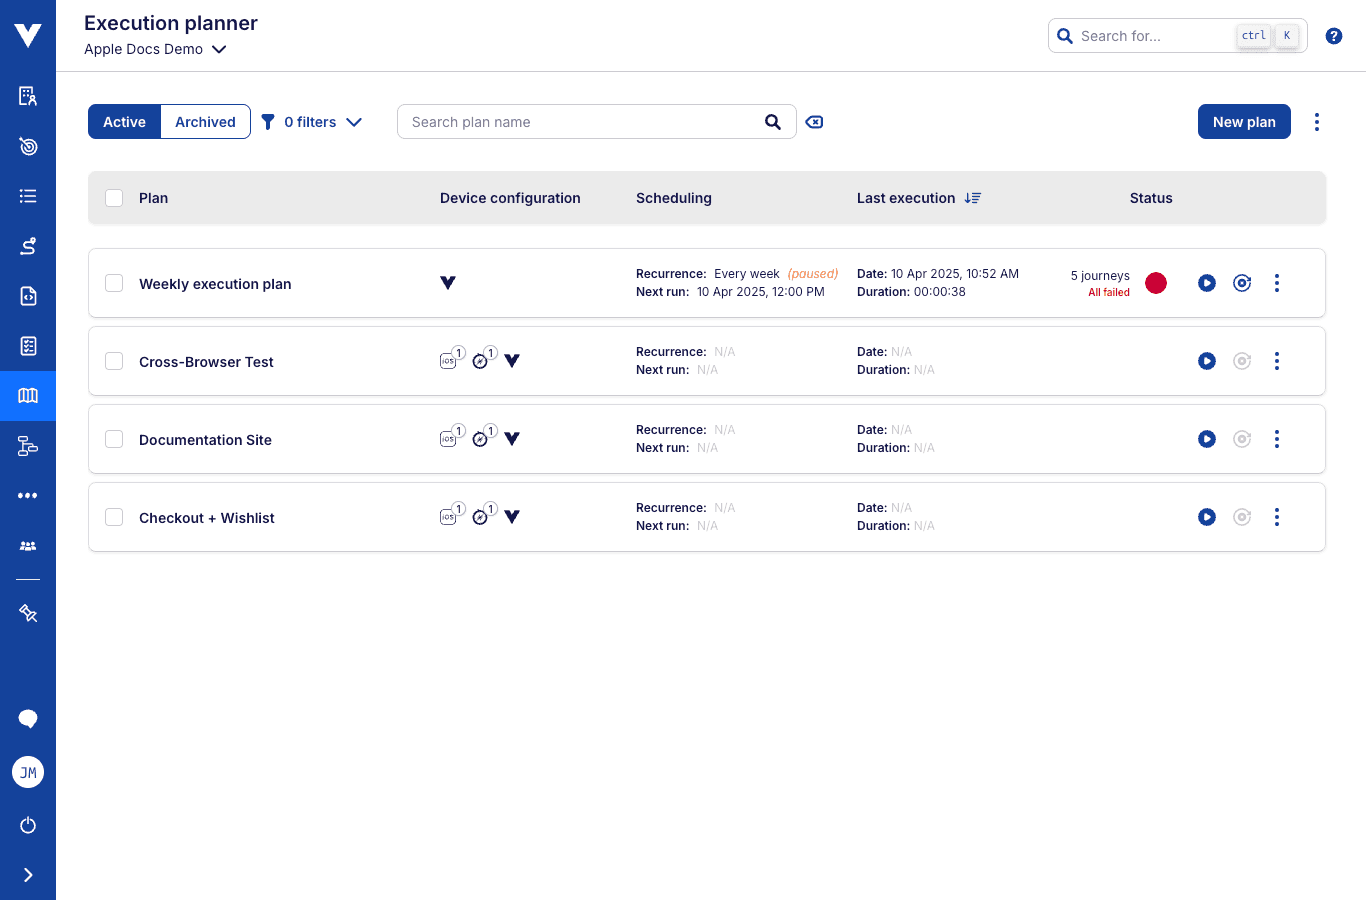
Sorting your plans
You can sort the plan list by clicking on any of the headers: Plan, Scheduling, Last execution, and Status.
# Creating a plan
Click on the New plan button to open the builder. This will let you configure all the properties needed to define a plan.
Most properties are optional but every plan needs a Name and at least one Journeys's target.
# Plan name
Identify the plan by providing it with a name that makes it easily identifiable. The name is limited to 90 characters.
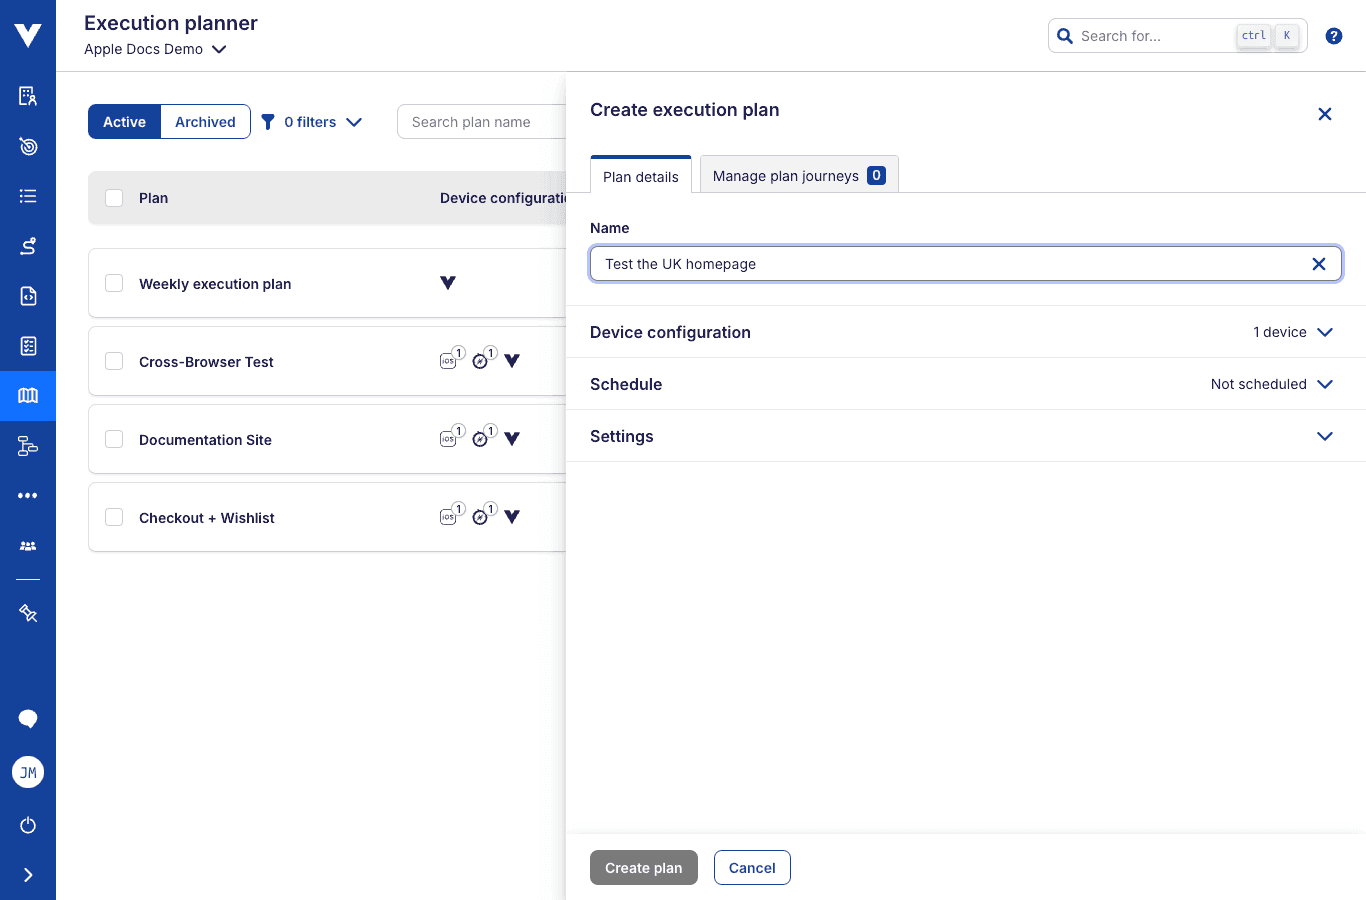
# Device configuration (optional)
A new plan will come pre-configured to run on Virtuoso's default Chrome browser. You can, however, change this configuration and add a number of custom devices to it.
At least one device required
You may customize the list of devices as needed, but at least one device is required when creating or updating a plan!
The journeys associated with the plan will run for each device configuration, and the corresponding execution will be shown as its own job on the main dashboard page when the plan's project is active.
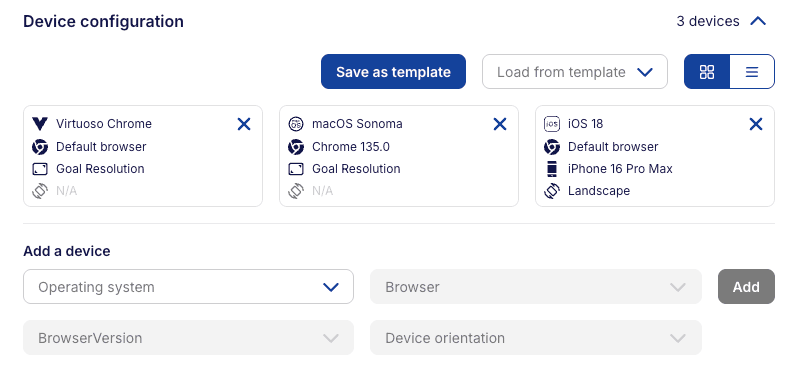
Each device configuration may be selected from a combination of properties that include operating system, browser, device make, model, version, and orientation.
Different sets of custom device configurations may also be stored as templates, so they can be easily reused in other plans.
Device orientation
The orientation property is only available for mobile (iOS and Android) devices.
# Schedule (optional)
A schedule may be added to each plan, so that it runs at a specified date and with a specific recurrence after that (once, hourly, daily or weekly).

You may also specify if a journey should be re-ran in case it fails on the first try of a scheduled execution.
Without clearing the schedule settings, you may at any time pause the scheduled executions by toggling the Enable schedule switch to off. The plan will be paused until it is enabled again.
Selected date and time
For recurrent plans, the Run from date and time field will always show the next scheduled execution date and time, which may no longer correspond to the value introduced when the plan was first scheduled.
This automatic update of the field's value was put in place to make changing the schedule simpler and less error-prone.
Daylight saving time
For recurrent plans, the provided time for scheduling is converted to UTC (Coordinated Universal Time) and saved. The interface will always convert that saved UTC time to the time in your time zone. This means that the recurrent plans will keep executing at the same UTC time, but the time they execute may change compared to your local timezone when entering or leaving daylight saving time.
# Settings (optional)

The plan may be further configured through a combination of settings, all of them optional. These include:
# Environment
By default, the plan will be executed using the default environment. Selecting an environment here will make the plan to be executed using the selected environment instead (see Environments for reference).
Environment to Bridge association
If the environment has an associated bridge, it will also be used by the plan when executing journeys.
The bridge associated to each environment option will be clearly displayed in the dropdown list.
# Starting URL
You can change the starting point of the goals used by the plan, defining a different URL in this field. Using a custom starting URL means that the plan will execute every associated journey using this URL in the first test step of the first checkpoint, which is a Navigate to <Goal URL> test step.
# Maximum parallelism
This configuration limits how many journeys can be launched at the same time during a plan execution.
For example, if you have a plan with 6 journeys and Maximum parallelism set to 1, they will run one after the other. If the Maximum parallelism is 2 though, they will run 2 at a time. If set to unlimited, they will launch as much as possible.
Maximum parallelism with multiple device configurations
This limit is for each individual device configuration in the plan. That is, if you add a second configuration and have a maximum parallelism of 1, the effective max parallelism will be 2.
Ordering
The order of the journeys executed are random, so in case you have Journey 1, Journey 2 and Journey 3 with Maximum parallelism set to 1, it is not guaranteed that they will run in the 1, 2 and 3 order.
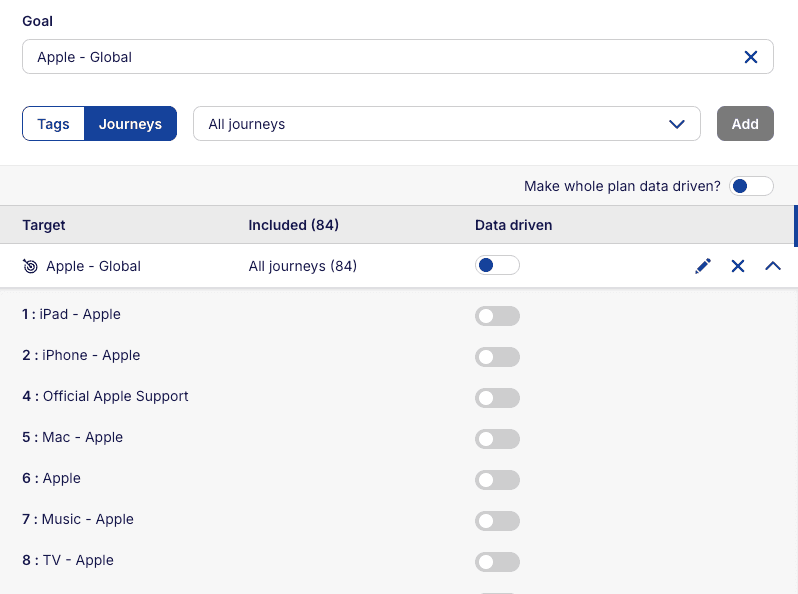
# Targeting Journeys
Journeys from multiple goals may be associated with a single execution plan through targets. Targets group journeys by one of two mechanisms: direct journey selection or tags.
Details on running journeys
Independently of the targeting systems used in a plan, two points must be taken into account:
- Each journey will run exactly once (excluding the usage of data-driven executions with multiple data table rows), even if it appears in more than one target.
- Each journey will run on the most recent version of the goal it belongs to, i.e. the last that was recently changed.
# Tag-based targets
When using tags, you start by selecting a Goal, or alternatively All goals, ensure the Tags option is selected, and then choosing a set of tags to use as filters.
Multiple tags can be selected for a single target. This results in an AND operation between all the selected tags, i.e., journeys from the selected goal, or all goals, will be added to the plan only if they have all the selected tags.
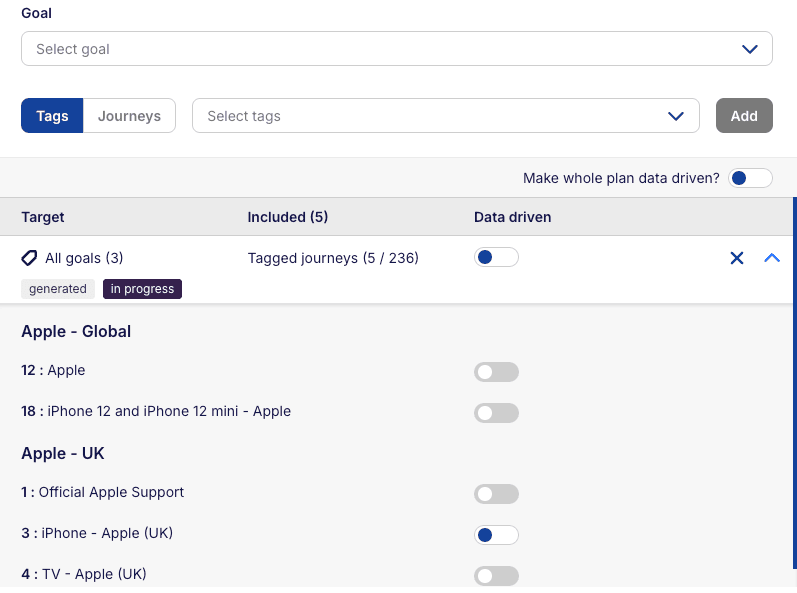
This targeting method will take into account future changes to the journeys: if a journey that was previously targeted loses one of the required tags it will be excluded from the plan. Conversely, if another journey (even a new one) receives the required set of tags, it will be added to the plan on the next execution.
Multiple tag-based targets and a good usage of the journey tagging feature can be leveraged into a clever targeting, ensuring that a plan runs exactly the journeys it needs to.
# Journey-based targets
To define a target using direct journey selection, start by selecting a Goal and then click the Journeys option to make the journey selection field available.
The journey selection option will be, by default, Use all journeys: this means that all current goal journeys will be used and, if any more are added to the goal, they will also be included in the plan. This makes the most sense for goals being actively worked on, ensuring that all their journeys are periodically executed.
Alternatively, you may choose the Select all option: this means that all current goal journeys will be used but newly added ones will be left out of the plan's execution.
The third option is to manually select a subset of the goal's journeys: the selected ones are included in the plan, while the remaining (and newly added ones) are not.
Editing targets
Journey-based targets can be edited after they've been created. Click the edit icon for the target, change your journey selection, and then click the save icon .
Don't forget to click the Update plan button, if you wish to persist those changes!
Archiving goals or deleting tags associated with targets
Targets for a specific goal will be deleted if that goal is archived! Likewise, if a tag is deleted, all targets that include that tag will be deleted as well.
If a plan is left without any valid target, it will not be executable until new targets are added to it.
# Data-driven journeys
Journeys that have an associated data table may have it used during an execution, resulting in the same journey being executed several times, one for each table row. In plans, to leverage this feature, you have to mark the journeys as data-driven.
At the journey level of a target you'll have the option to mark a journey as data-driven. By default, it will run once for every row in the associated data table, but the rows for which the journey should run can be further filtered by clicking the button that appears next to the data-driven toggle.

Alternatively, you may opt for marking the whole plan data-driven, ensuring that all journeys with associated data tables, even the ones that are added in the future, are ran that way.
Repeated journeys
The same journey may be associated with a plan through multiple targets but, as stated before, it will only run once.
However, as you go through your plan's targets, you may come across the same journey, repeated several times. In such cases, all but one of the instances of that journey will appear grayed-out, and clicking on them will take you to the target the main instance of that journey is associated with.
# Plan management
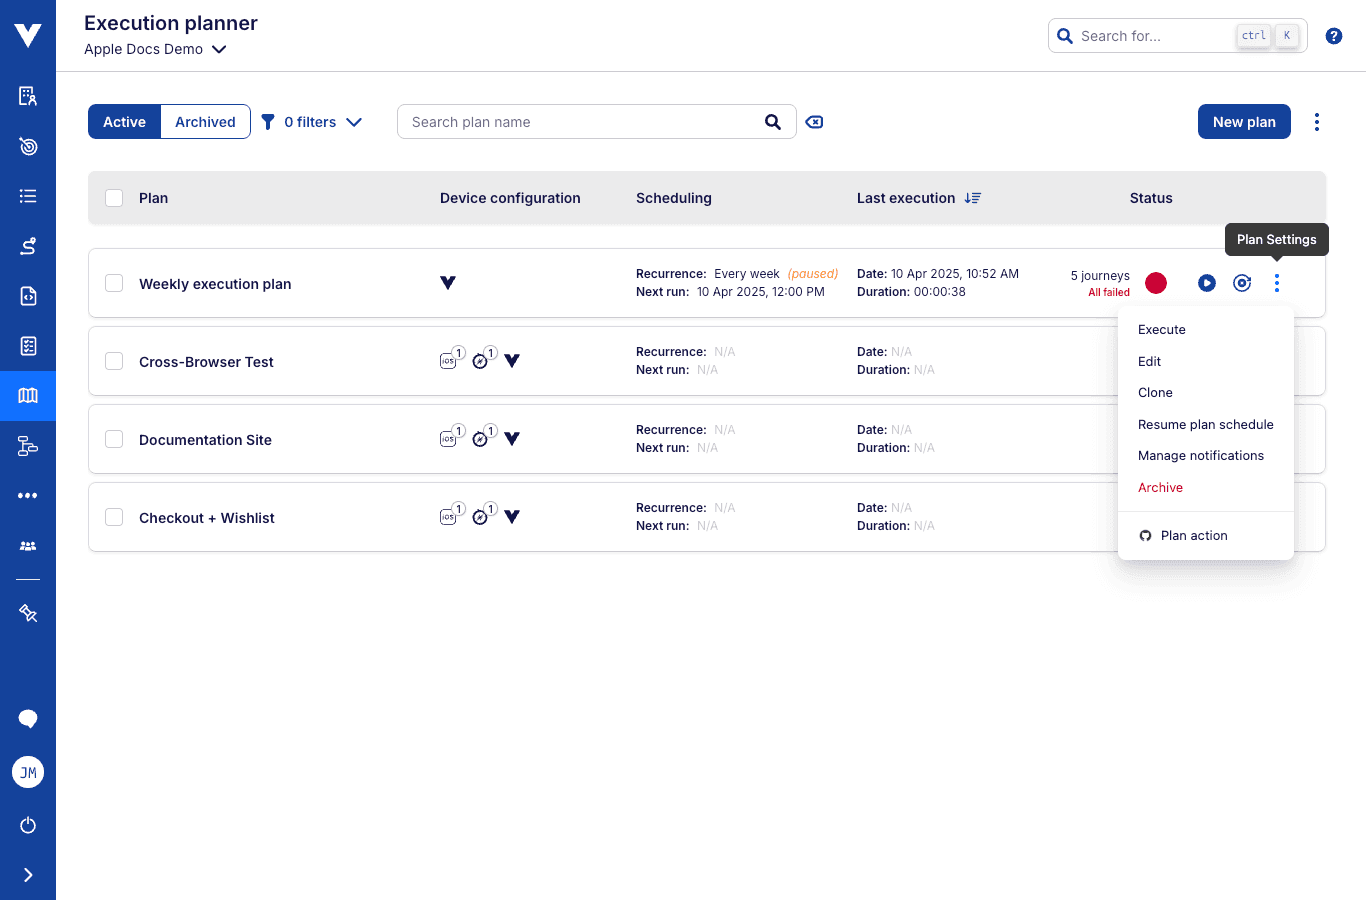
The execution planner allows access to the following operations by clicking on the menu icon on the right side of a plan entry you can:
Executethe plan independent of any schedule settings;Stopa running plan execution;Editthe plan, opening the Plan configuration page similar to the page used to create it;Clonethe plan, creating a new one with the same configuration as the original - which can be updated during the process;Pause/Resumethe plan's schedule without clearing its schedule settings;Manage notificationscustomizes notification settings such as information to monitor, team members to notify, or notifications in a configured Slack app (see Manage plan notifications);Archive/Restoretoggling the archived state of a plan. Old information can be stored without losing aggregated information collected by archiving a plan.
Quick stop
Started a plan execution you didn't mean to?

Hover the cursor over the animated execution status icon to reveal the Stop execution button. Click it and ongoing plan execution related jobs will be cancelled.
Next schedule
The next schedule date/time indicates when Virtuoso will evaluate whether a plan should be executed (e.g., if the plan is still archived or paused at this time it will not be executed).
Impact on the plan's schedule
Archiving a plan suspends its execution, and restoring it will resume the schedule on the next available date/time according to the plan's schedule configuration.
Draft journey
Draft Journeys are not included in the plan executions.
Concurrent executions
Due to the nature of the plans, each plan only supports one single execution at a time, though multiple plans can run in parallel. If a plan is already running and a new execution is initiated, whether manually or by schedule, the execution will automatically fail.
# Manage plan notifications
You can set to be notified (via Email or Slack) about the execution outcome of a plan when a condition is met.
To access the plan notification configuration, click on the menu icon of a plan and select the option Manage notifications.
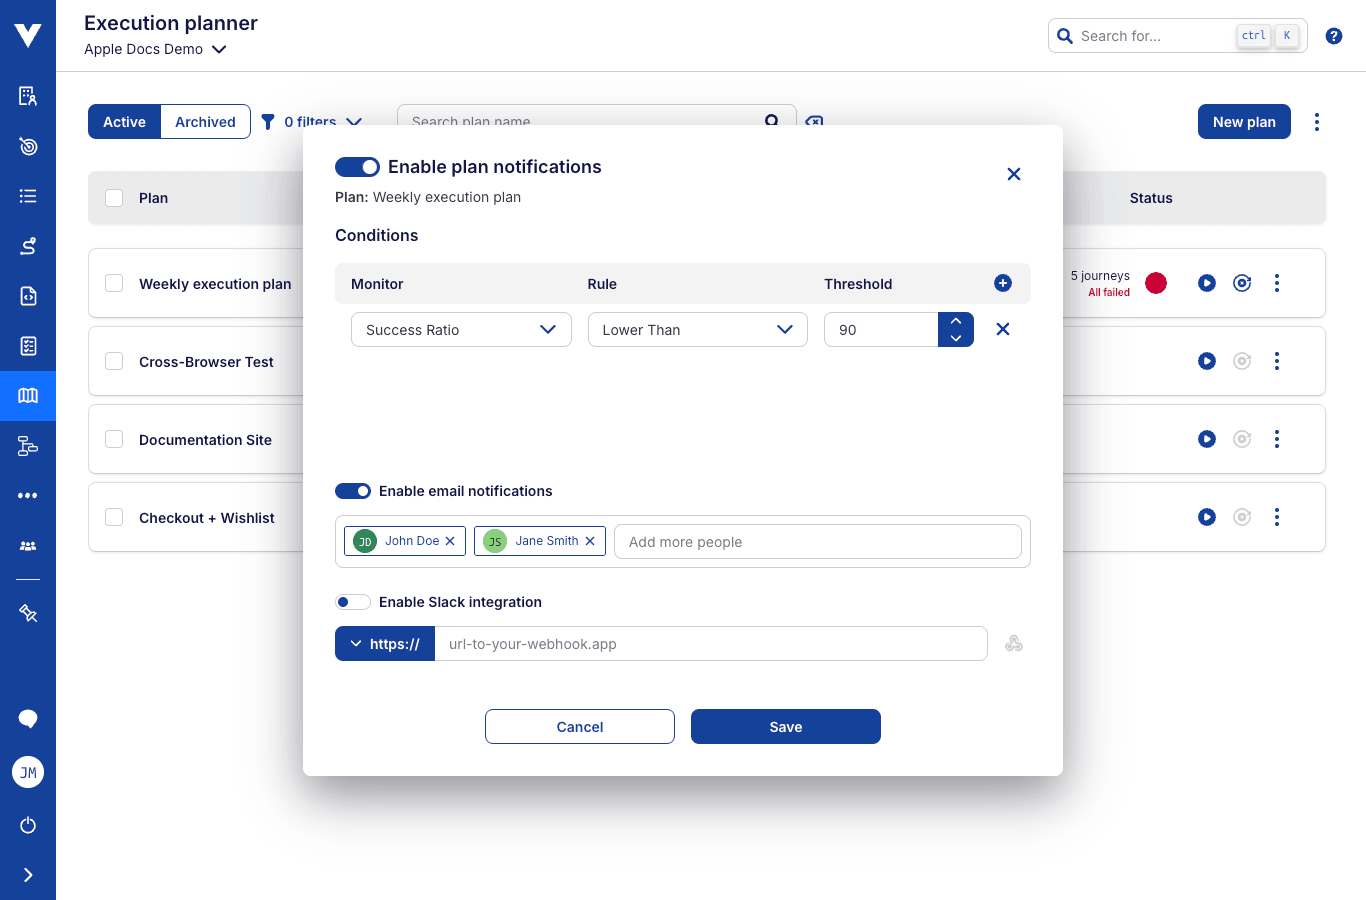
# Notifications enabled:
Enable or disable all notifications related to the plan (email and slack notifications).
# Conditions:
Here you can define a list of conditions to be notified (e.g. you can choose to be notified whenever an execution fails, or if the ratio of journeys passed out of all journeys is below 80%.
You can have multiple conditions and when at least one of the conditions is met you will receive a message.
Get notified when some executions fail
If you want to receive a notification when an execution has failed, you can configure the following condition Execution Status > Failure
Get notified when 10% of the journeys fails
If you want to receive a notification only when 10% or more of your journeys fail, you can configure the following condition Success Ratio > Lower Than > 90%.
# Send notification email to project members:
You can specify a list of project members to receive the notification via email. Limits to the number of selectable users may apply.
Using the text field you can search for all users with access to the project and add the ones you wish to have them notified.
List of project members
You can also preview the list of project members by hovering the mouse over the total of project members.
# Slack Integration:
Specify an incoming Webhook URL that will be used to integrate with Slack. To achieve this, follow the steps in Incoming Webhooks (opens new window) to setup Slack and generate a new Webhook URL in the format https://hooks.slack.com/services/T00000000/B00000000/XXXXXXXXXXXXXXXXXXXXXXXX, and paste it on the configuration field below Slack Integration.
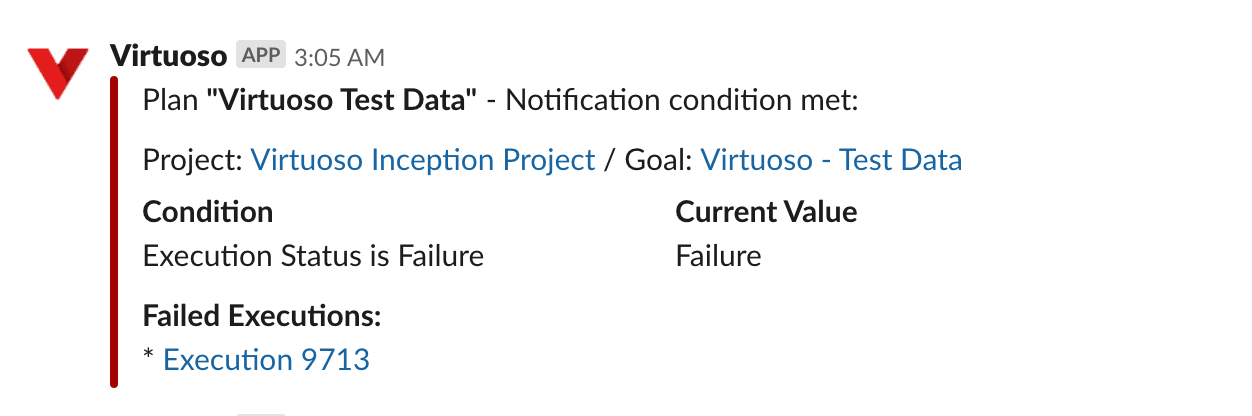
Next you will find an example of a slack message from a plan with a failed execution.
Test incoming webhook
You can test the webhook by clicking in the icon on the right
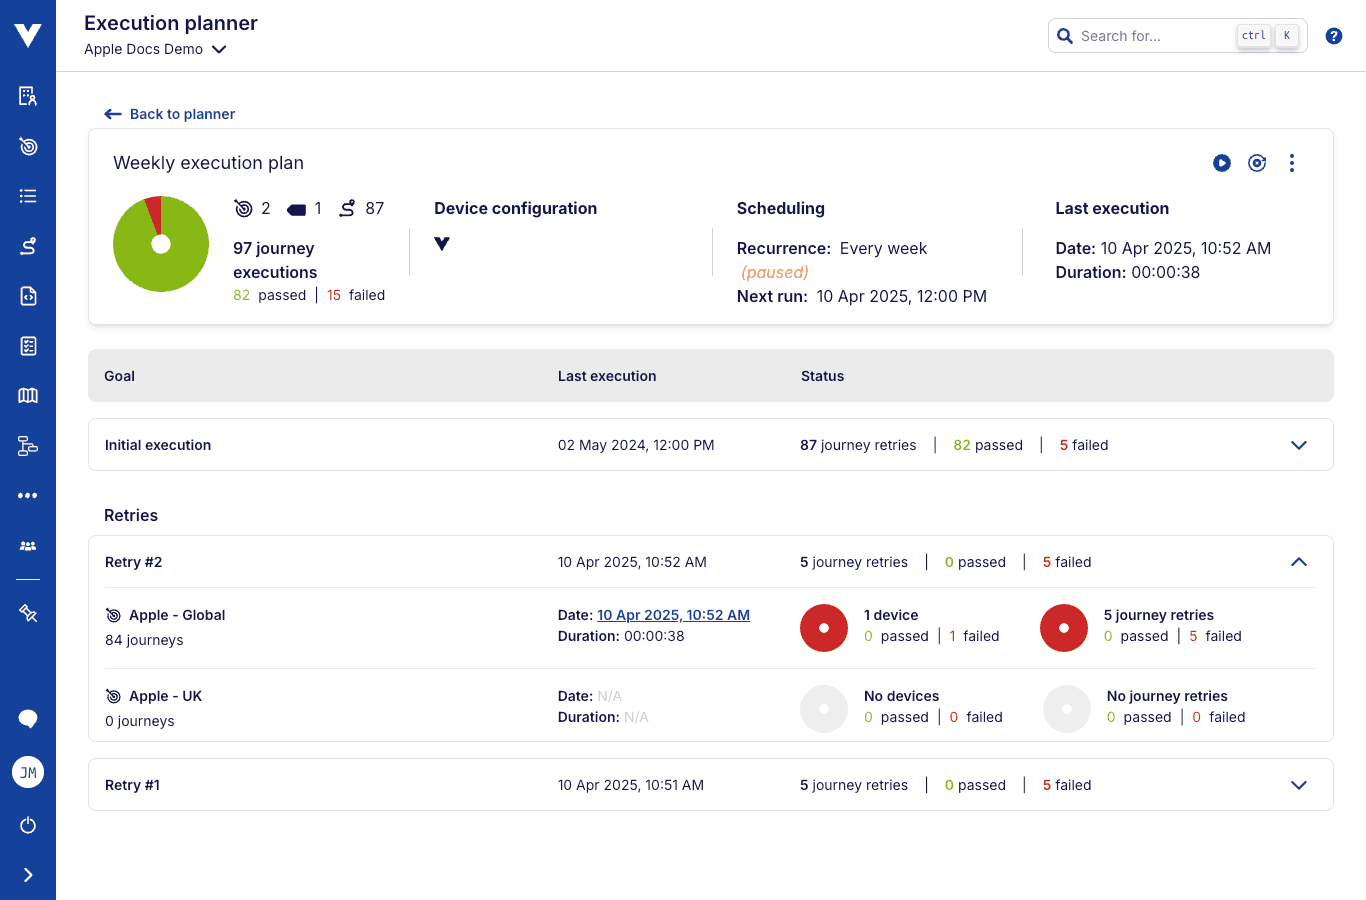
# Plan details
By clicking the name of any plan you will be redirected to that plan's details page, where you'll find more information about the plan, its latest execution, and eventual retries. Retries can be triggered either automatically via the schedule options or manually by clicking the "re-execute" button .
At the top of the page, you'll find a "summary" section with the following information:
- Number of
goals,tags, andjourneysassociated with the plan; - Total number of
journey executions, and its division bypassed/failedstatus. These will be computed across the latest execution and its eventual retries; - The list of
device configurationsassociated with the plan; - The
next scheduled run; - The
last execution dateandduration. These are taken from the last job among the latest execution or its retries;
From the same section you'll also be able to perform actions over the plan, including executing it and re-executing failed journeys, triggering a new "retry execution" that includes only any outstanding failed journeys.
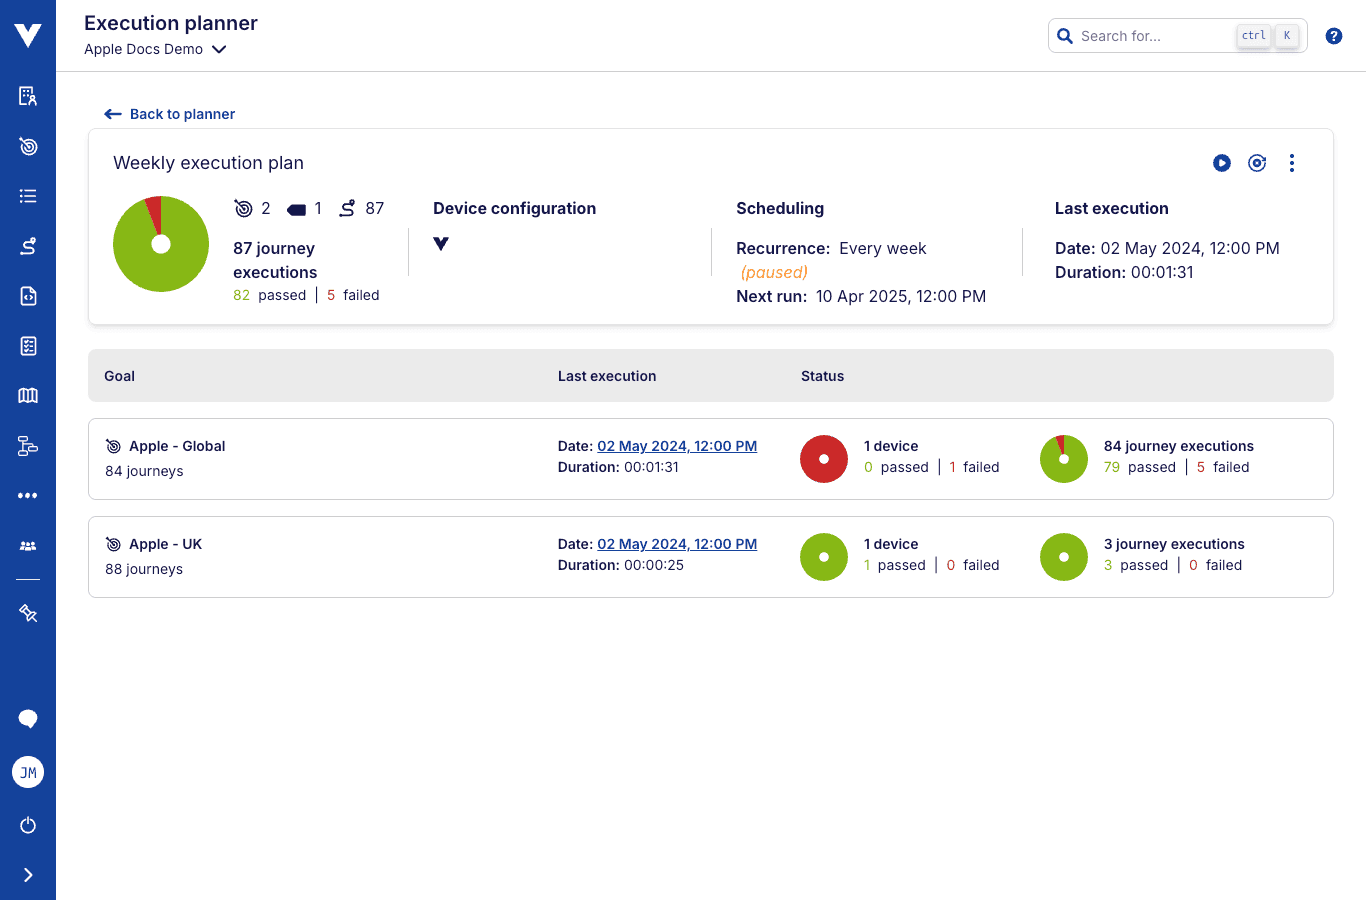
The execution results are presented on the bottom section of the page. If only the single execution has happened, the results for each plan goal will be listed. For each, the information is broken into:
- The number of executed
journeysin that particular goal; - The
execution date; - The
total/passed/failednumbers, in terms ofdevicesandjourney executions;
If any "retry execution" was also triggered, then the results of each, on the same format as described above, will be listed as collapsed items, which can be expanded to reveal the detailed information about the executed goals. The list is presented in reverse order, with the latest retry execution at the top.
CI/CD integration
You can configure CI/CD integration for your plans, allowing you to trigger them automatically from your CI/CD pipelines. For more information, see the Configure CI/CD integration.