# API Manager
Most modern applications rely on APIs to interact with a web server. Here at Virtuoso, we know that testing APIs in E2E tests can be tedious and, sometimes, hard to implement. But it's also absolutely necessary for scalable testing strategies. Use this API builder to define your APIs and leverage them in your journeys as test steps. You can use API calls to interact with your application’s back-end, bypassing your application’s UI. This can be leveraged to quickly get or set data in your journeys or to test whether the APIs themselves are working as expected.
# Accessing the API Manager at different levels
The API Manager exists at two levels: organization and project. You can always access it by clicking on the API Manager icon on the side-bar.
However, depending on whether you are in the context of a specific project or not, you will be accessing either the project-level or organization-level API manager.
Both levels have the same user interface and features, the main difference being the scope of the API definitions created in each level. A few points to note:
Project-level definitions are only available to the current project and not to others in the same organization. Organization-level definitions are available to all projects in the organization.
Project-level definitions may be moved to the organization level to make them available to all projects in the organization. Organization-level definitions cannot be moved to the project level, for that would break other projects already depending on them.
Organization-level definitions do not have access to project-level environment settings, when tested directly from the API manager. However, when used in a journey, all API definitions have access to the environment settings of the project the journey belongs to.
# Creating and testing your first API
For the purpose of this introduction, we are creating a basic request, named listUsers, and we want it to do a GET request against a mock server.
Start by opening the API manager by clicking on the API Manager icon on the side-bar.
Virtuoso groups APIs into folders, so let's start by creating our first folder. Click on the New folder button, give it a name, staging in our example, and click on Save.
Now we can add our very first API to the folder we've just created. Click on Create a request and the API builder will appear on the right side:
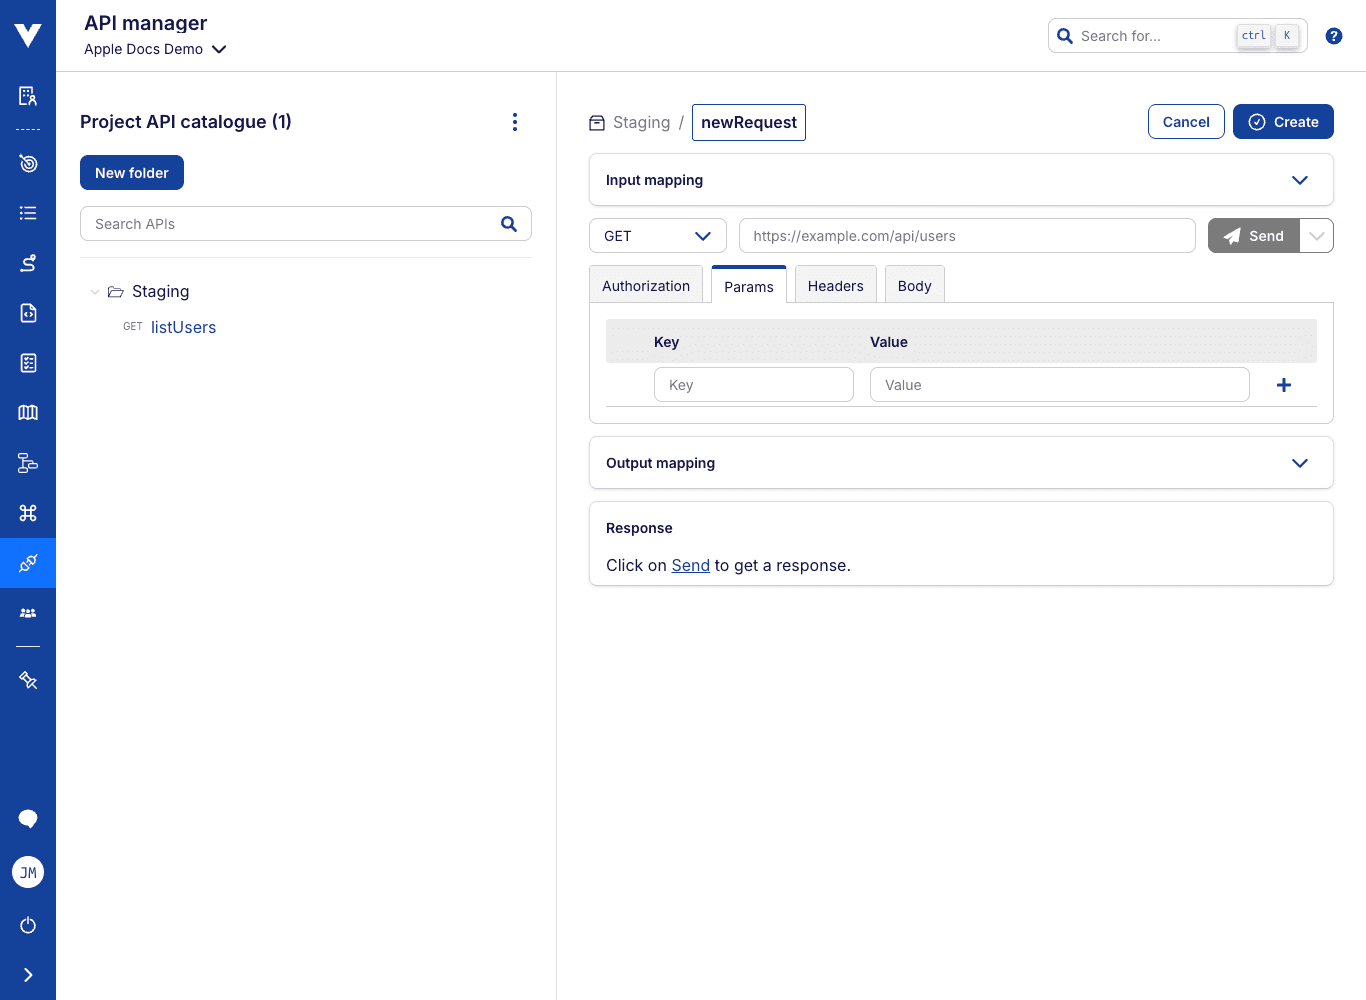
Fill in the name, listUsers in our example, and the URL; then click on the Create button to create your first API definition.
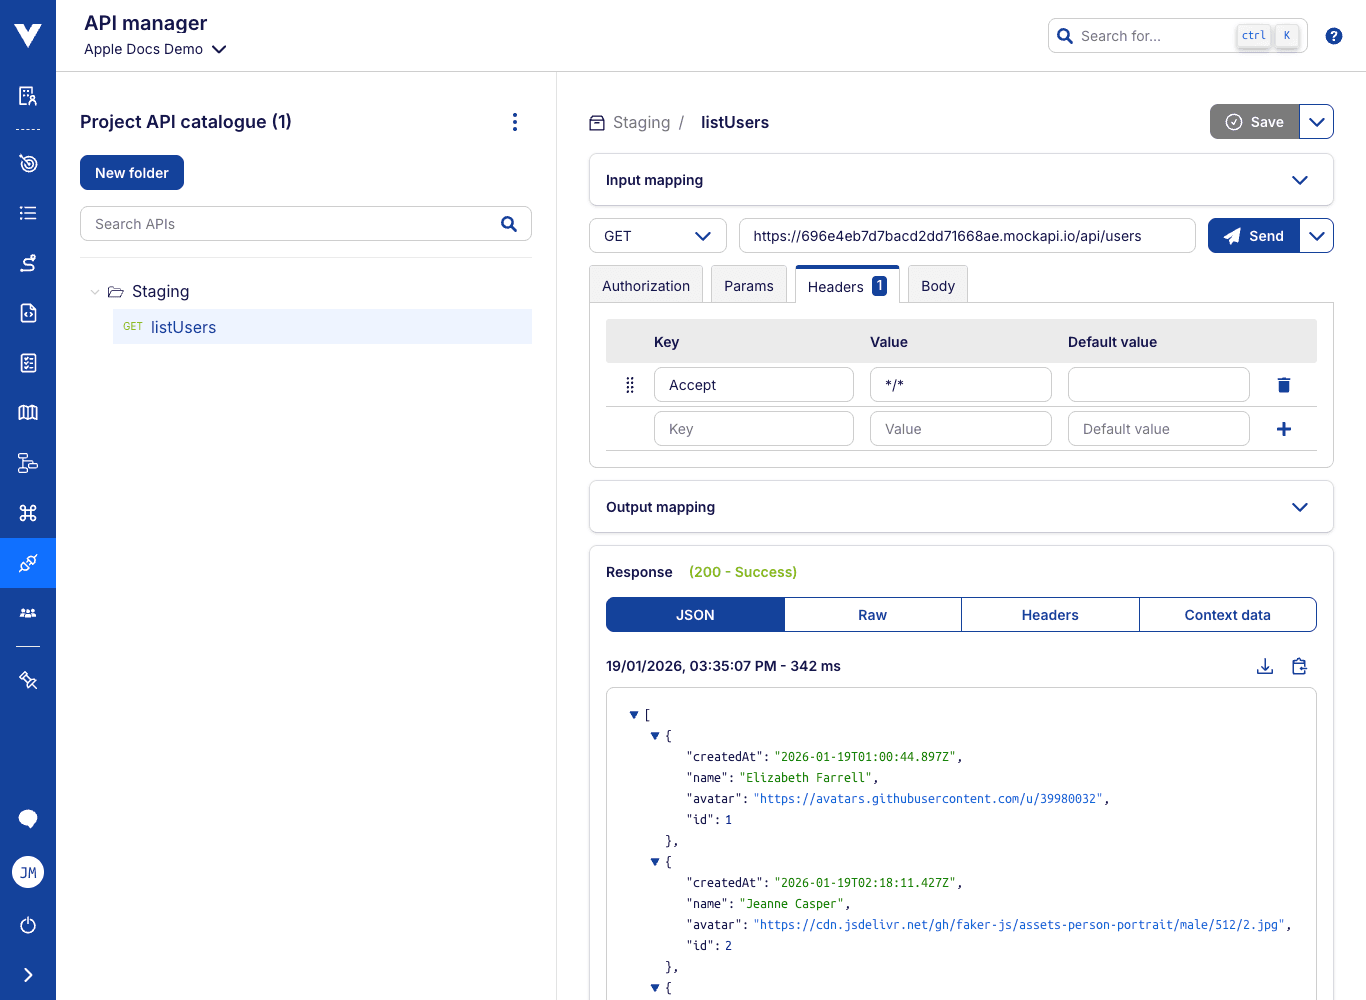
Now, click on the Send button next to the URL field to execute the request and see the response from the API in the Response box at the bottom:
This is the most basic way of creating an API definition with the API manager, which you can use directly. In another section, we explain how to use it as a test step inside a journey.
Project and Organization API definitions
Remember there are two main levels of API definitions: Project and Organization. API definitions defined at the project level are available to the current project only. API definitions defined at the organization level are available for all your organization members.
# About API folders
As outlined previously, an API definition will always live inside a folder. You may create as many folders as needed, and you may also create nested folders with multiple depth levels.
As an example, here is a possible structure for your APIs:
staging/
  |__users/
  |     |__listUsers
  |     |__createUser
  |     |__deleteUser
  |__items/
        |__listItems
        |__createItem
        |__deleteItem
# Moving API folders
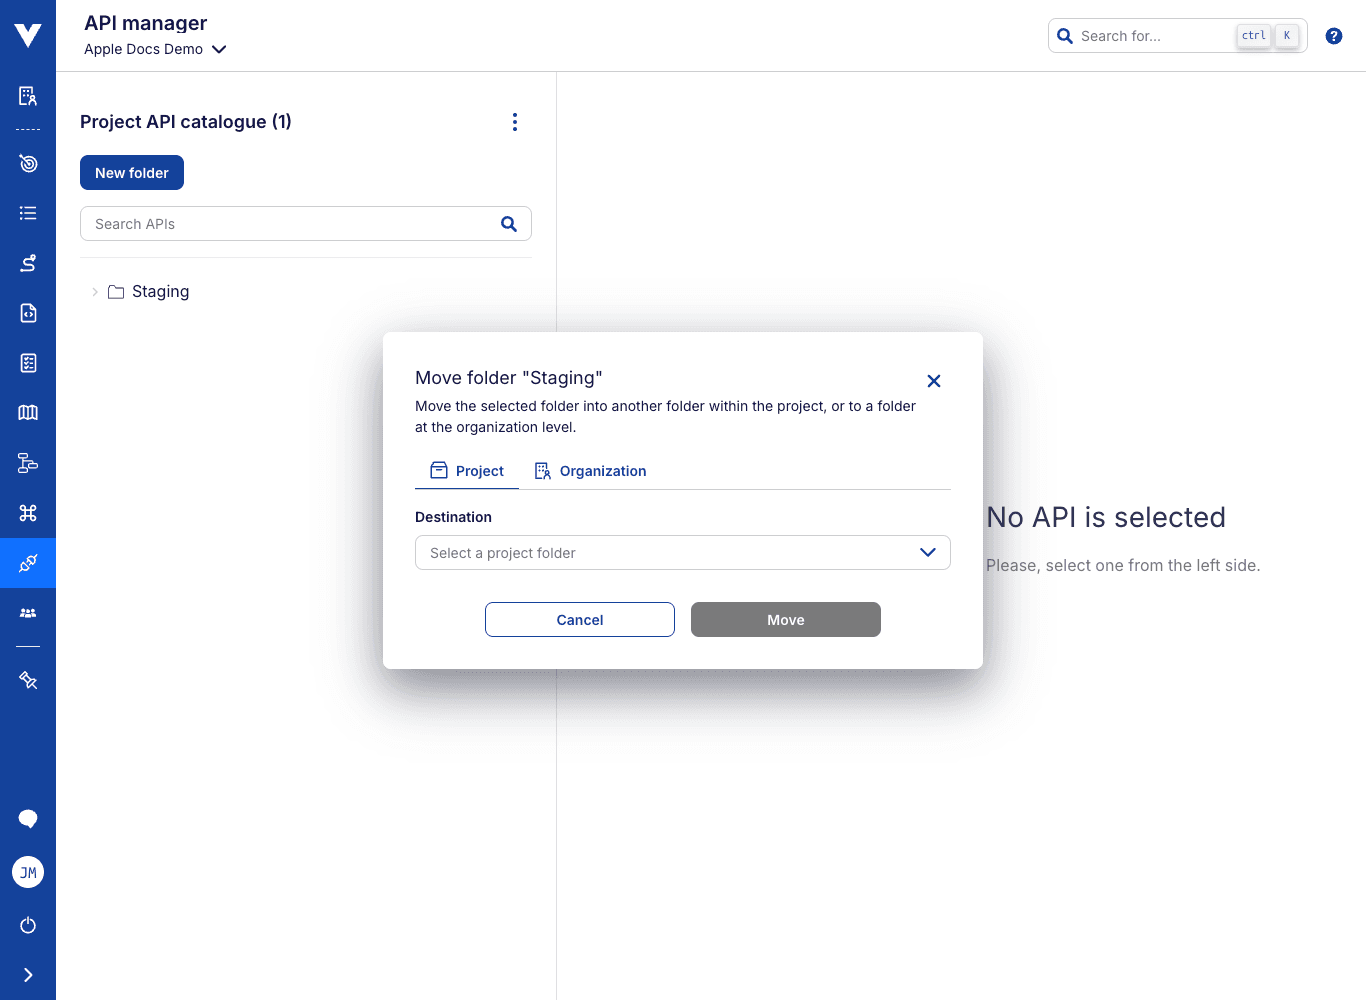
To move a folder, open its context menu ⋮ and click Move, select the folder you wish to move to, and click the Move button. You can also move folders from the Project to the Organization level, making them available for all your organization members.
Moving folders to organization level cannot be reversed
You are unable to move any API folders from the Organization to the Project level. This is because these may be used by other organization members and moving them would cause unexpected side effects.
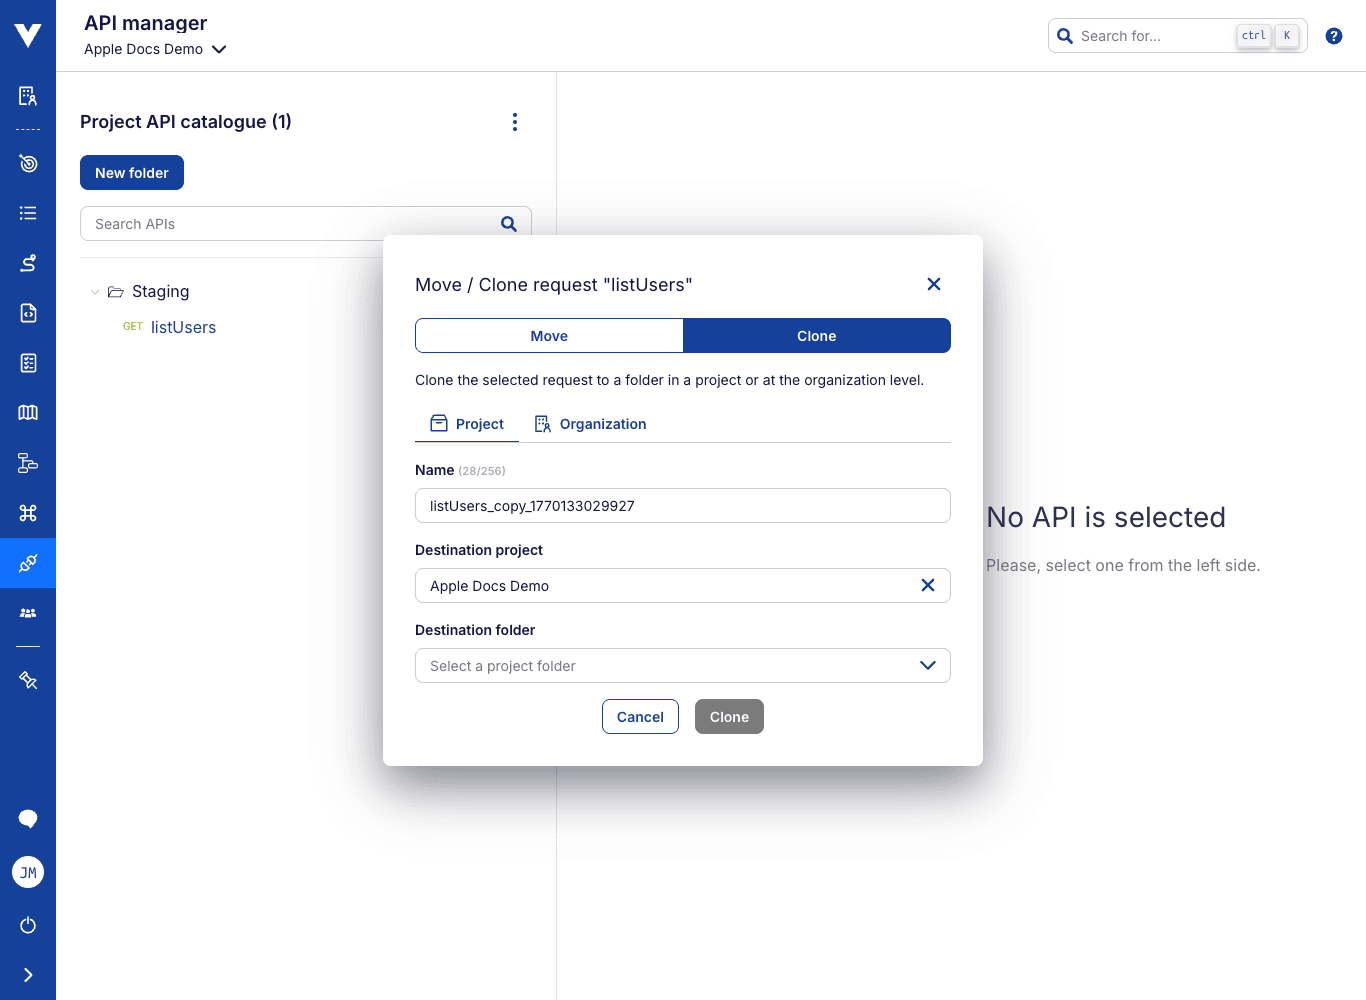
# Moving and Cloning API definitions
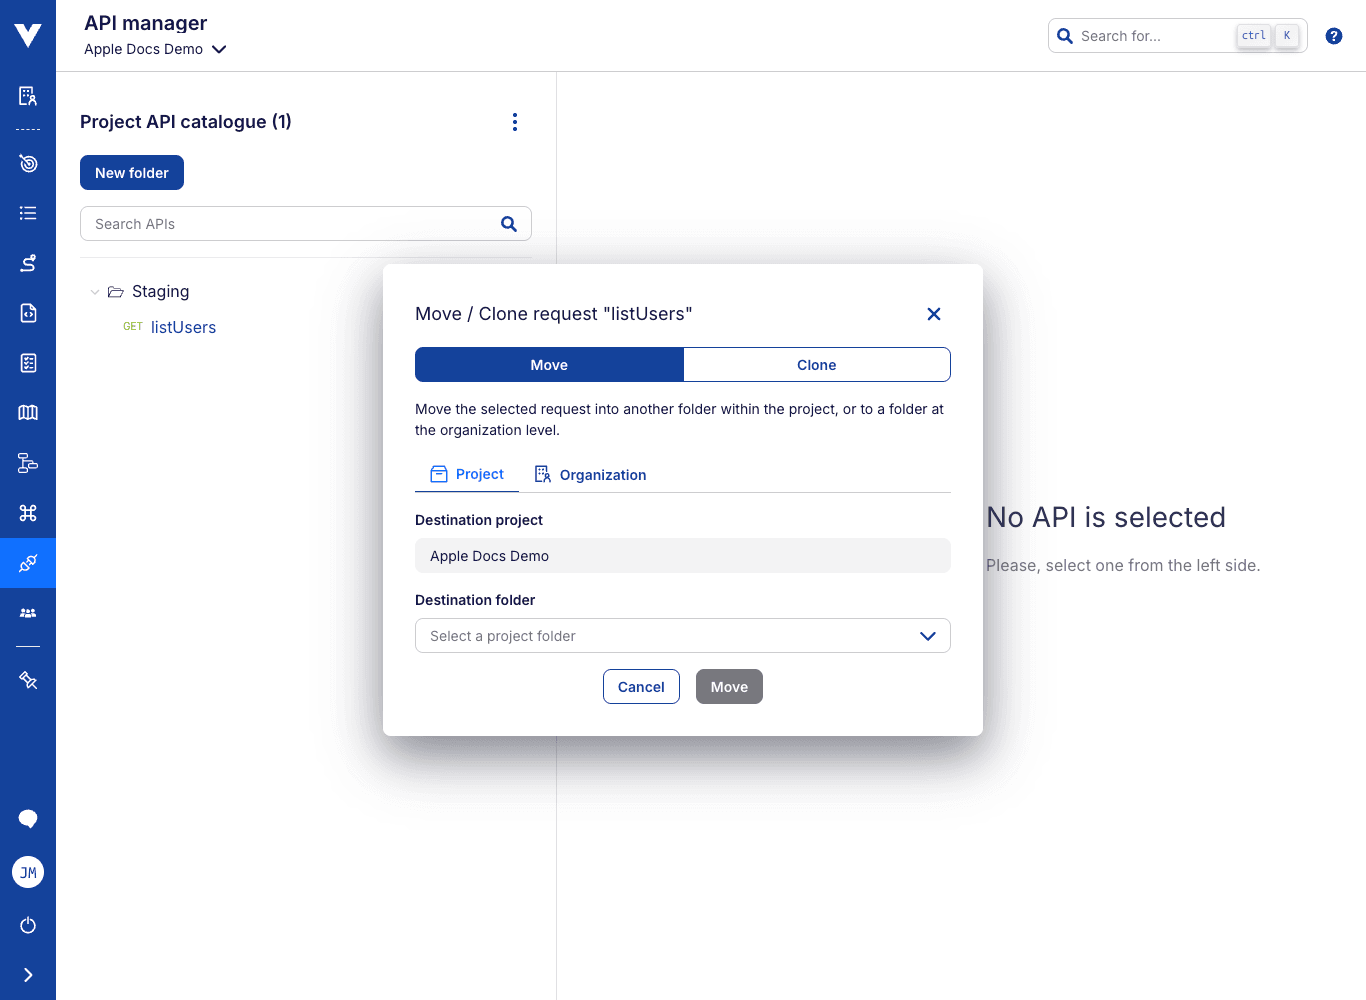
For API definitions, there are two options when it comes to changing their location: moving or cloning. Both can be done by opening a definition's context menu ⋮ and clicking Move / Clone.
To move an API definition, select the Move option at the top of the modal. You are then given the options to move the definition to another folder, at the project or organization levels.
Restrictions when moving API definitions
Same restrictions apply when moving API definitions as when moving folders: you can move definitions from the Project to the Organization level, but not the other way around. Likewise, you cannot move definitions from one project to another.
Both situations could cause the loss of access to definitions that are already in use and have unexpected side effects.
While Organization level API definitions cannot be moved to the Project level, you can clone them instead. This will create a copy of the selected API definition at the desired Project, without the risk of breaking tests already relying on it.
Use this feature also to copy API definitions from Project level to Organization level and even between different projects.
To clone an API definition, select the Clone option at the top of the modal.
When cloning, the original name of the definition will be appended with a unique suffix to avoid name clashes. You may rename the cloned definition as needed.
If cloning to the Organization level, you must also select what the destination folder is. If cloning to the Project level instead, you must select the destination project as well.
Duplicating API definitions
You can use the clone feature to easily duplicate API definitions in place! Simply open the clone modal and use the pre-filled settings.
This is useful when you want to create a similar API definition without starting from scratch.
# Searching for API definitions or folders
On the left side of the API manager, there is a search box that can be used to quickly find API definitions or folders by name.
The list will be filtered, showing only folders or APIs that contain the specified search term, or folders that contain other matching items.

# API builder reference
This section explains all the settings that you may use to configure an API definition through the API builder.
Don't forget to save your changes
Don't forget to save changes as you make them to ensure that the changes are recorded for future use. Click the Save button at the top or press Ctrl + S on your keyboard.
# Input mapping
Think of API definition as a function with the specific purpose of sending an HTTP request and retrieving a response. Just like functions, they may have inputs which can then be used in other request settings like the URL or the body.
These may have a constant value or a variable-based one, which is only computed at the time the API is executed from environment variables or values passed explicitly during execution. To denote a variable input, prefix its value with a $.
Using variables as input
Variable based input mappings are always prefixed with $.
Since variable-based values are unknown until the API is called and there are no guarantees that they always evaluate to a valid value, you can assign to each input a default value.
In our previous example, if you want to map the inputs id with constant value 3, and departmentId with the value from the variable $department using the default value 123, you can setup the following input mapping table:

To use input mappings in the remaining request settings enclose their name in double braces {{...}}, e.g., {{departmentId}}.
# Method and URL
The method for the request is the HTTP method that will be used by your API call: GET, POST, PUT or DELETE. By default, it is set to GET.
The URL is the endpoint of the API that you want to test.
# Request settings
The request may need additional settings to work properly such as authorization token, specific headers, or a body (e.g., POST requests usually use some value for the body of the request).
In all the following sections, the previously defined input mappings may be used. To do so, simply use the key of the desired input enclosed in double braces, e.g., {{departmentId}}.
Using input mappings in settings
To use input mappings, always enclose their respective key in double braces, e.g., {{<key>}}.
Escaped input mapping values
The values of inputs wrapped by double braces will be HTML escaped. For most cases this is OK.
However, there may be situations where this is not the desired behavior, and you want the full unescaped value. For example, let's assume the URL we're configuring in our API comes from an input mapping target. We could easily do that by typing {{target}} as our request's URL.
Assuming target is mapping to an environment variable with value https://example.com/api/users, we would expect this request to have the same result as before. However, it would fail because the request would actually be sent to the escaped version of the url, https://example.com/api/users.
To prevent these situations, encase the input mapping key in triple braces, e.g., {{{target}}}
# Authorization
By default, there is no authorization set, but you can use the dropdown to select an authorization type, e.g., Bearer token. After selecting an authorization type, you have to fill in the required information (e.g., the bearer token value).

# Params
You can configure the query parameters using a table-like interface to better organize what your request will use.
For example, if we want to add a parameter named id with value 123, the key would be id and the value would be 123. Similarly, if we want to pass the input mapping departmentId as parameter department, the key and value would be, respectively, department and {{departmentId}}. Type those into the respective fields and press ENTER or click on the plus icon to the right to get the params added to the URL.

Edit query parameters inline
Just like the URL field gets updated as you edit the query parameters on the table, the table will get updated if you edit the URL field inline.
# Headers
This section provides another table-like interface, similar to the query parameters interface, where you can add as many headers as needed to your API request.
For example, if our API request needs the header x-powered-by with the value VIRTUOSO, you have to type those respectively as key and value and then press ENTER or click the plus icon on the right.

As presented in input mappings, variable based header values may not be set when the test is executed. You can set a default value for the headers that you want the request to always send even if the variable does not have a value.
Automatically added headers
If the selected authorization type is Bearer token, the header with key Authorization and value Bearer <token> will be automatically added to the table.
# Body
Use the body section to add a payload to the request, e.g., the user details when creating a new user with an API.

Message about HTTP method being used
Depending on the HTTP method you have selected, the interface might show a warning message telling you that the body might not work as expected. A body is commonly used with POST requests as explained here (opens new window). However, this will depend on the specific API you're using, so read its documentation to be sure of how it works.
# Output mapping
Just like you can define input mappings to the API, you can also add pre-defined output values to it.
Whatever the response to the API request may be, it will come wrapped in Virtuoso's own response (exposed as the variable $response) which contains 3 components:
status- the HTTP status code of the response to the API request;headers- an object containing key/value pairs for the response headers;data- the actual data returned by the API request;
With output mappings, you can apply simple transformations to any of these elements as needed for the specific API that will also be available in the output context of the API. This is especially useful when you use API calls in your journeys and want to quickly access information snippets of the whole API response.
Using variables as output
Variable based output mappings are always prefixed with $.
As with input mappings, variable based output values and any transformations over these variables may not contain a valid value when the API call is executed. You can define a default value for each of the output mappings, which will be returned in case the mapping value is invalid.
This may be useful to avoid creating invalid context variables that will make your tests using APIs fail when calling APIs in your journeys. Conversely, you may want a specific value returned in case of failure, so that you can test it to evaluate the API call success.
For example, if you want to use the API we created before in one of your journeys, you might want to test if the API is successfully returning a response with the correct number of users, and you can add two output mappings to make your test simpler:
- Add key
statuswith value$response.status, to map directly to the HTTP status code of the API response; - Add key
userCountwith value$response.data.data.lengthand default value-1, to map directly to the number of users returned by the API;

Then, it is just a matter of creating assertion steps to validate these two numeric values against the expected ones. Since the number of users may never be negative, the default value for userCount may be tested to make sure the API is behaving as expected.
# Manually testing an API
Even without integrating API calls with your journeys, the API manager is a powerful tool on its own. Each API that you define may be run manually, with the response immediately shown to you at the bottom of the API builder.
Request duration limit
When you send an API request, either from the API builder or as a step in an E2E journey, Virtuoso imposes a timeout of 29 seconds. The request / step will fail if no response is received within that period.
The response section is divided into four tabs:
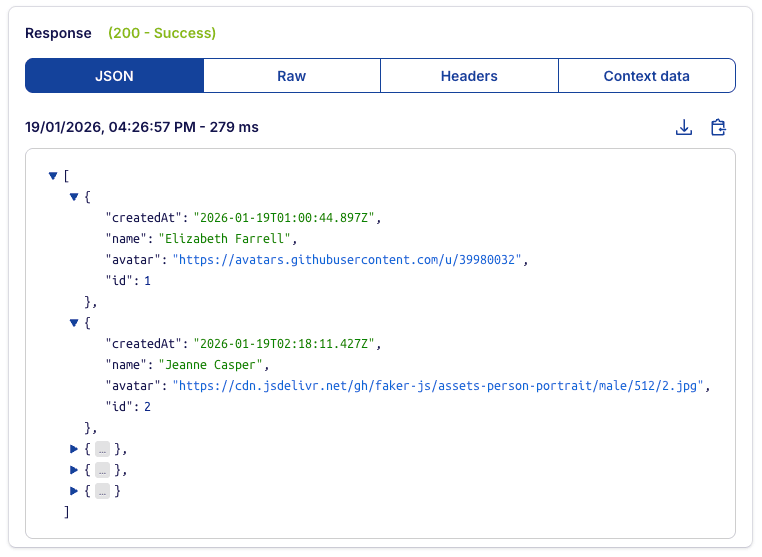
# JSON
This tab will display the payload of the response to the API request. Virtuoso will try to display it as a JSON, so that property names and values are correctly highlighted, and objects and arrays can be collapsed and expanded.
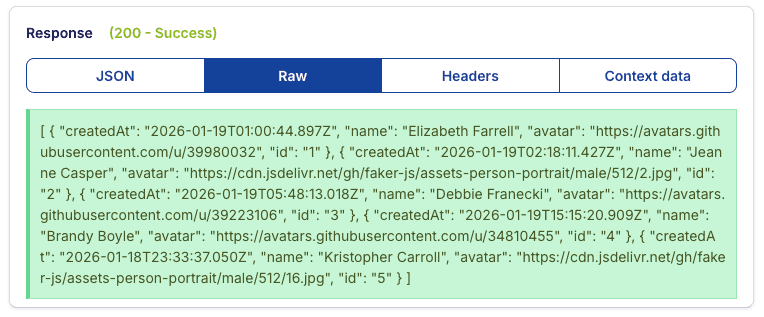
# RAW
This tab is similar to the previous one as it will also display the response payload. However, in this tab, the value will be displayed as raw, unformatted text. This tab may be better suited for responses which are not expected to be in a JSON format.
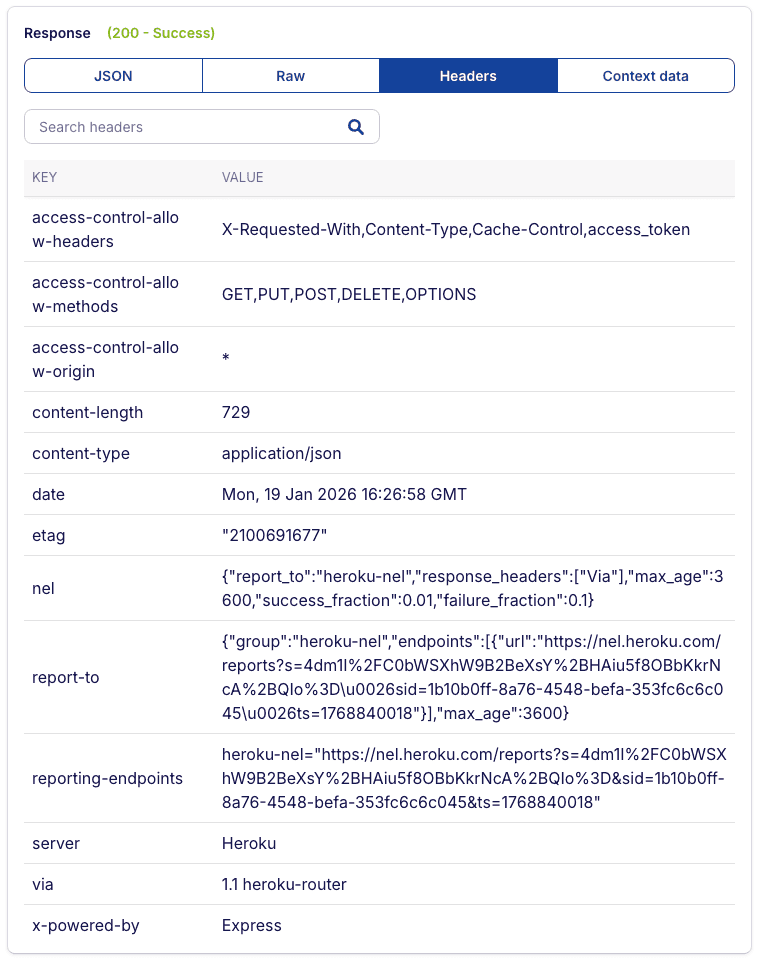
# Headers
The headers tab will display a table of key/value pairs corresponding to the response headers.
# Context data
The last tab will display the request input and output context. This lets you know exactly what values were available to the request through the input mapping, as well as what values were exposed, when the request completed, through the output mapping.

# Calling APIs with different settings
We have already mentioned input mappings and how these let you pass variables into the request. But how do these apply when running APIs manually from the API builder?
Virtuoso will try to match the input mapping variable based values to the variables defined in your environment. Looking back to our example, we could define the variable department in our environments and have it automatically passed to our request through the departmentId input.
Furthermore, we can have different values for the same variable in different environments, making it easy to test different scenarios. If there is a default environment, Virtuoso will use it unless specified otherwise. To switch environments, open the Send options menu, next to the Send button, and select Send advanced.
This will bring up the send advanced modal, where you can select any of the environments available to you. Once you confirm your choice by clicking Send advanced, the request will automatically be sent with the selected environment being taken into account.
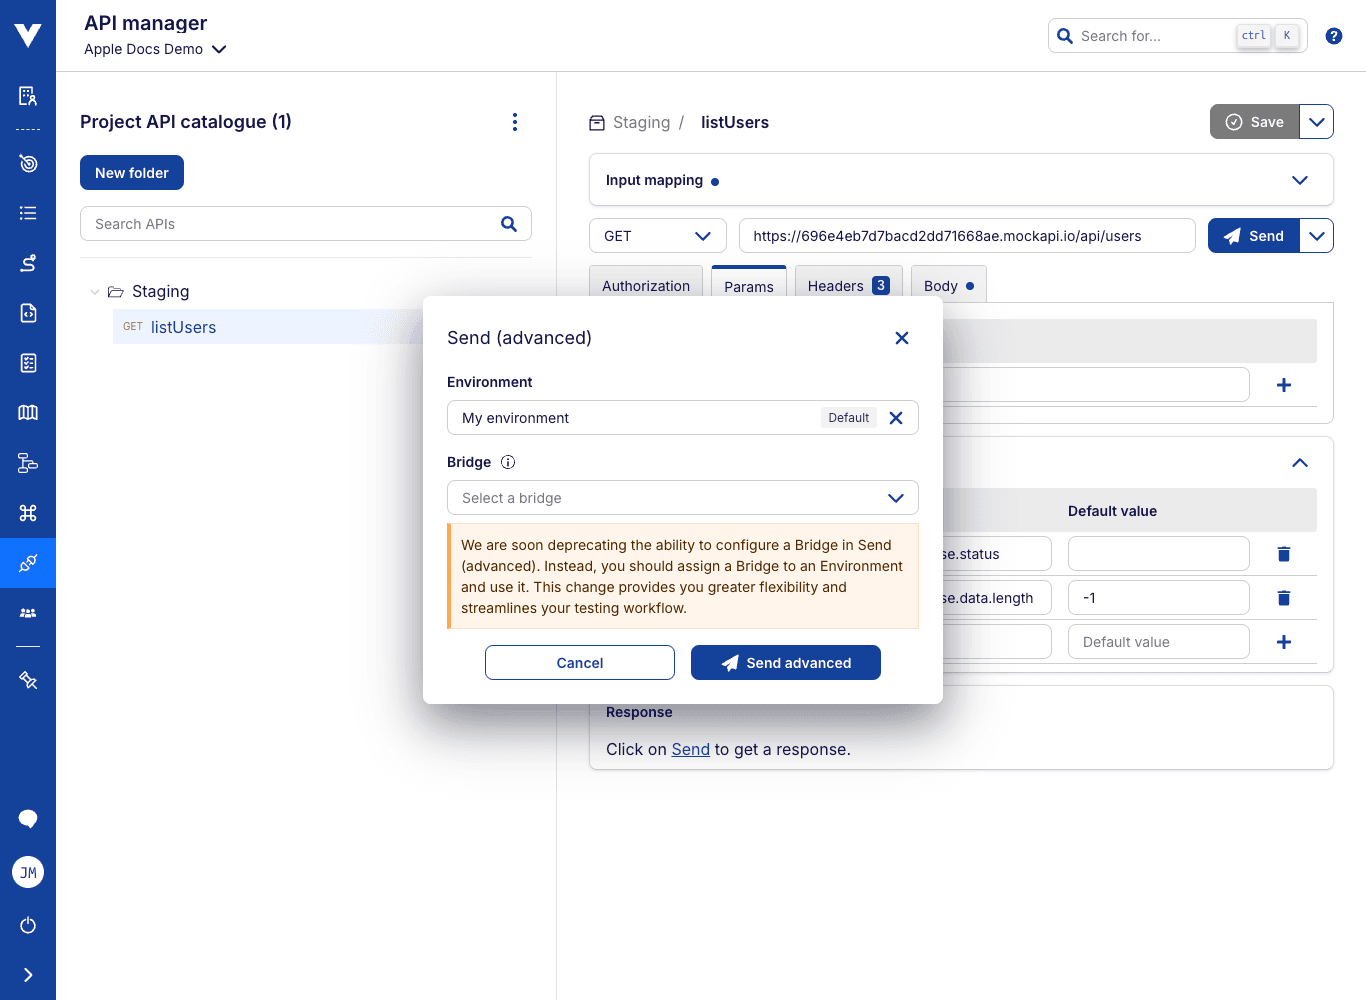
Calling local / private API using a bridge
If you want to send an API request to a local or private API, you can use Virtuoso Bridge.
Each environment may have a bridge associated with it. When you select an environment in the Send advanced modal, Virtuoso will automatically use the associated bridge to send your request through.
Alternatively, you may also select one of the available bridges directly. Please note that this option may be removed in the future, allowing only the selection of bridge through the environment selector.
No "Send Advanced" at the Organization level
There are no Organization level environment definitions. For this reason it is not possible to select an environment when not in the context of a specific project.
The Send advanced option will not be available when using the API manager at the Organization level.
This will not affect the usage of those APIs in your journeys, as these will always be executed in the context of their project, where environment definitions are available.
# Calling and testing APIs in your journeys
Once you have built your API definitions on the API manager, it's time to use them inside a journey as test steps. The syntax to be used for our NLP parser is:
API call "folder1.(...).folderN.apiTest"
Following our example in the previous section, if you want to use the API named listUsers in folder staging, you have to use the NLP API call "staging.listUsers. As usual, Virtuoso provides NLP alternatives for the same action; you can use api "staging.listUsers", and it will produce the same command. Of course, the step editor will show you suggestions as you type, so if you have many APIs, you do not need to remember all of them.

At this point, you can execute your journey and see the results of the API call:
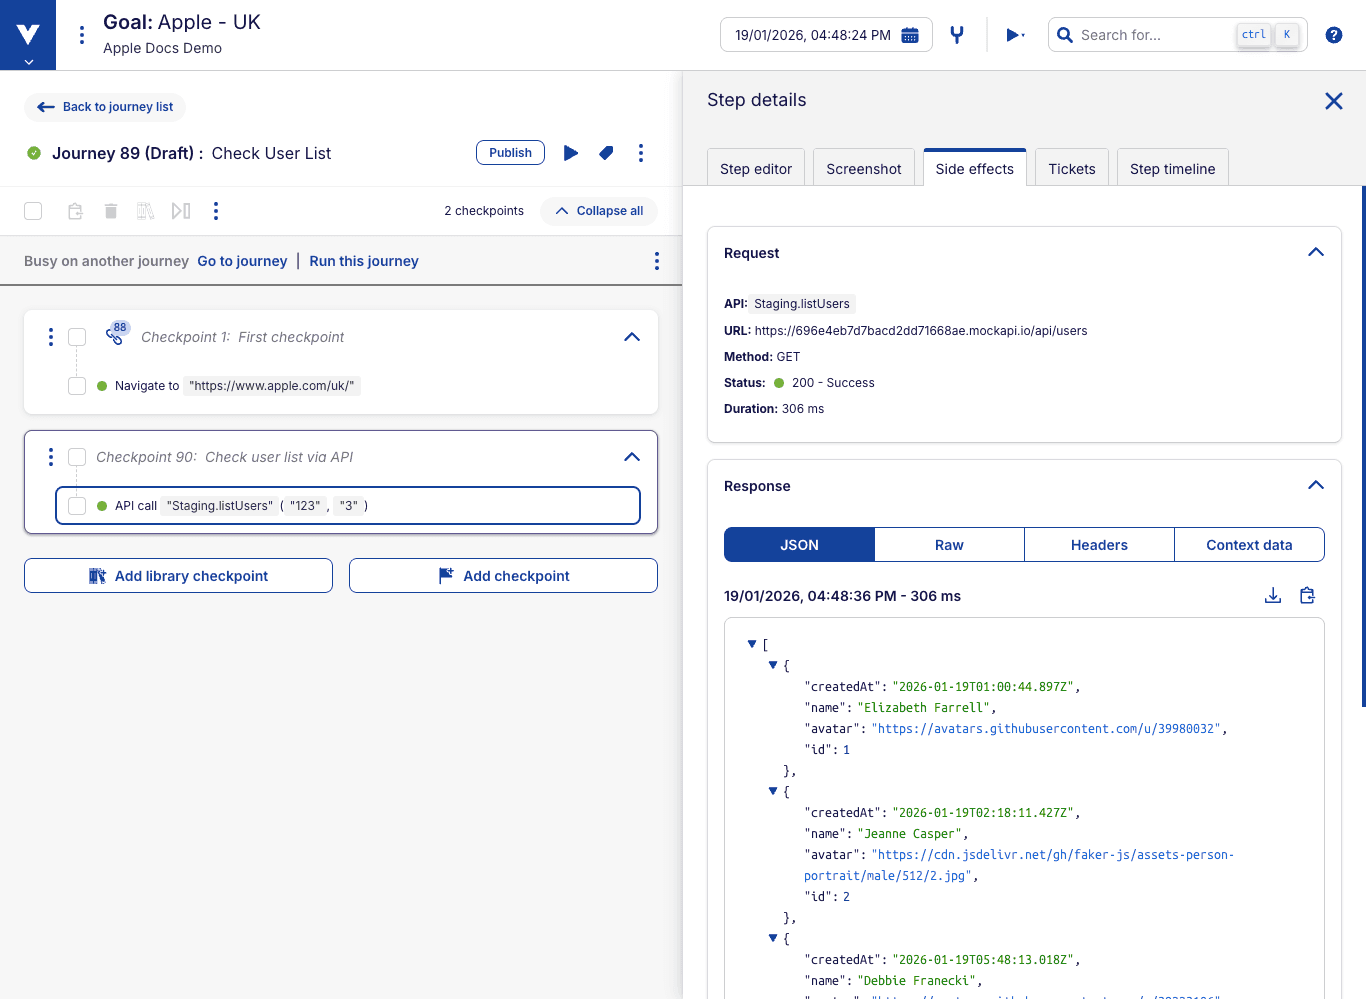
# API calls and journey context
An API's input and output mappings may be used in the context of a journey. Through Virtuoso's natural language syntax, you may pass variables from the journey context into the API call, and the API output variables will be made available to take into the journey context as return values.
In our example, a more complete API step could look as follows:

A complete analysis of this step reveals that:
- We're executing
listUsersinside folderstaging; - The value
10and context variable$departmentare being passed, respectively, to the API inputsidanddepartmentId; - We did not specify a value for the
organizationIdinput parameter, so it defaulted to$defaultOrg(you can see the difference by clicking on the step an seeing its detailed panel); - The call returns outputs
statusanduserCount, which are being added into the journey context, respectively as$testStatusandcount.
# Import Postman collections
If you already have a Postman collection (opens new window) and want to reuse it in Virtuoso, you can import it into your project.
To start the import, click in the menu option Import Postman collection, and drag the Postman collection file into the highlighted area.
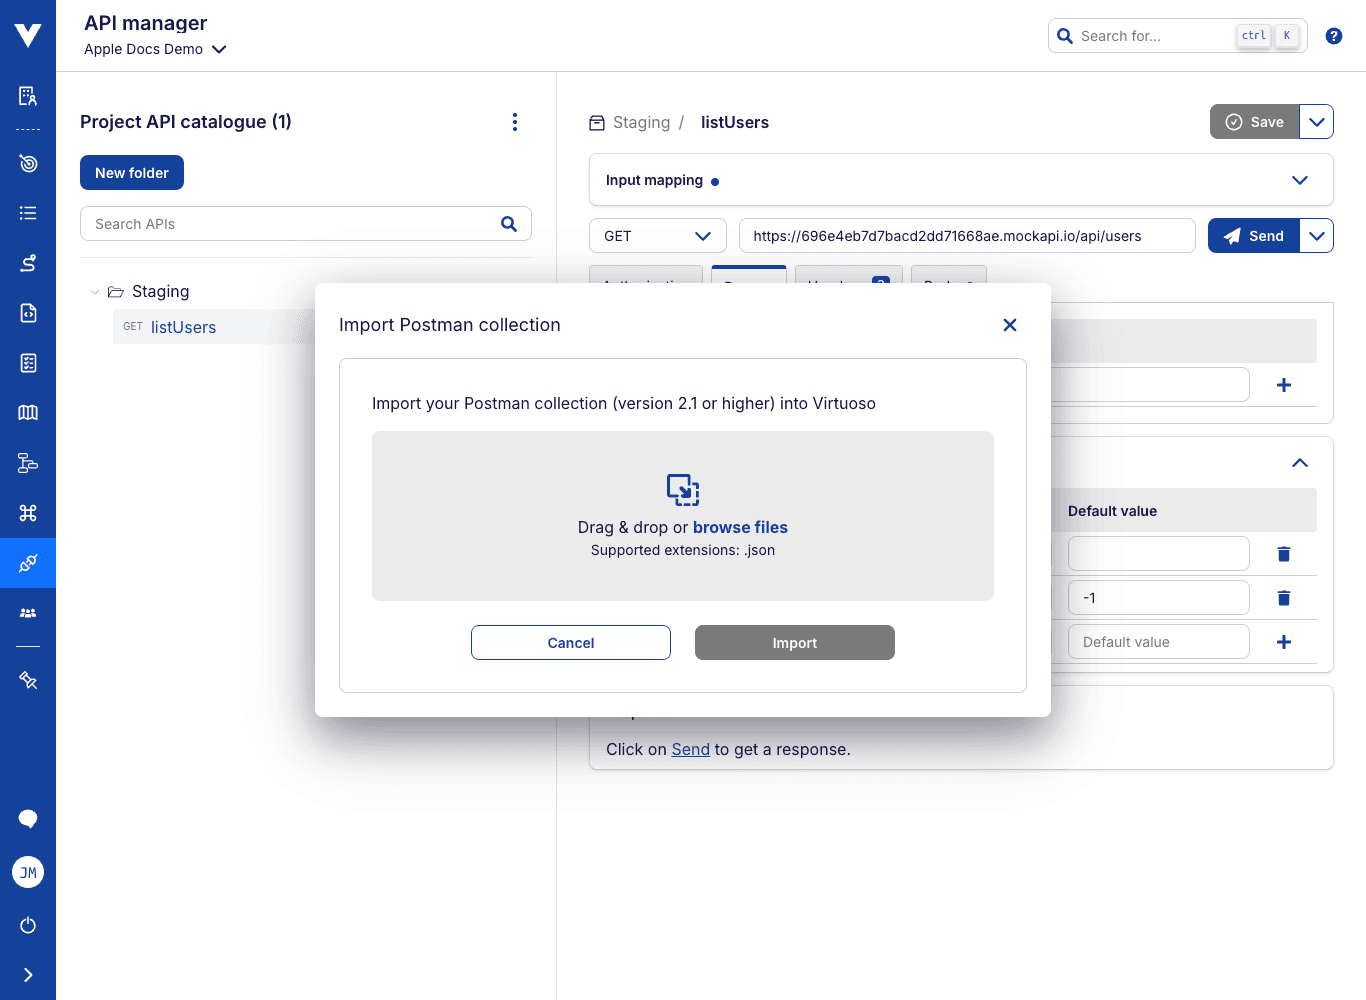
Once the import is successful, the new API definitions will be appended to the existing ones.
Postman collections considerations
- Only Postman collections of version 2.1 are supported
- Virtuoso supports collections up to 8MB. If you have a larger collection, you may need to break it down into multiple smaller collections.
Limitation importing POST request's body
Postman offers different methods for defining how the body data should be sent. While importing POST requests, only the ones defined for using raw body are completely imported. Requests defined using other methods will be imported with an empty body. You will have to complete them doing the needed adjustments. Ex.: After importing a request that has a body type as x-www-form-urlencoded, you have to:
- Go to the Headers tab and add an entry containing
Content-Typeas the Key andapplication/x-www-form-urlencodedas the value. - Go to the body section and paste the list of key-value pairs using this format:
param1=value1¶m2=value2
However, all keys (ex.: param1) and values (ex.: value1) must be encoded first. Check HTML URL Encoding Reference (opens new window), for instance.
Example:
- Given this list of key-value pairs:
- Key: "user name", value: "josesilva"
- Key: "name", value: "José Silva"
- The encoded string body is:
user%20name=josesilva&name=Jos%C3%A9%20Silva
Open API support
You can use the Postman compatibility to also import OpenAPI Specifications (formerly known as Swagger):

- Export the Open API as JSON;
- Import it as a Postman Collection;
- Export the Collection as the Postman Collection v2.1 format;
- Import it on Virtuoso.
# Deleting API or API folder
To delete an API or API folder:
- Click the
⋮(more options) menu next to the item. - Select
DeleteorDelete folder. - Confirm the action when prompted.
Once confirmed, the API or API folder will be permanently deleted.


Cannot delete an API or API folder if it is in use.
If the item is being used in an active journey or library checkpoint, the deletion will be blocked. To proceed, remove all references from active journeys or checkpoints, then try deleting again.