# Data-driven Testing
Virtuoso allows you to provide structured tables of data and associate them with your tests. This indicates that each test should be executed multiple times, one for each existing test data row.
In order to use test data, you first associate journeys with test data tables, then you associate test steps with test data attributes. Steps not associated with any attribute will use their own value during execution. However, a row may contain no value for a given attribute, in which case the step associated with this attribute will be executed without a value for that row.
The remaining of this section presents the following topics:
- Creating a test data table
- Viewing and editing a test data table
- Managing a test data table
- Controlling test data table assignments
- Using test data in a journey
- Executing using test data
- Visualizing results on the execution report
- Initial data for journeys
# Creating a test data table
To manage the test data tables associated to a project, click on the test data icon on the left side of the Dashboard. This will open the test data management screen.
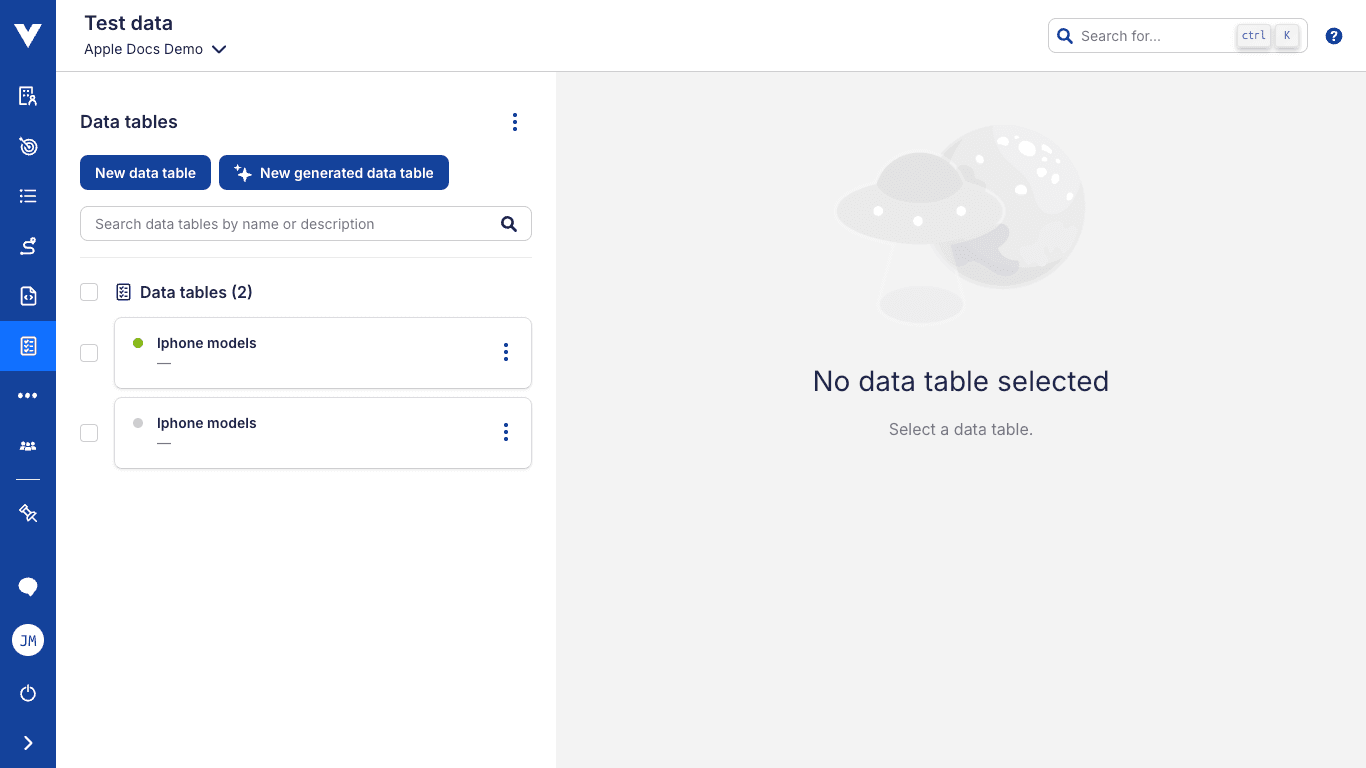
From here you can add new test data tables in one of two ways: manual and AI assisted.
# Manual creation of test data tables
Clicking the New data table button will open the modal for creating a new test data table.
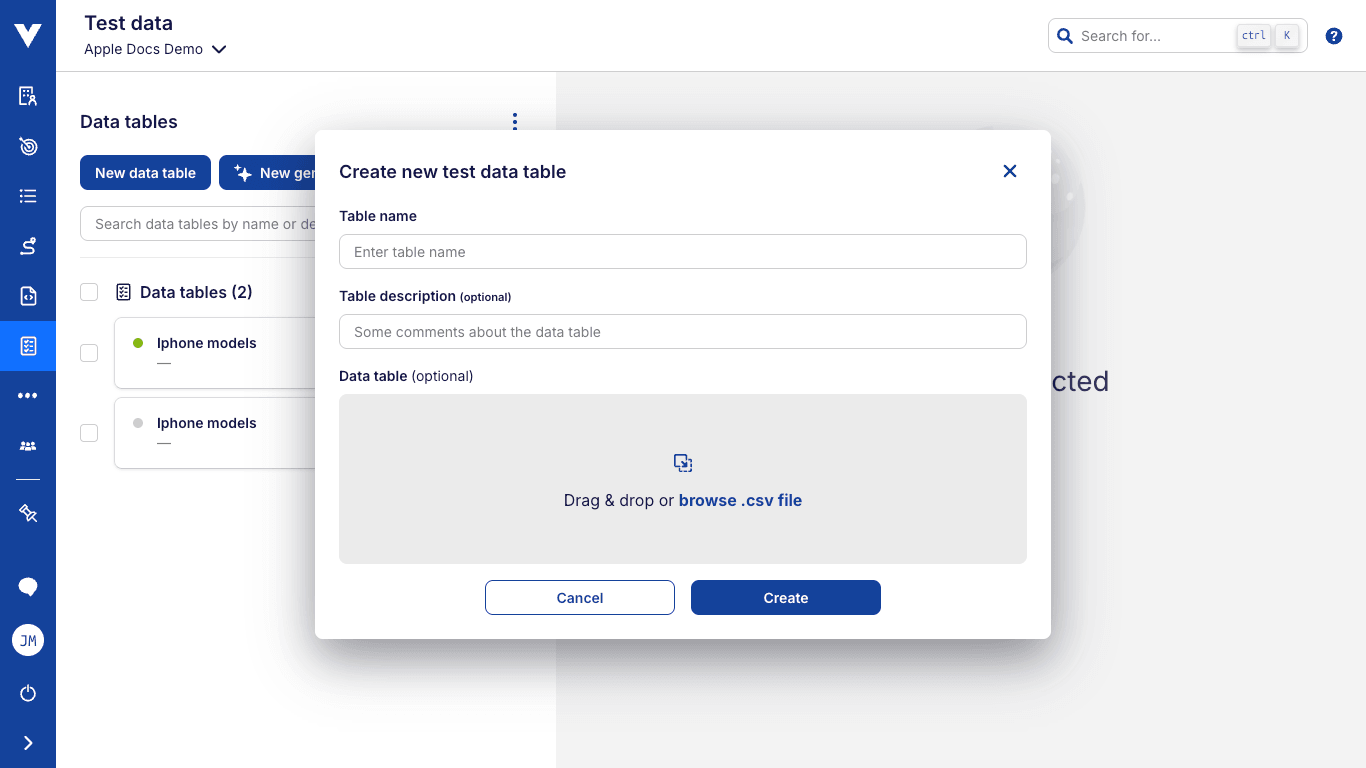
In this modal, you should provide the following information:
Name: A unique name that allows you to identify the test data table;
Description (optional): A small description to help you and others identify the test data table and the information it contains;
Data table (optional): A CSV (comma-separated values) file, containing attribute names and, optionally, rows of values, that Virtuoso uses to populate the new table. A row of values may contain less values than the number of attributes, but never the opposite. Note that the file must be UTF-8 encoded if you have any special characters.
Finish the creation by clicking the Create button at the bottom. This will create the new test data table and redirect you to it in the manager, so you can further edit its contents.
# AI assisted creation of test data tables
If you want to speed up the creation of test data, our Data Table Generator may be able to help you. It is especially suited for the creation of multiple rows of contextual data, such as personal information, tech specs, and more!
To use it, click the New generated data table button.
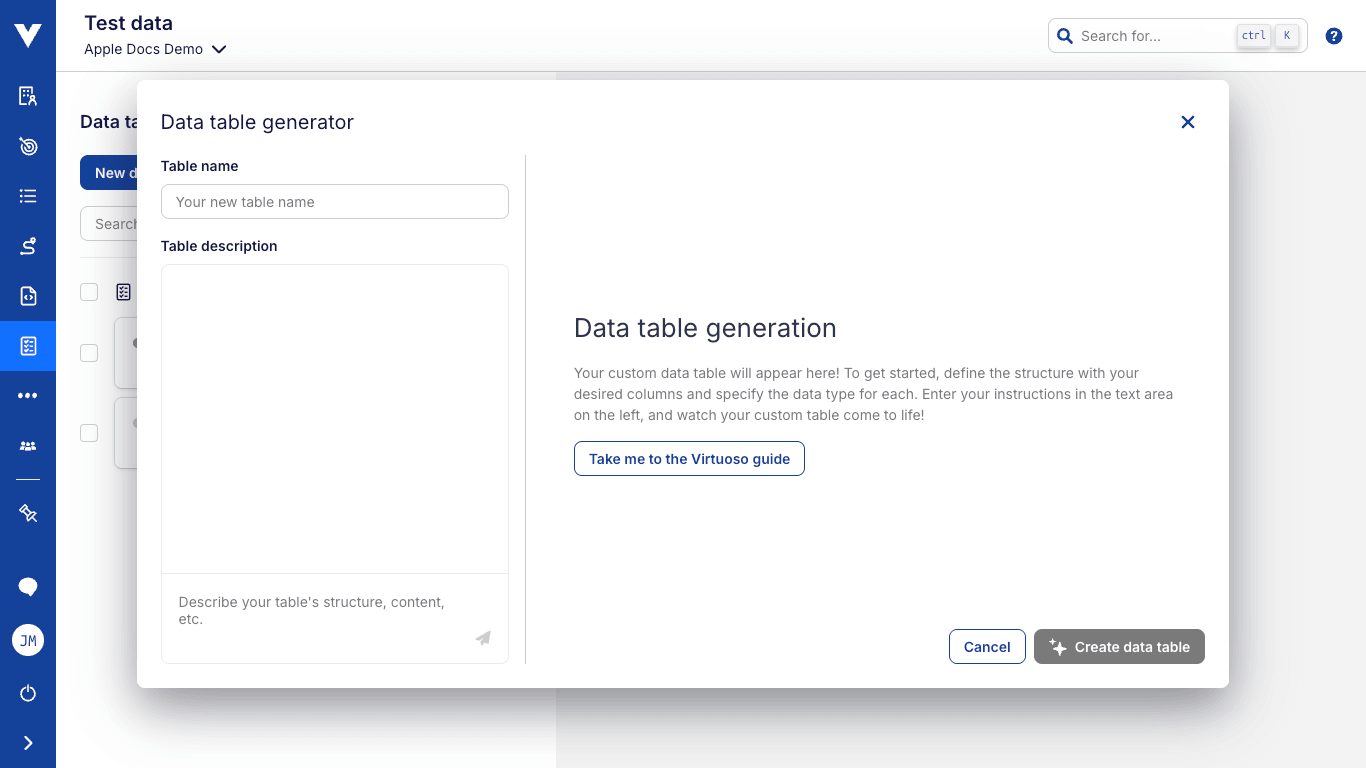
In this modal, you should provide the following information:
Table name: A unique name that allows you to identify the test data table. The assistant may also take additional context information from it and use it to provide more accurate suggestions;
Table description : A description of the content and structure of the test data table. Specify the number of rows, the name of the columns, special requests for data format, etc. Be as specific or as vague as you want, and our assistant will provide the best suggestions it can based on that.
Finish the creation by clicking the Create data table button at the bottom. This will create the new test data table and redirect you to it in the manager, so you can further edit its contents.
Name the table before describing it
Our assistant will take context information from the table name and base its suggestions on it, as we illustrate on the use case below.
If possible, name the table before submitting a request to get the best results.
Assistant limits
Our assistant has limits on how much data it can generate. Please refer to our Quotas and thresholds to learn how many rows and columns of data can be generated.
You can, however, add more data to a generated table in subsequent edits.
AI-generated data
Even though it is smart, our assistant occasionally makes mistakes, just like most AI-based technology. Please check the generated data to ensure that it is safe and helps in your testing efforts.
# Basic use case
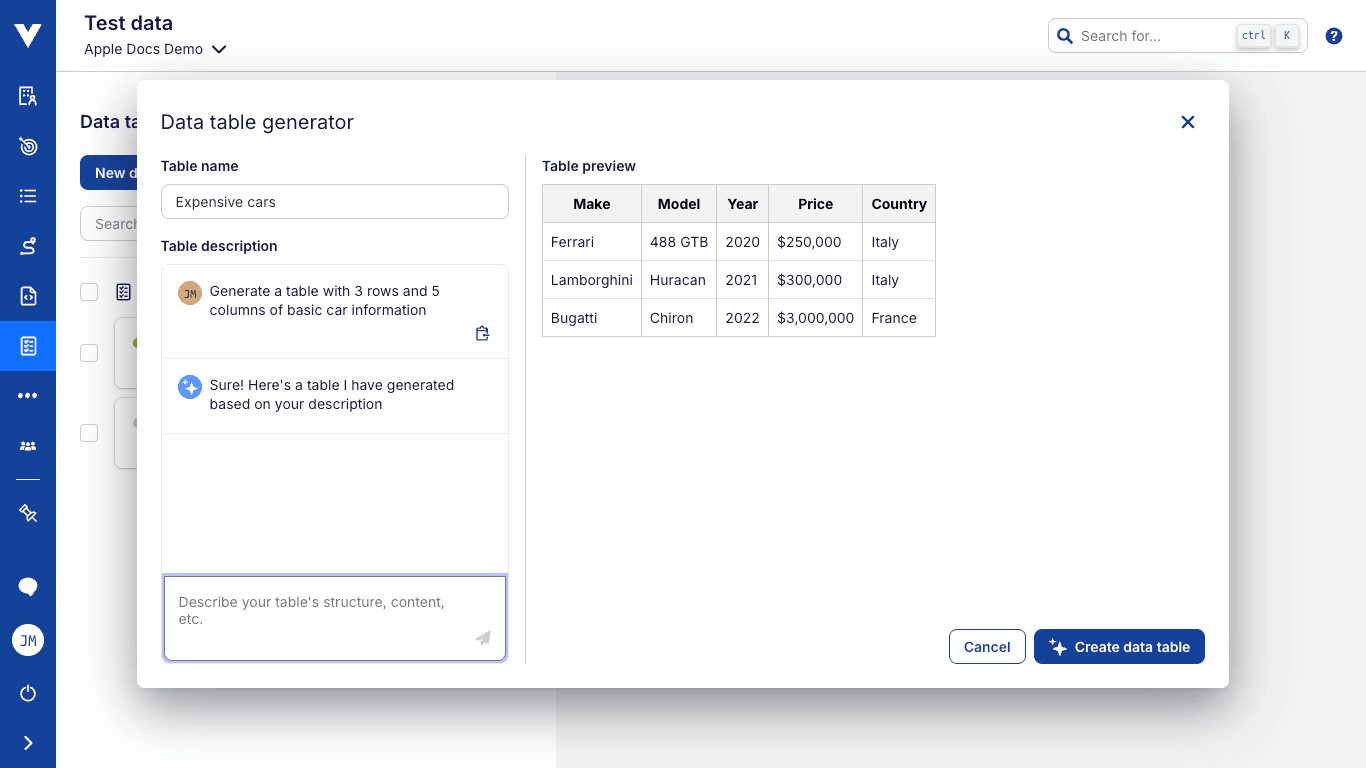
Let's say you want to test your application with car information. You don't need any particular car specifications, you just need it to look real. Also, you need at least 3 different cars to carry your test.
Based on that, you can create the following description
Generate a table with 3 rows and 5 columns of basic car information
Given that information, our assistant could reply with the following table:

If on top of that same description we also added the table name Expensive cars, the assistant could instead reply with the following table:
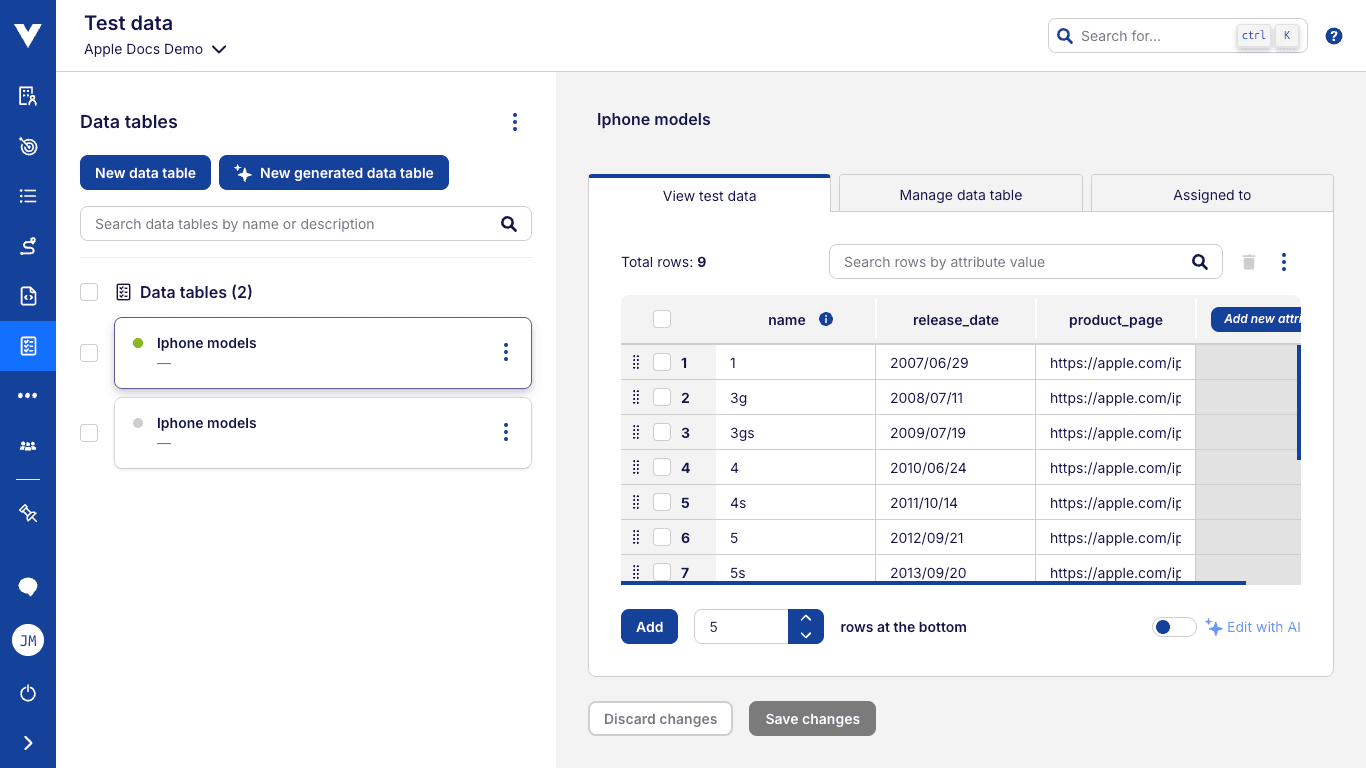
# Viewing and editing a test data table
In the left side of the test data screen, you can see the list of data tables for each project. A green circle in the left of each table indicates if it is already in use.
Tables can be filtered by using the search bar above the list. The filter will try matching your search term against the table names and descriptions.
From the test data screen, you can also edit a test data table by clicking on the menu icon in the right corner associated with it and choosing the Import option. A modal very similar to the creation modal is presented. You can also update the table name and title by clicking on the edit icon , editing them, and hitting enter.
While importing, the CSV file may have no headers, i.e. you do not need to provide attribute names at the first line. Virtuoso will match the order of the attributes in the table with the order of the values provided in the file. If the file has more attributes than the table, the new attributes will be created, respecting the order in which they appear on the file.
The values contained in the file will completely replace the current values of the table. If you only want to add more values to the table, you may export current values to a file (see below), add the new values to the exported file, and import it back. If you import the same file twice nothing will change.
You can edit values in a data table directly. With the data table selection, hover the mouse pointer over a data row, and a bin icon should appear on the right side to allow you to delete a row. Hovering over the row also allows you to reorder it by dragging and dropping the row's anchor icon on the left. Discard and Save buttons will be enabled if there are unsaved modifications in the data table. The columns will have an information icon , and hovering over it will show the description if it has one.
Clicking on a field of an empty row will create the row and assign a number to it. This line will be saved even if nothing is written to any of the columns. This allows you to have empty values in your test data set.
Multiple rows can be deleted at once by selecting them using the checkbox located in the number column and clicking a bin icon .
Similarly, we can export multiple rows at once by clicking on the tab menu icon and choosing Export all rows or Export selected rows if any rows were selected.
In the Manage data table tab you can add, edit, remove or reorder test data attributes. Additions and modifications are saved by hitting enter or changing focus to elsewhere. A confirmation dialog is shown before deletion, but reordering has no confirmation.
Finally, in the Assigned to tab, you can see the list of journeys that are making use of the test data table and easily remove those assignments.
# AI assisted generation of rows in test data tables
If you want to add additional rows to your test data tables without manually typing them, our assistant may be able to help you. It is especially suited to create a bunch of new rows based on the existing data present in your table.
To use it, turn on the Edit with AI switch.
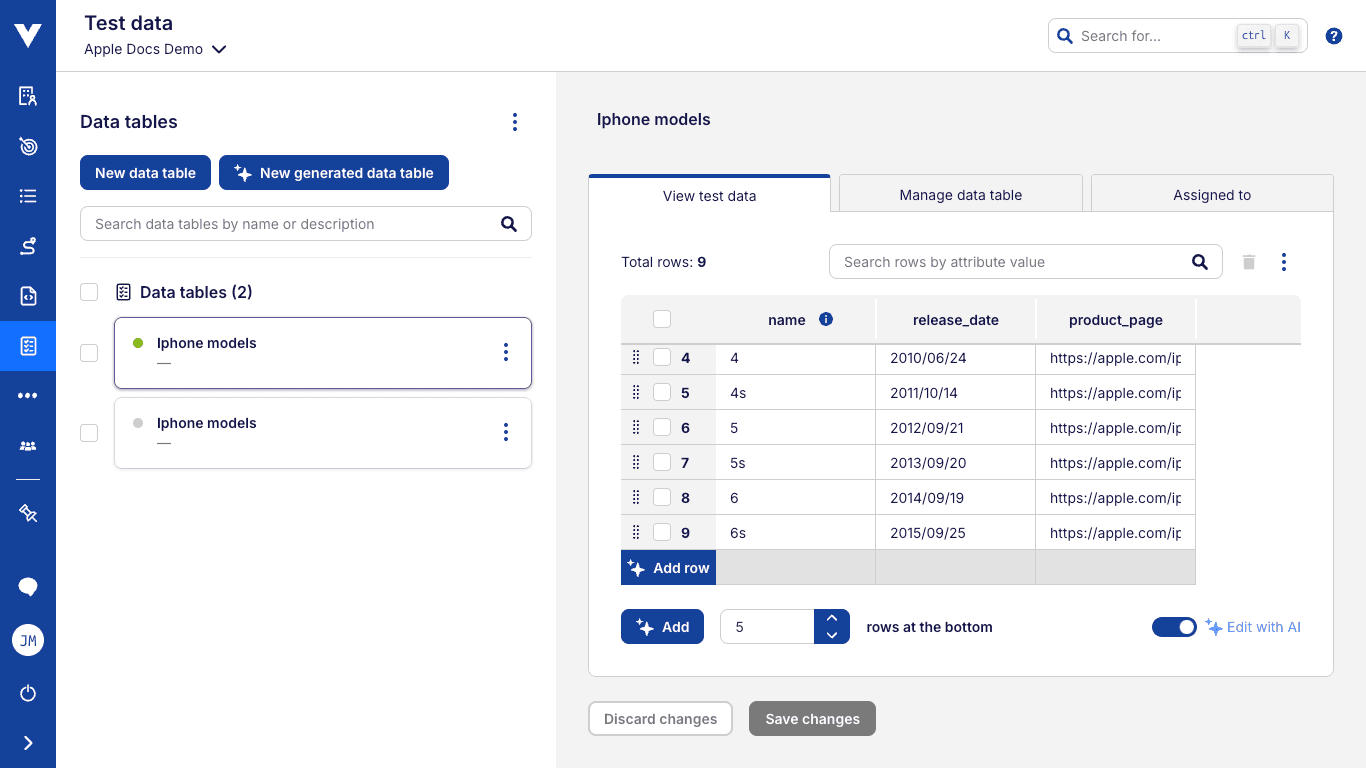
A single row can be generated using the Add row button present below the last row of the table, if you wish to add multiple rows at once just fill in the number in the input field and click on the "Add" button present beside it. The assistant will do its magic and present you with the new rows.
Once you are happy with the generated rows, save them using the Save changes button.
Assistant limits
Our assistant has limits on how much data it can generate. Please refer to our Quotas and thresholds to learn how many rows and columns of data can be generated.
You can, however, add more data to a generated table in subsequent edits.
AI-generated data
Even though it is smart, our assistant occasionally makes mistakes, just like most AI-based technology. Please check the generated data to ensure that it is safe and helps in your testing efforts..
# Managing a test data table
To add a new attribute, click on the plus icon in the top right corner of the table. The new attribute will be placed in the last position of the list.
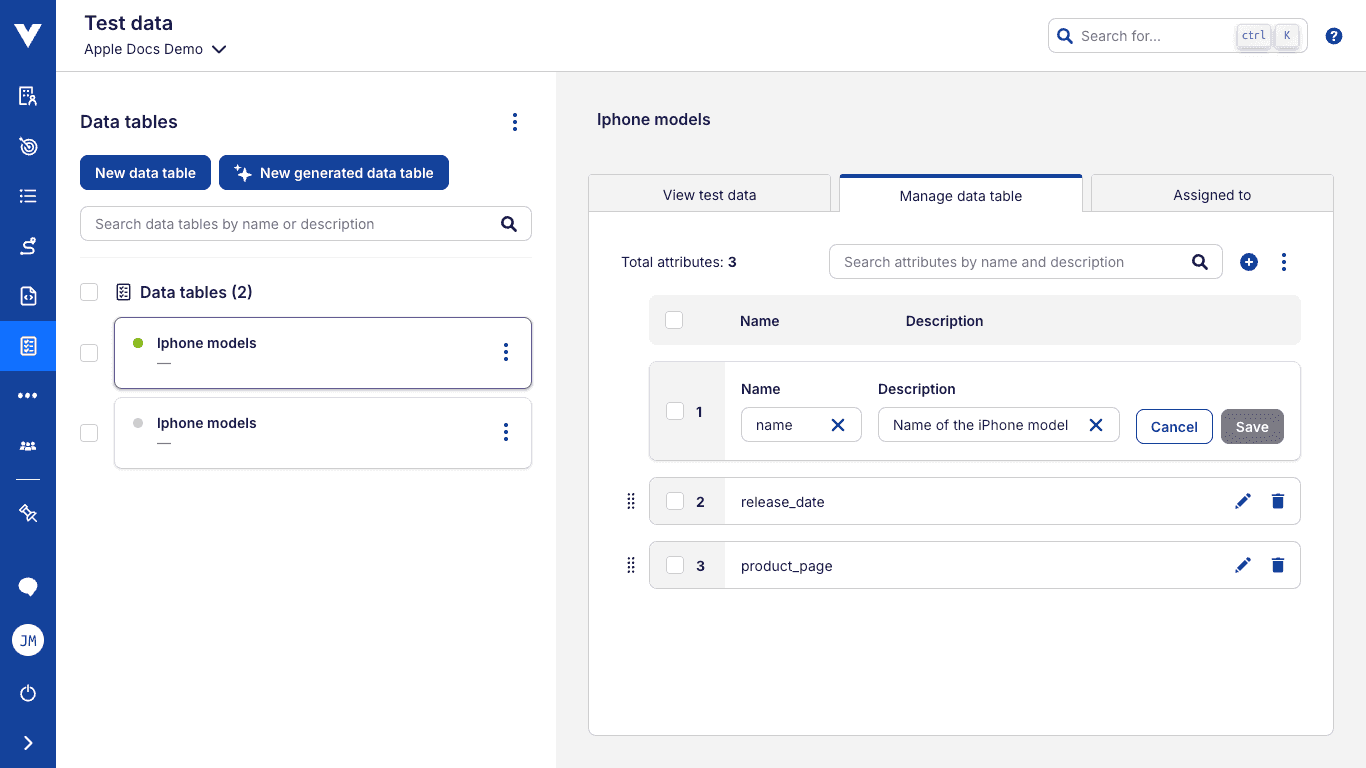
Test data attributes contain:
Name: A unique name that allows you to identify the test data attribute;
Description (optional): A small description that help you identify the test data attribute;
Once happy with the data entered, simply press enter in one of the two fields.
When the mouse pointer is over an attribute, a bin icon is shown on the right side to allow you to delete the attribute. A confirmation dialog is shown before deletion. Multiple attributes can be deleted at once by selecting them using the checkbox located at the number column, clicking on the tab menu icon , and choosing Delete selected attributes.
Hovering over an attribute also allows you to reorder it. For that, drag and drop the attribute by the attributes anchor icon shown on the left side.
# Controlling test data table assignments
In the Assigned to tab, you'll see all journeys a test data table is assigned to grouped by their respective goals. The search box above the list allows you to filter the journeys by their names and numbers.
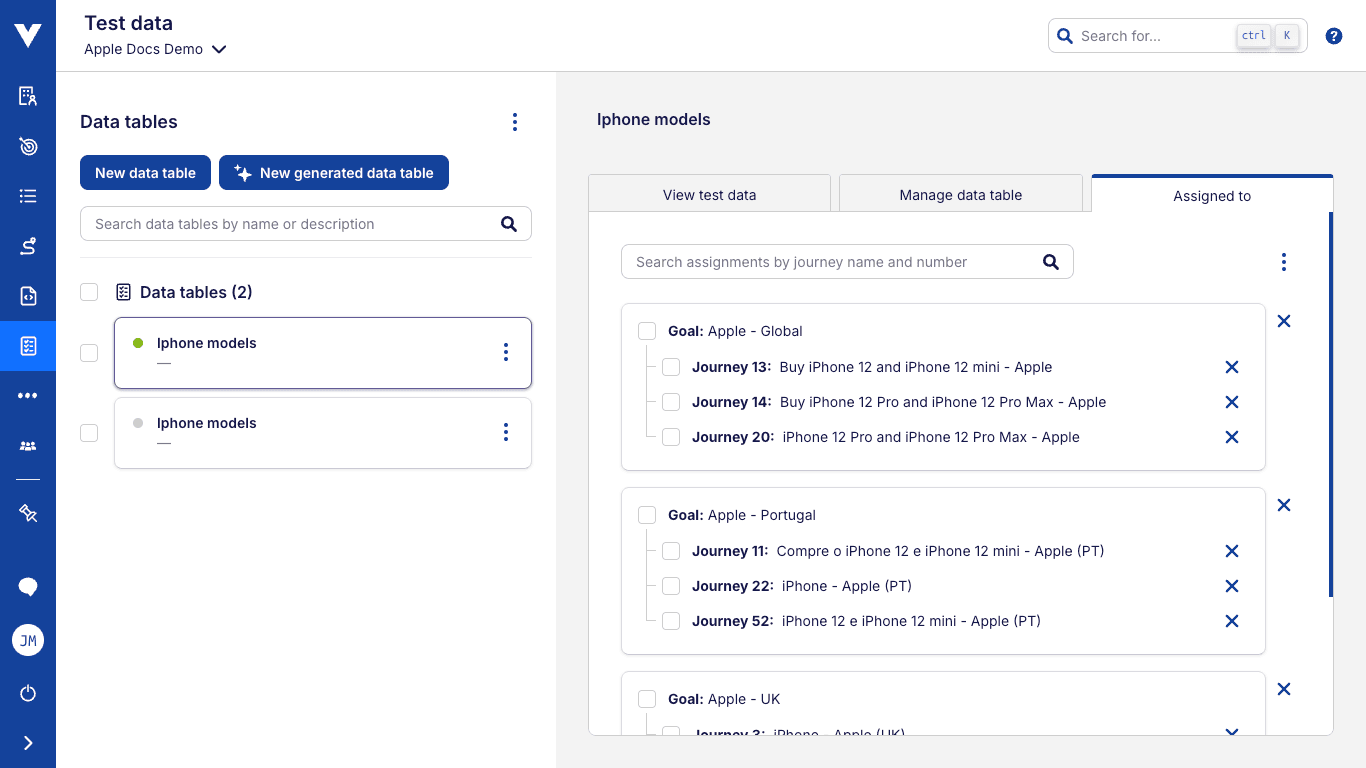
By clicking the remove icon of a journey, the association between the journey and the test data table will be removed. Likewise, by clicking the remove button next to the goal card, all associations between its journeys and the test data table will be removed.
A third option is to manually select the journeys across multiple goals, click the assignment actions icon , and then click on Remove from selected journeys.
# Using test data in a journey
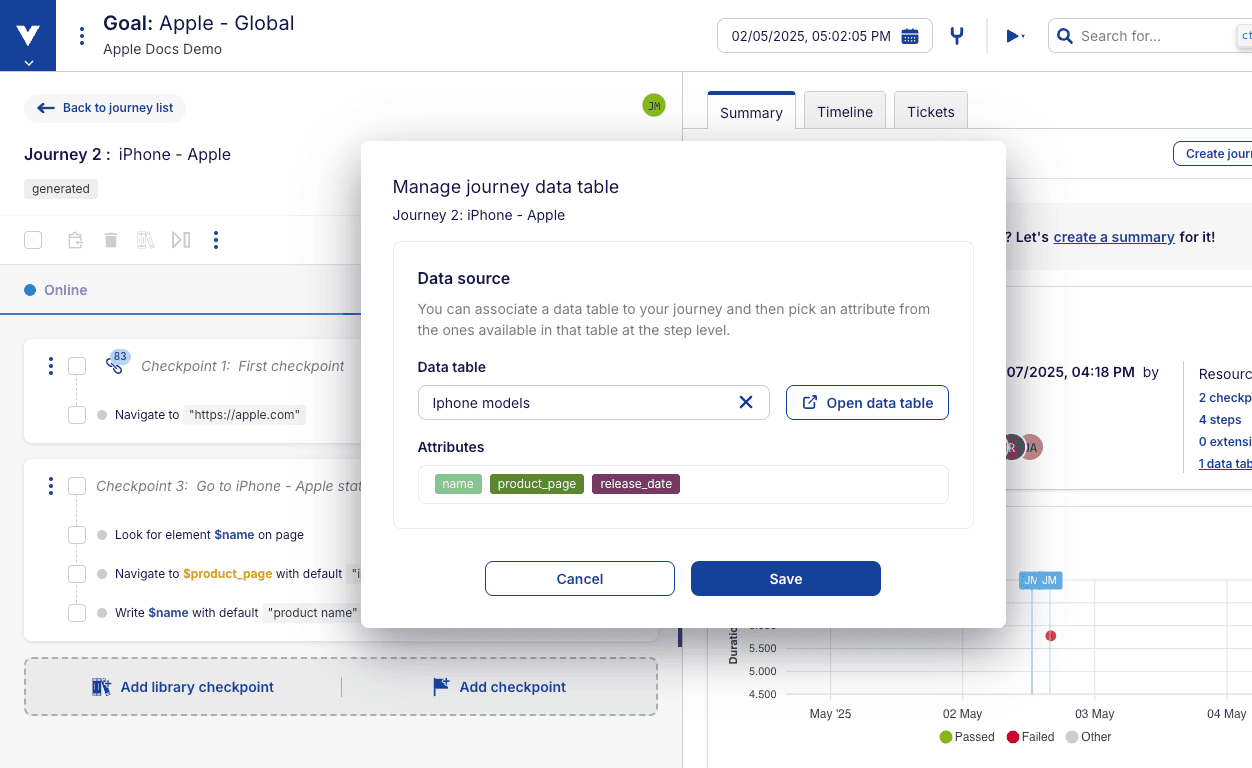
To start using test data in your tests, you should select the Manage test data option in the journey context menu, as shown in the next screenshot:

The Manage journey data table modal for the journey will be shown:
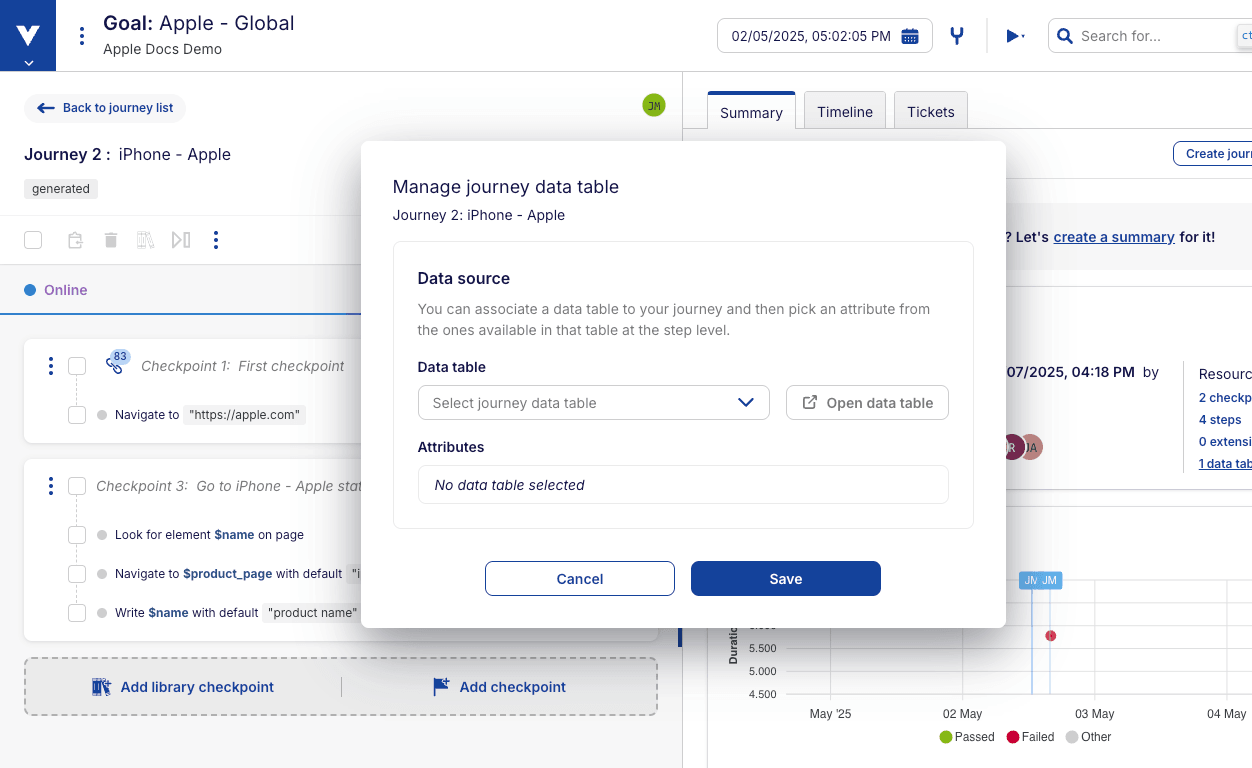
From here, you can select one of the test data tables in the project from the dropdown list. A list of that table's attributes will be shown below the dropdown.
Once the table is selected, click Save.
Open test data table from test data modal
You can open the selected test data table in a new tab by clicking on the Open data table button present beside the dropdown.
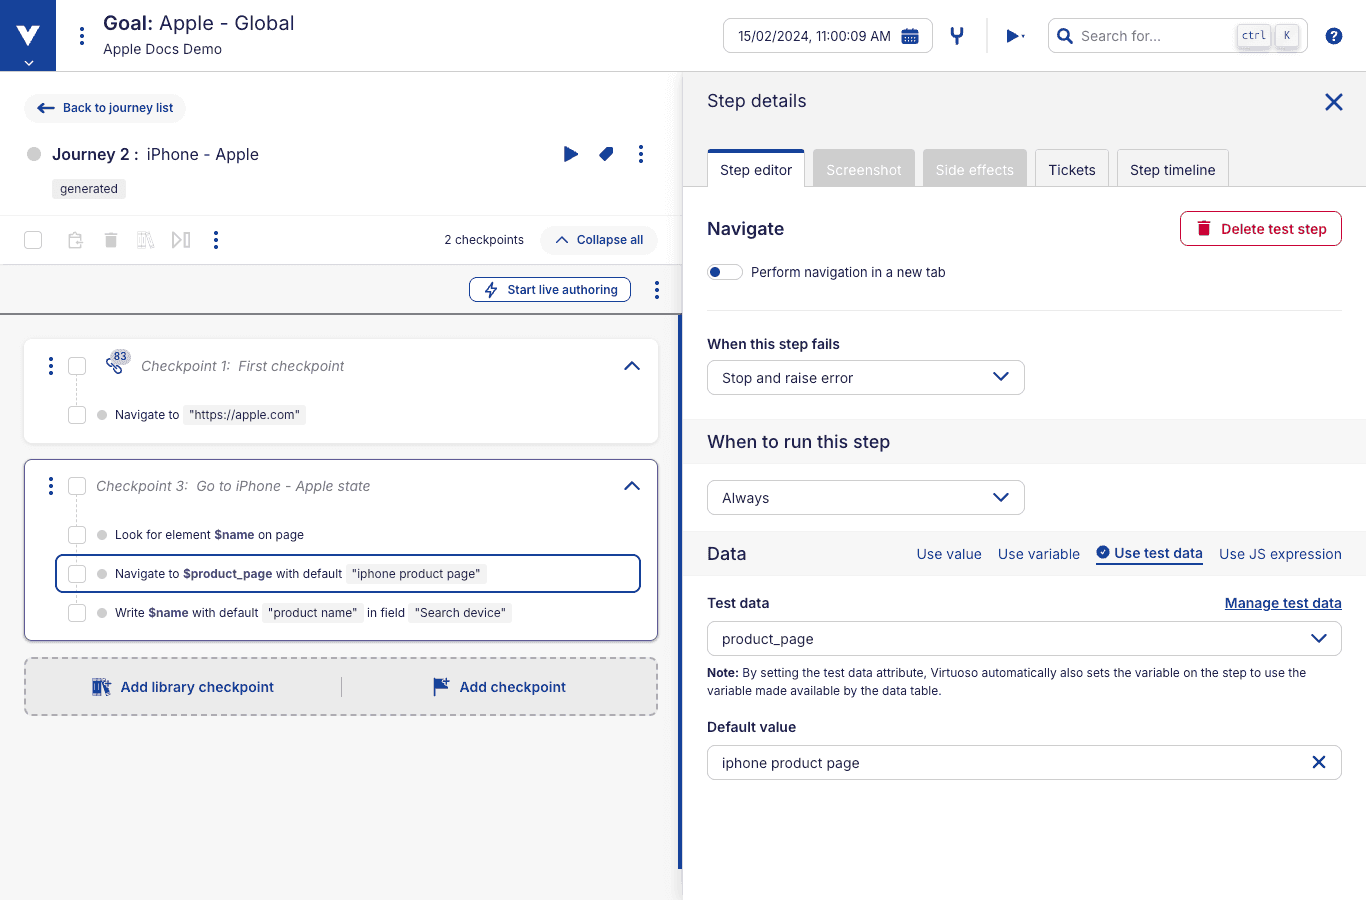
To use the table's test data in your journey you must assign it at the individual step level. There are several ways to do this:
Use variable names based on the attribute names: e.g., if you have an attribute (column) named
name, then you can use this in your steps by for examplewrite $name in "field". Any non-alphanumeric character is automatically converted to_(underscore). For example, a column "first name" becomes$first_name.Select the attribute in the step properties panel: having a test data table already assigned to a journey, click a step to select it and look for the
Test dataselector in the step properties panel on the right side of the screen and choose one of the attributes from the list.The default value provided to a test step will be ignored if a test data attribute is assigned.
Edit the step's selector options: for steps where Virtuoso will interact with an element in the page, you can enter the name of an attribute from the associated data table as
Variablein theSelector Optionsmodal.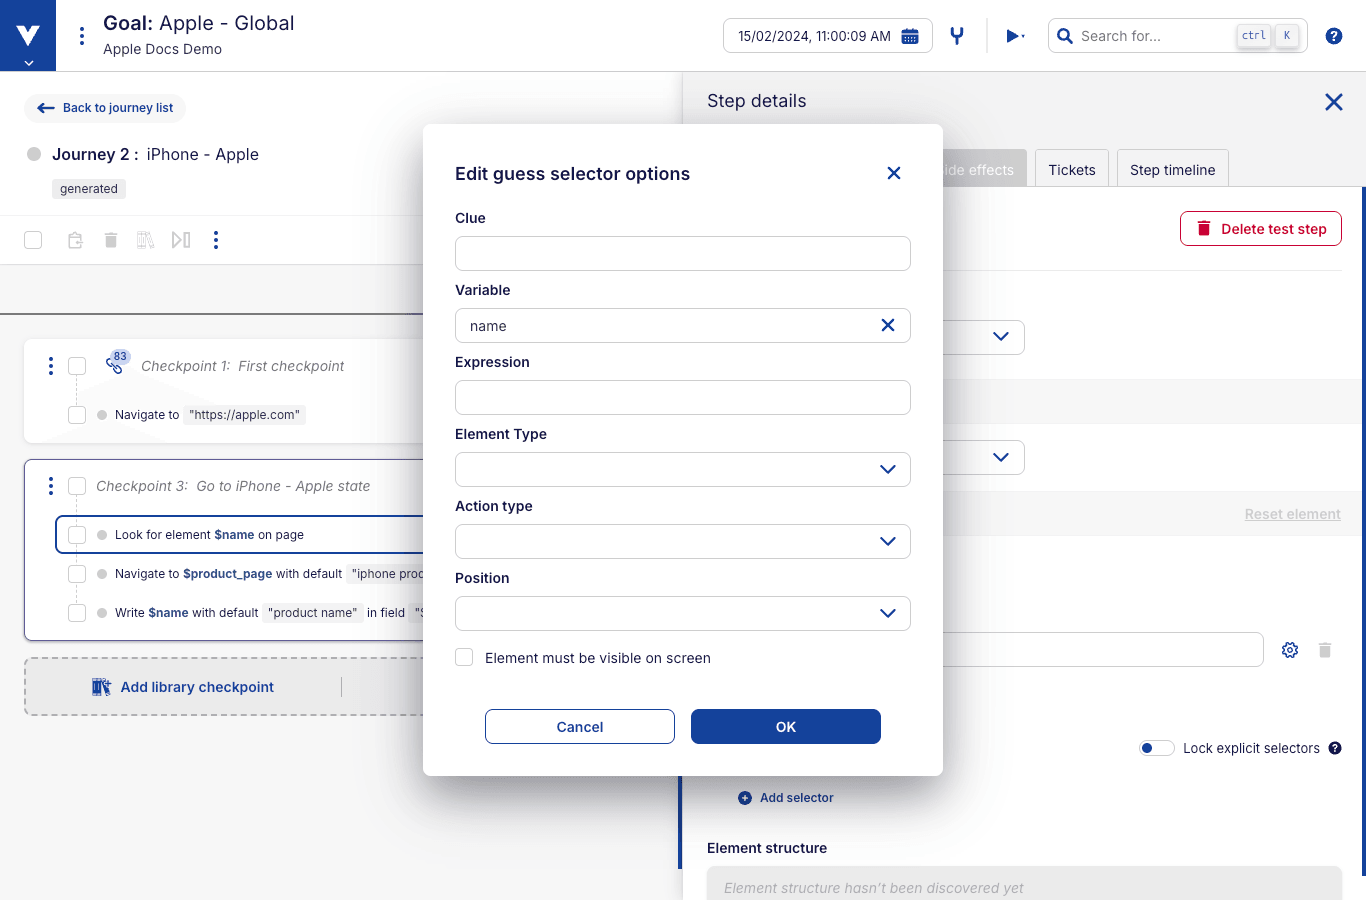
# Executing using test data
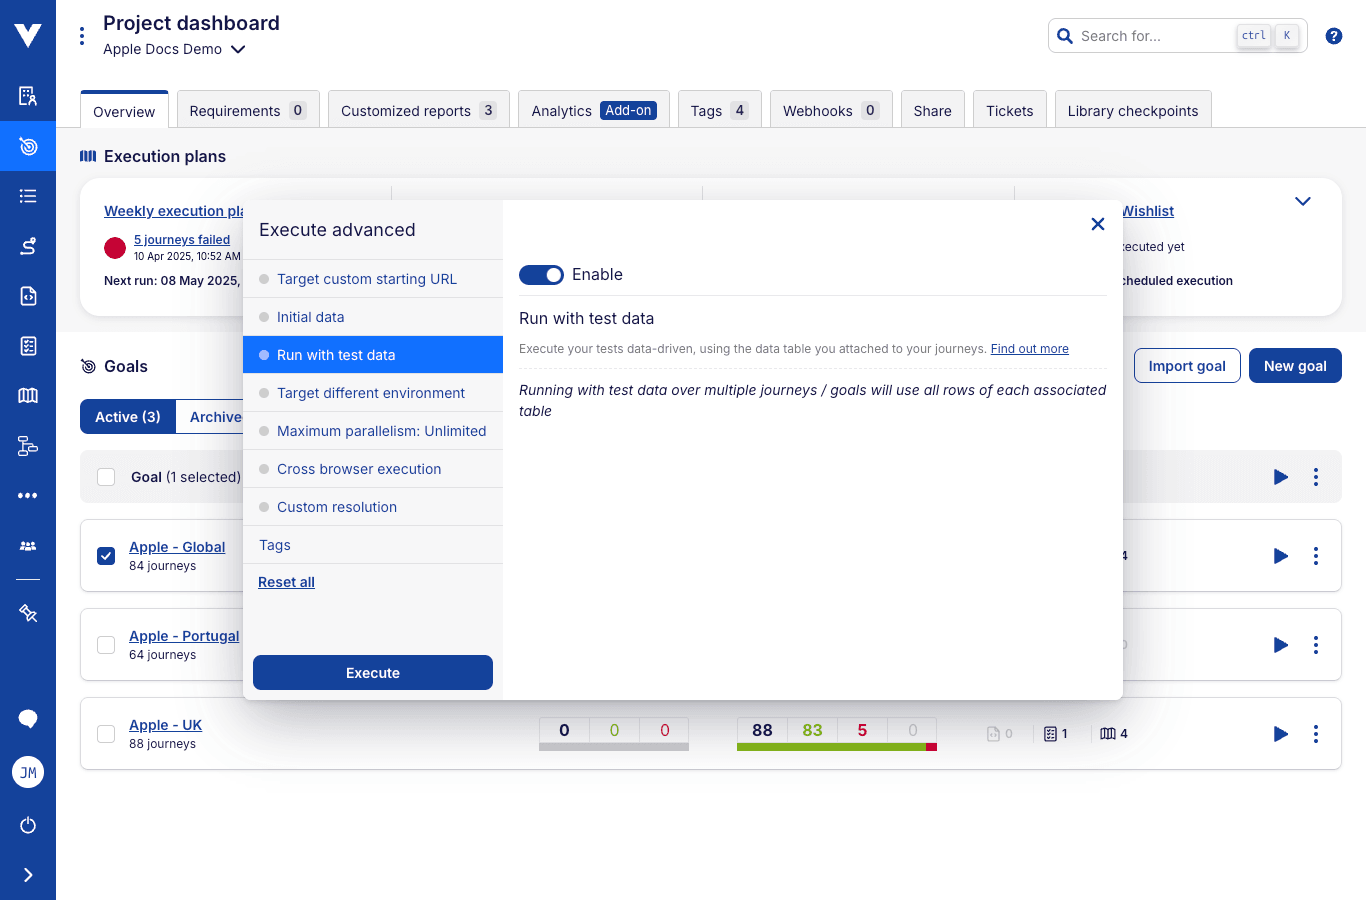
Once your journeys have test data tables associated, and attributes have been assigned to test steps, test data will be used when executing those tests. On standard executions, only the first data row of each table will be used. If you wish to execute for more than one row of data, you can do so by using the Execute advanced option that exists in goal and journey context menus.
In the advanced execution modal, toggle the Run with test data option to launch executions relying on the data tables: each journey will use its own assigned data table, if configured, and will run once per row. The Execute advanced option is available even when multiple goals or journeys are selected.
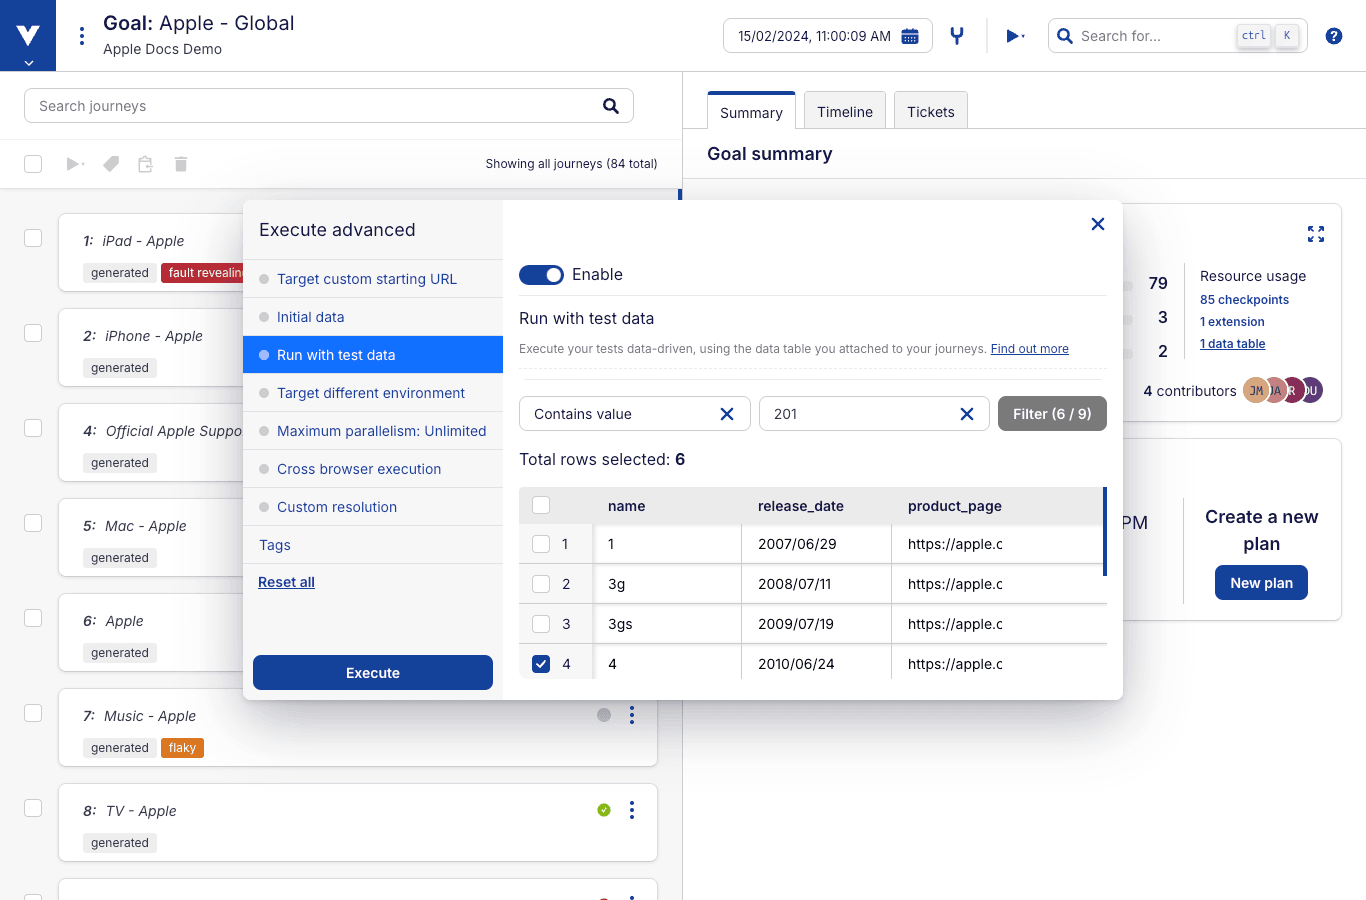
When calling an advanced execution over a single journey with an associated data table you have the added option to manually select a subset of rows from that table. Only the selected rows will be used in the execution.
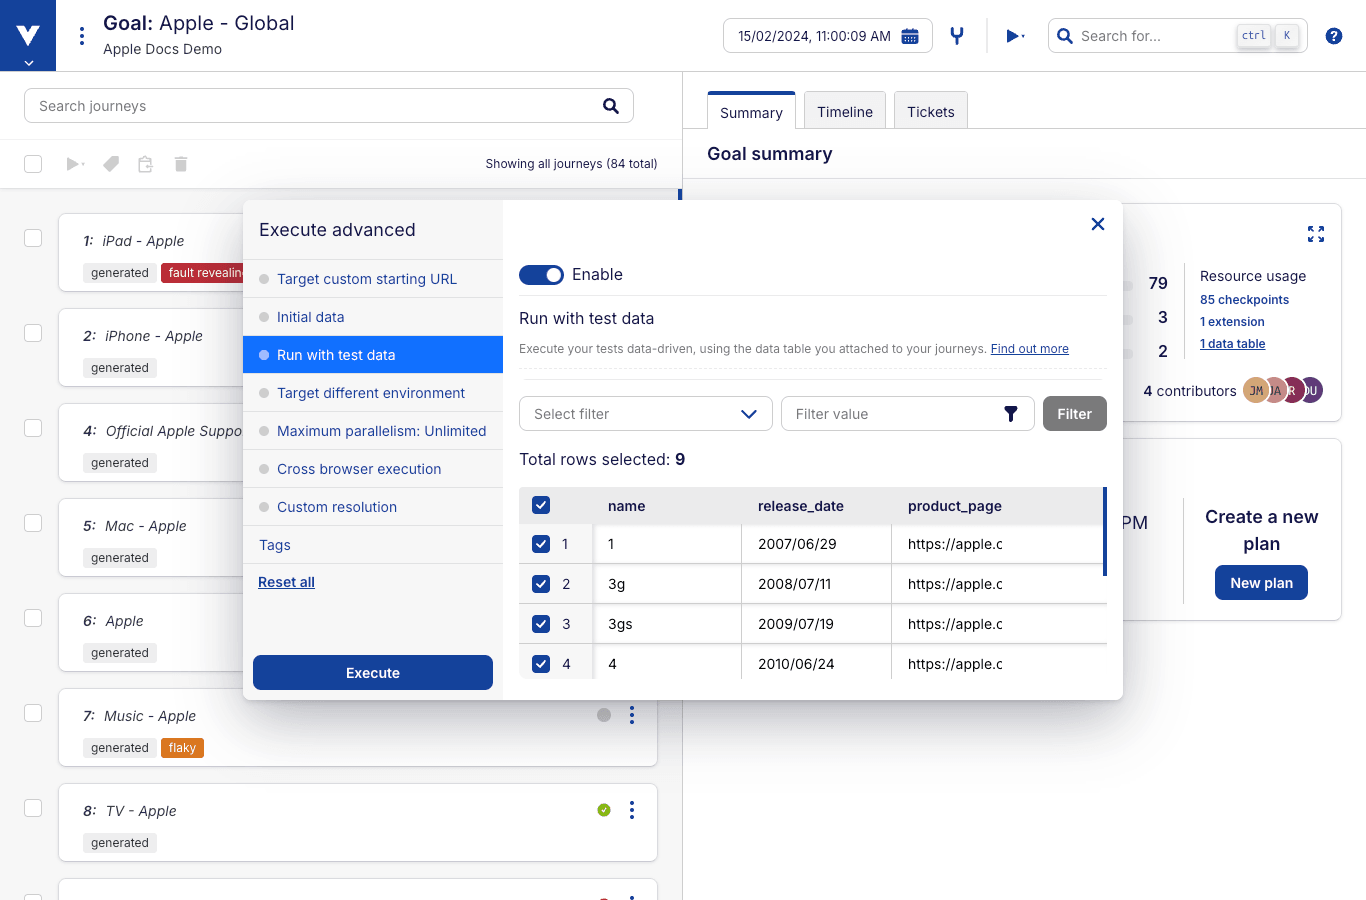
To select rows you can pick them one-by-one from the data table or you can use filters to select several that share common characteristics. First, pick a filter type, and then give it a filter value. The rows that match the filter will be highlighted and can be selected by clicking the Filter button. Available filters are:
- Contains value - row matches if any of its attributes contains the filter
value; - Does not contain value - row matches if none of its attributes contains the filter
value;
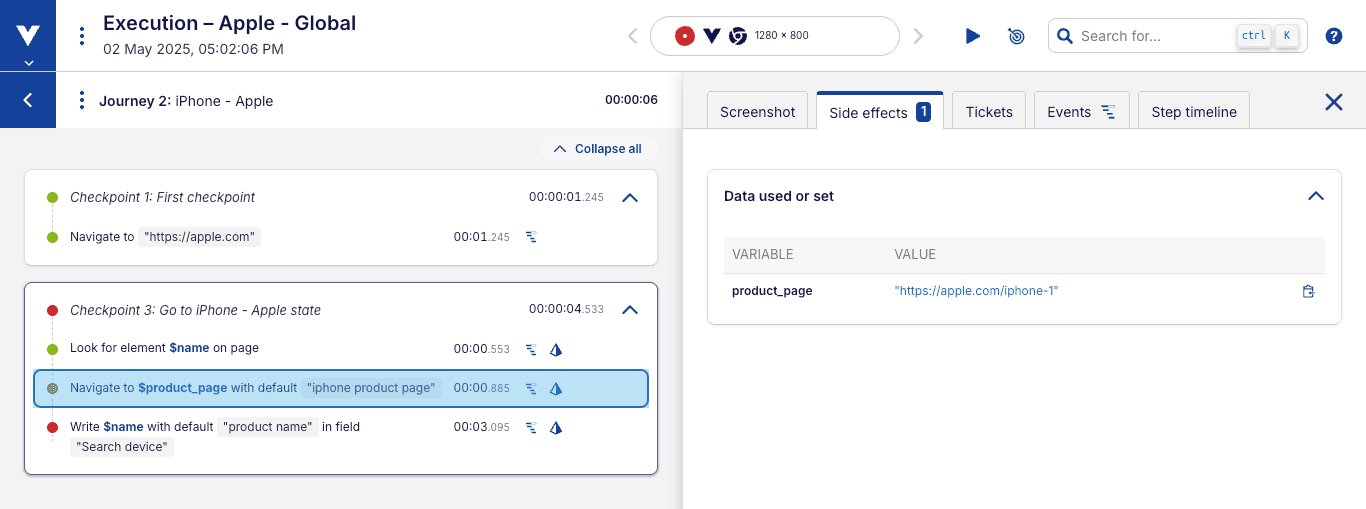
# Visualizing results on the execution report
The execution report of a journey that is associated with a test data table shows the execution results for each data row of your table that was executed. You can navigate among results by clicking on the execution sequence number shown in the upper left corner.
# Initial data for journeys
Virtuoso allows you to use data in your tests through multiple means, such as data tables, environment variables, etc. An alternative way to test your journeys is to provide initial data for one shot data-driven tests in Virtuoso, using Initial data.
To use this, on "Advanced execution" of the journeys, click on Initial data to enable adding the data into your journeys, as inputs to your tests.

Here you can define associations between variable names and their values, which become available when the journey begins to execute. Click Save to confirm the values added for the variable associations, close the modal, and click on Execute to start the execution of the journey.
This will execute the journey with the values added for the associations of the variables, supplied in the Initial data.
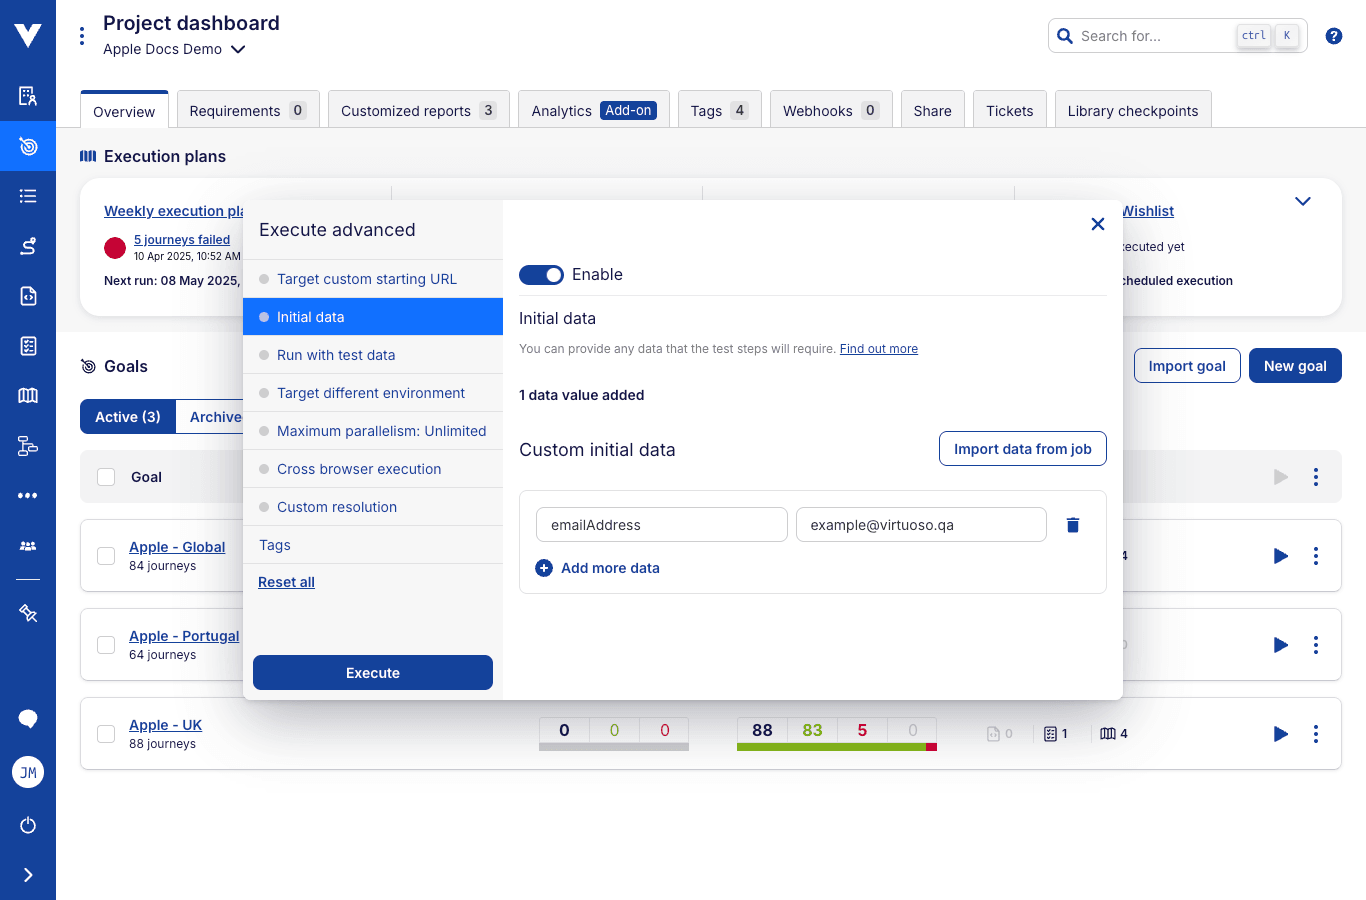
Alternatively, you can also use initial data from any other previous execution job by clicking on Import data from job button, finding the job you want to copy and then clicking on it to import its data.
The filters on the left side of the job selection modal can be used to quickly find the job you want to import the initial data from, and jobs with initial data can be expanded to reveal it, before they are added to the current Advanced Execution configuration.
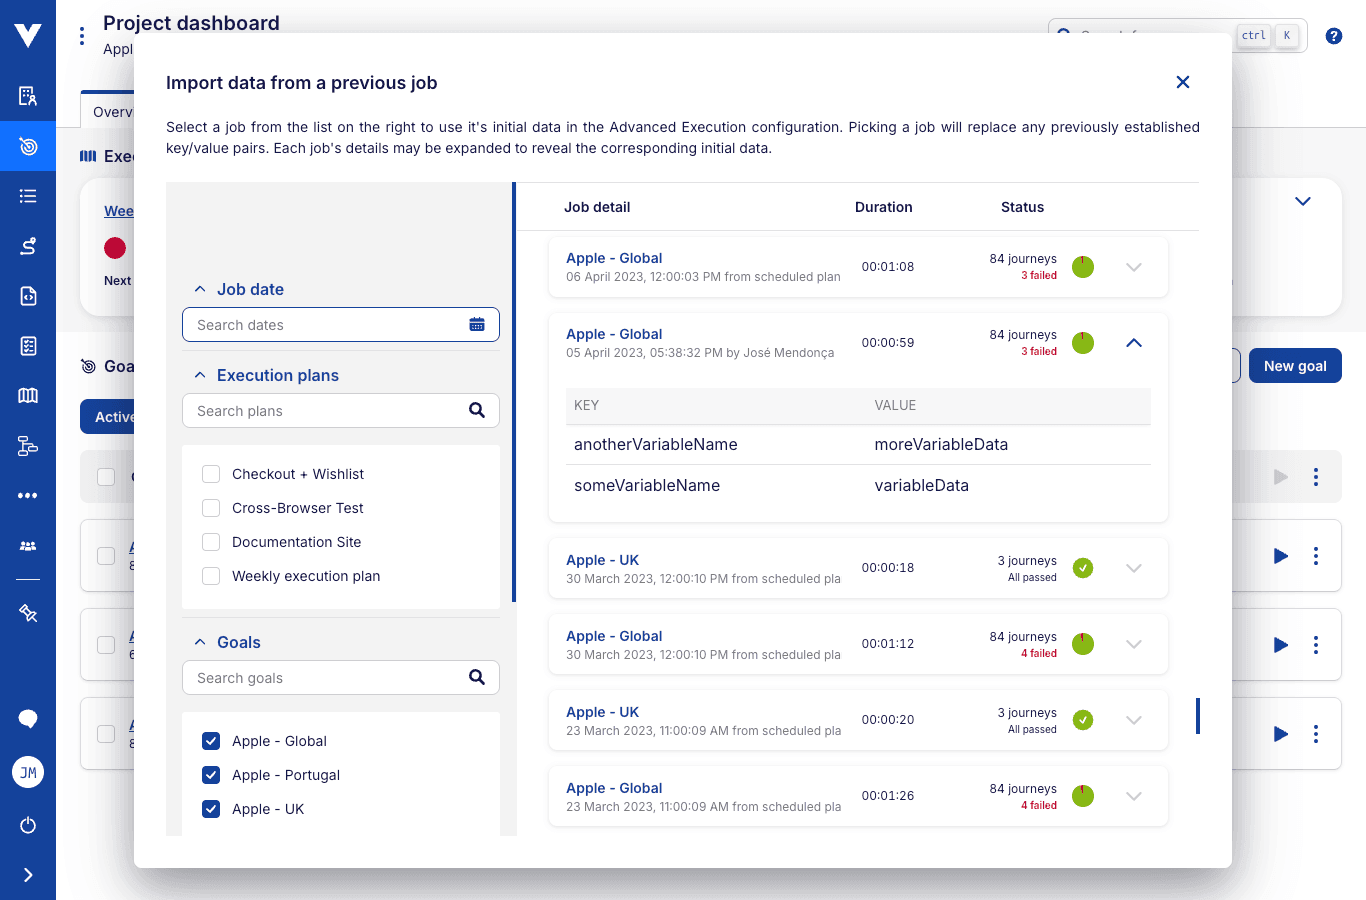
Data is overwritten when a job is selected
Picking any job from the list will cause any other previously established data to be replaced.
If you wish to start from a previous job's initial data and then add some changes to it, select the job first and change or add to it afterwards.
# Data source hierarchy
Data used in journey steps can have multiple and independent sources. Because of that, the same variable can be defined in multiple places. The order in which they are used in the context of a journey execution is as follows:
- Variables created in previous journey steps (store, execute, etc.)
- Data tables
- Initial data (advanced execution)
- Environment variables
- Own variables
- Parent environment (for cases where an environment inherits from another)
The higher a source is in the list, the higher its priority. For example, if a variable is defined in both the environment and the initial data, the initial data value will be used.