
# Requirements
Requirements are the statements of what your application must do, held in a Virtuoso project alongside the journeys that test them. Each requirement has a description, a risk assessment, tags, a version history and a list of linked journeys, and the Requirements screen shows at a glance which requirements are covered by tests and how those tests are doing.
Requirements has its own place in the project navigation. It replaces the Requirements tab that used to sit on the Project Dashboard; old links to that tab now open the new screen.
If your organisation uses Touchstone, the same screen is also where requirements are generated from your source documents and kept in step with them as they change. This page covers what every project sees. See What Touchstone adds for the extra capabilities.
# What a requirement holds
- Name. Unique within the project. Shown in the list and on the requirement itself.
- Description. The behaviour to be tested, written in Markdown. It can be a sentence or a full specification with scope, preconditions and acceptance criteria. If it's written in Gherkin, it can also be used to generate journeys from Gherkin syntax.
- Risk assessment. Critical, High, Medium or Low. New requirements default to Medium, and a requirement can also be left with no risk set.
- Tags. Labels for grouping and filtering requirements. Use the project's existing tags or create a new one from the requirement.
- Linked journeys. The journeys that test the requirement, each shown as published or draft.
- Version. A number that goes up each time the name or description changes. See Version history.
- Contribution details. Who last changed the requirement, and when.
# Getting started
Select Requirements in the project navigation. In a project with no requirements yet, the screen explains what requirements are for and offers two ways in:
- Import requirements, to turn existing files into requirements. See Importing requirements from files.
- Create a new requirement, to write one from scratch. See Creating a requirement.
Either way, the next step is to link journeys to each requirement so you can track its coverage and how its tests are doing. Once a project has requirements, the same options are under Import/add requirements at the top of the list.
# Creating requirements
Select Import/add requirements at the top of the list. The dialog has two tabs: Import requirements and New requirement.
# Creating a requirement
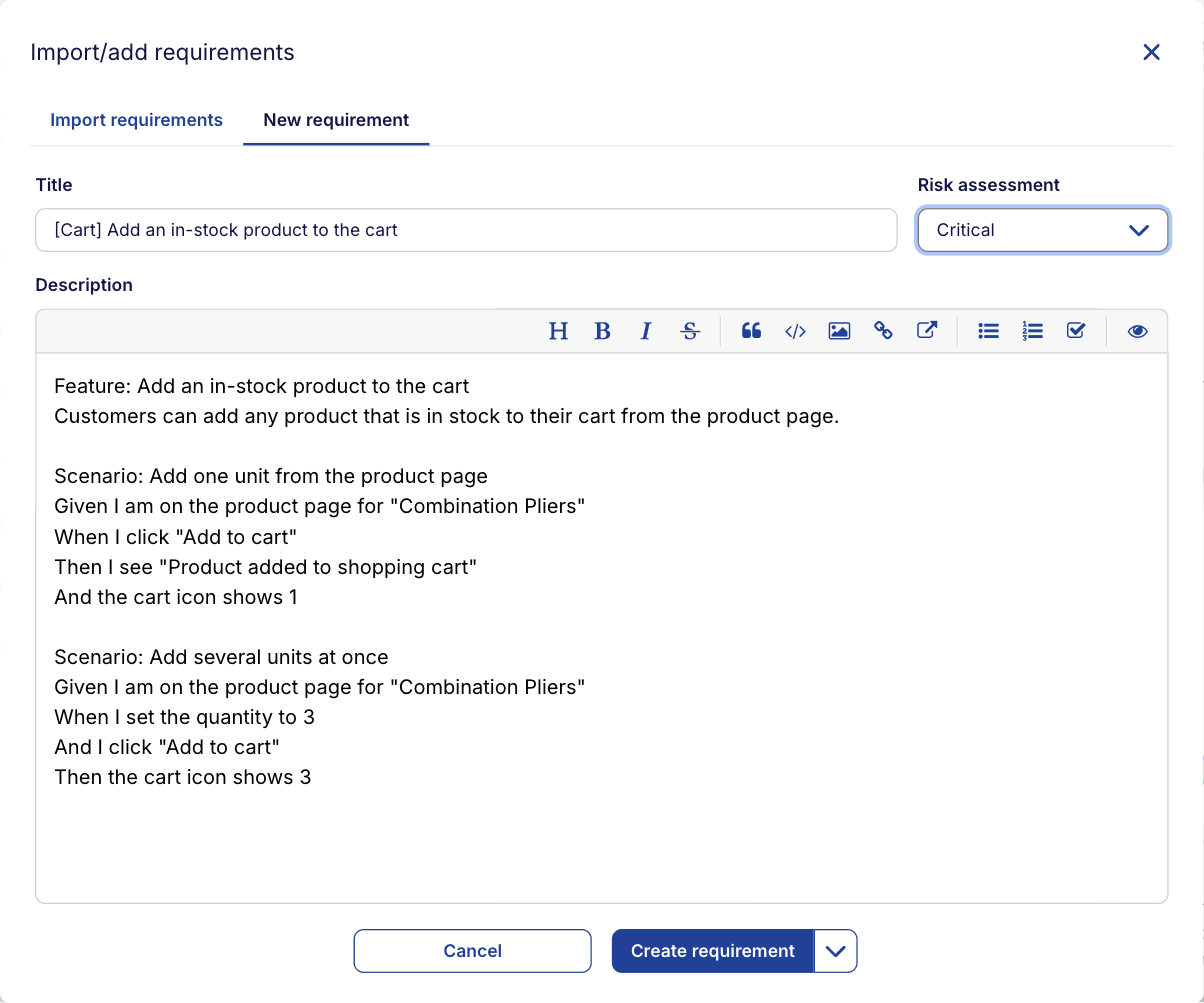
- Open the New requirement tab.
- Enter a Title. This becomes the requirement's name, so it must be unique in the project.
- Set the Risk assessment. It defaults to Medium.
- Write the Description. Markdown is supported, so headings, lists and tables render in the requirement.
- Select Create requirement. To add several in a row, open the arrow beside the button and choose Create & add another: the requirement is saved and the form resets so you can create the next one.
The requirement appears in the list as version 1, with no journeys linked yet.
# Importing requirements from files
Importing turns existing files into requirements, one requirement per file.
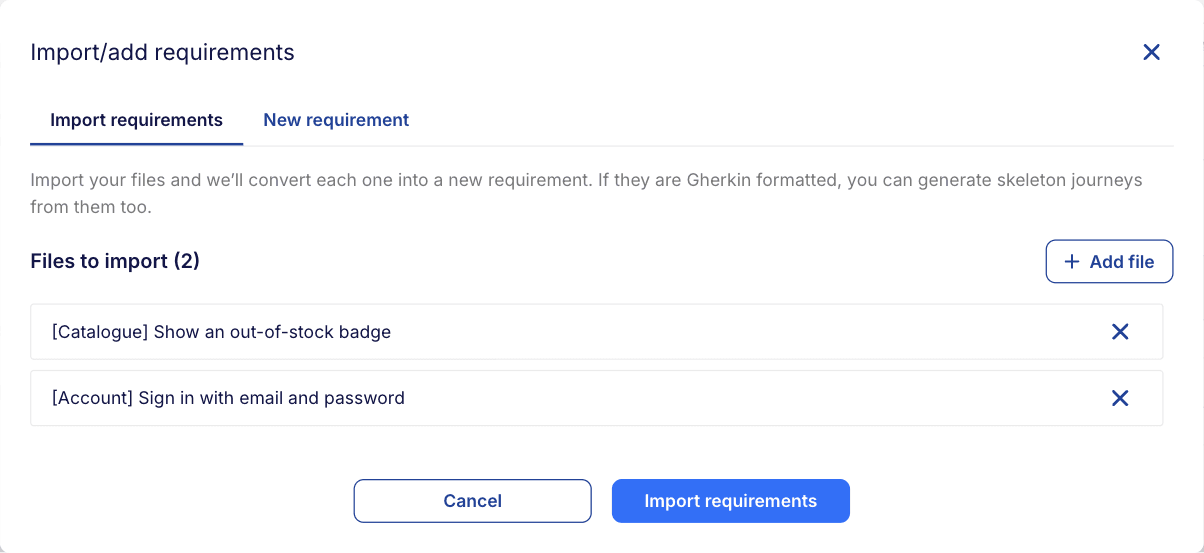
- Open the Import requirements tab.
- Drag files onto the dialog, or click the drop area to browse for them. You can add several at once, and Add file lets you keep adding to the list before you import.
- Check the list. The file name, without its extension, becomes the requirement name, and the file's contents become the description, read as plain text. A file over 1 MB, or one that can't be read, is flagged and skipped.
- Select Import requirements. Each file that succeeds becomes a requirement, and any that fail show the reason beside them, for example a name that's already in use.
- Select Done to close the dialog, or Import more files to start another batch.
Imported requirements have no risk assessment set. Open each one afterwards to set it, or filter the list by Not set risk to find them all.
TIP
Write requirement files in Markdown. The description renders it, so a .md file with headings and acceptance criteria imports as a properly structured requirement. A file written in Gherkin can be used to generate journeys from Gherkin syntax once it's imported.
# The requirements list
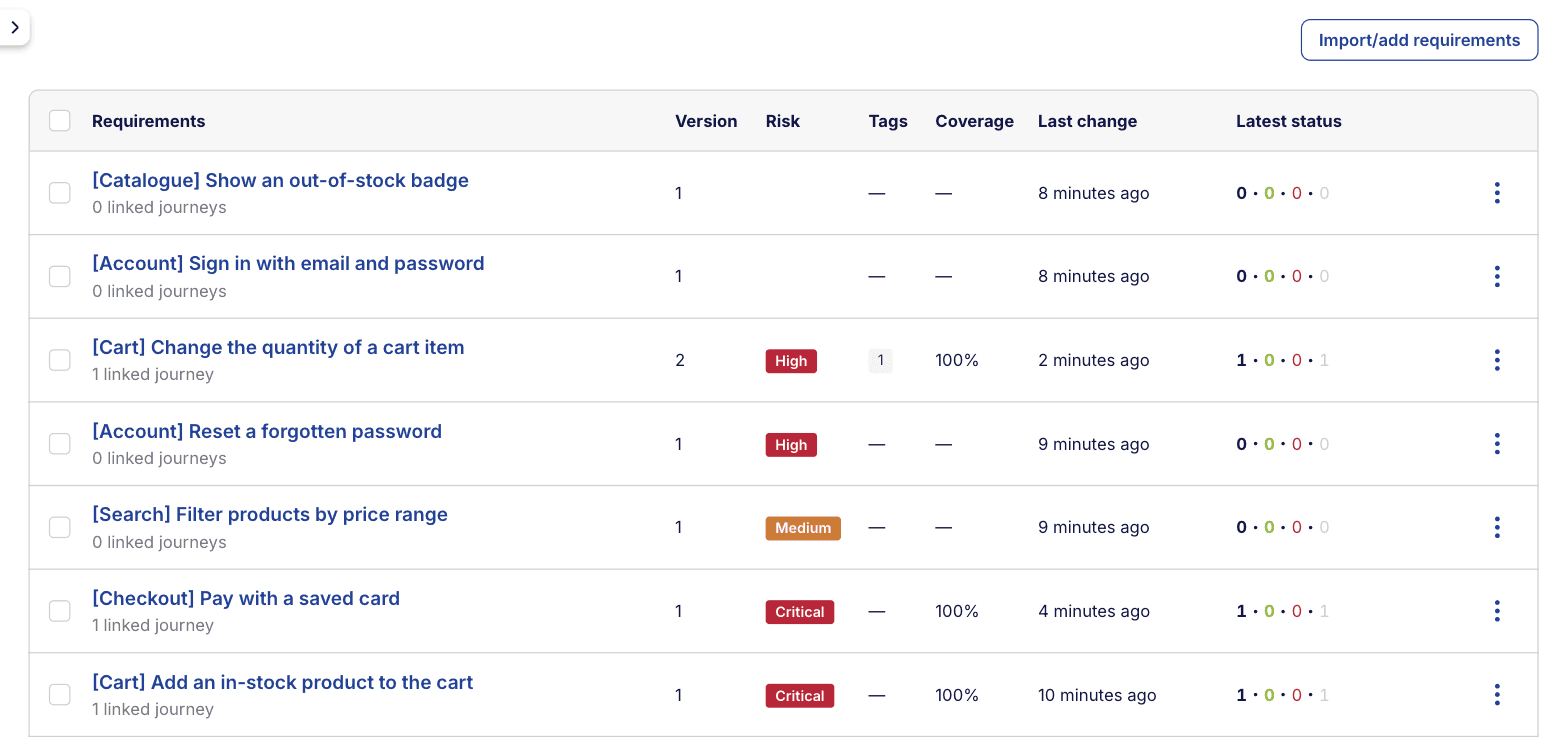
The list shows every requirement in the project in a table.
| Column | What it shows |
|---|---|
| Requirements | The name, with the number of linked journeys underneath |
| Version | The current version number |
| Risk | The risk assessment, as a coloured badge. Empty if no risk is set |
| Tags | How many tags are applied. Hover over the number to see them |
| Coverage | Whether at least one journey is linked. A dash means none is |
| Last change | How long ago the requirement was last edited |
| Latest status | Four numbers for the linked journeys, based on each journey's most recent execution: how many journeys are linked, how many passed, how many failed and how many haven't run. Hover over a number to see which is which |
Select a requirement's name to open it. The ⋮ menu on each row offers Edit requirement, Link journeys and Delete requirement. To delete several at once, select their checkboxes and use the ⋮ menu in the table header.
# Finding requirements
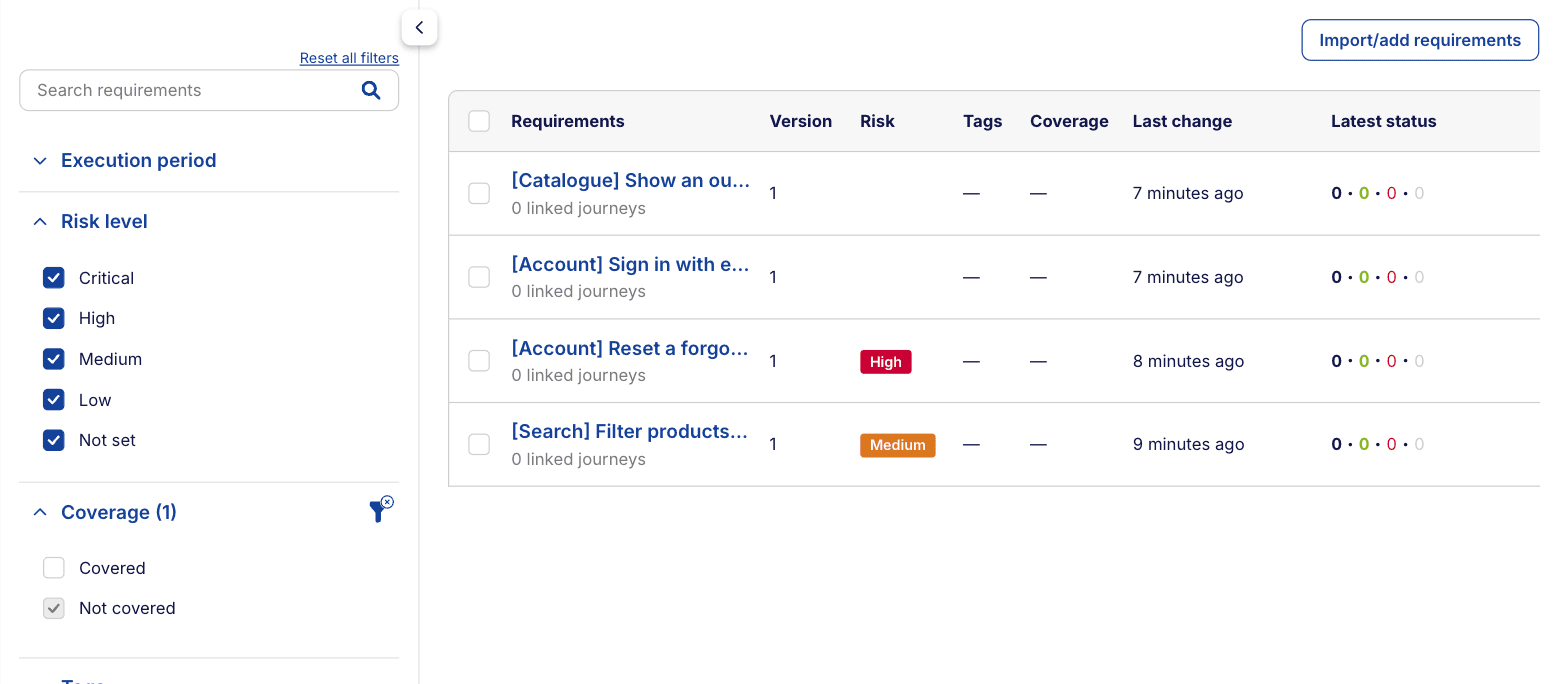
The filter panel sits to the left of the list. Use the arrow at its edge to hide it and give the table more room. Search requirements at the top of the panel matches on the requirement name, and the sections below narrow the list further:
- Execution period: sets the date range for the execution figures shown. It doesn't change which requirements are listed.
- Risk level: Critical, High, Medium, Low and Not set. All are ticked to start with, so untick the ones you don't want to see.
- Coverage: Covered and Not covered, both ticked to start with. Untick Covered to see only the gaps.
- Tags: requirements carrying any of the selected tags.
- Created date and Updated date: date ranges.
Filters combine, so "Critical and Not covered" is a single view. Each section shows how many of its options are applied. The filters are kept in the page address, so a filtered view can be bookmarked or shared. Reset all filters, at the top of the panel, clears them.
# Working with a requirement
Opening a requirement shows its name at the top. Select the edit icon beside it to rename it, or use the ⋮ menu to delete it. Below are the tabs Overview, Journeys and Version History. Version History is available once a requirement has more than one version: see Version history.
# Overview
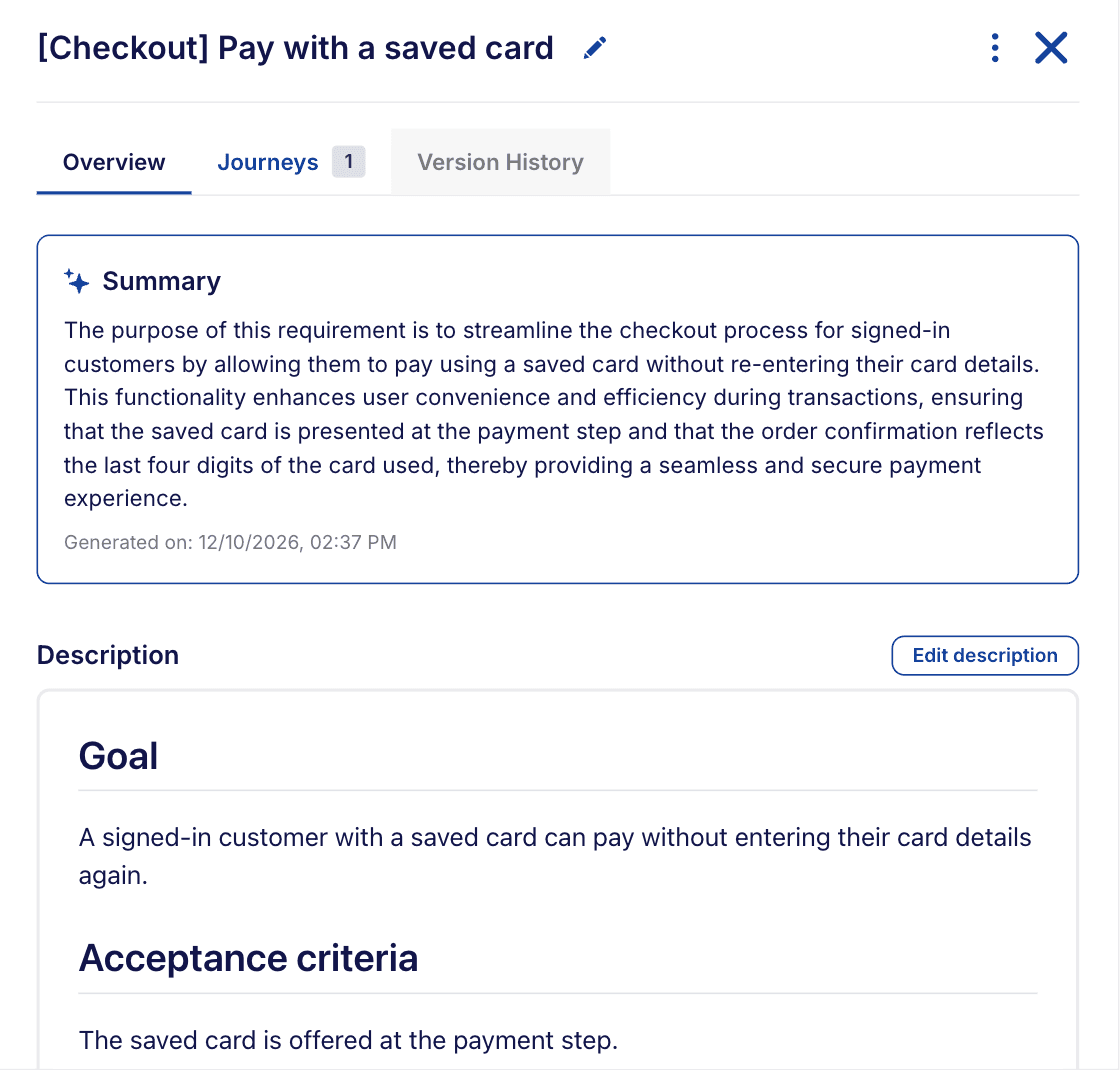
Once the description is long enough, Virtuoso adds a short Summary of it at the top of the tab, generated by AI, with the date it was generated.
The description is shown rendered. Select Edit description to change it in a Markdown editor.
The details panel alongside holds:
- Risk assessment: change it directly from the dropdown.
- Tags: add or remove them in place, or type a new name to create a tag.
- Executions: how many times the linked journeys ran in the last 30 days, split into passed and failed.
- Latest status: the same four numbers as the list's Latest status column.
- Contribution details: who last changed the requirement, and when.
# Journeys
The journeys linked to this requirement, with a Published / Draft toggle showing how many of each there are, and a search box for the goal or journey name. Published journeys show when they last ran, and Execute journey runs one from here. Draft journeys show when they were last updated and by whom. Select several journeys to Execute or Unlink them together.
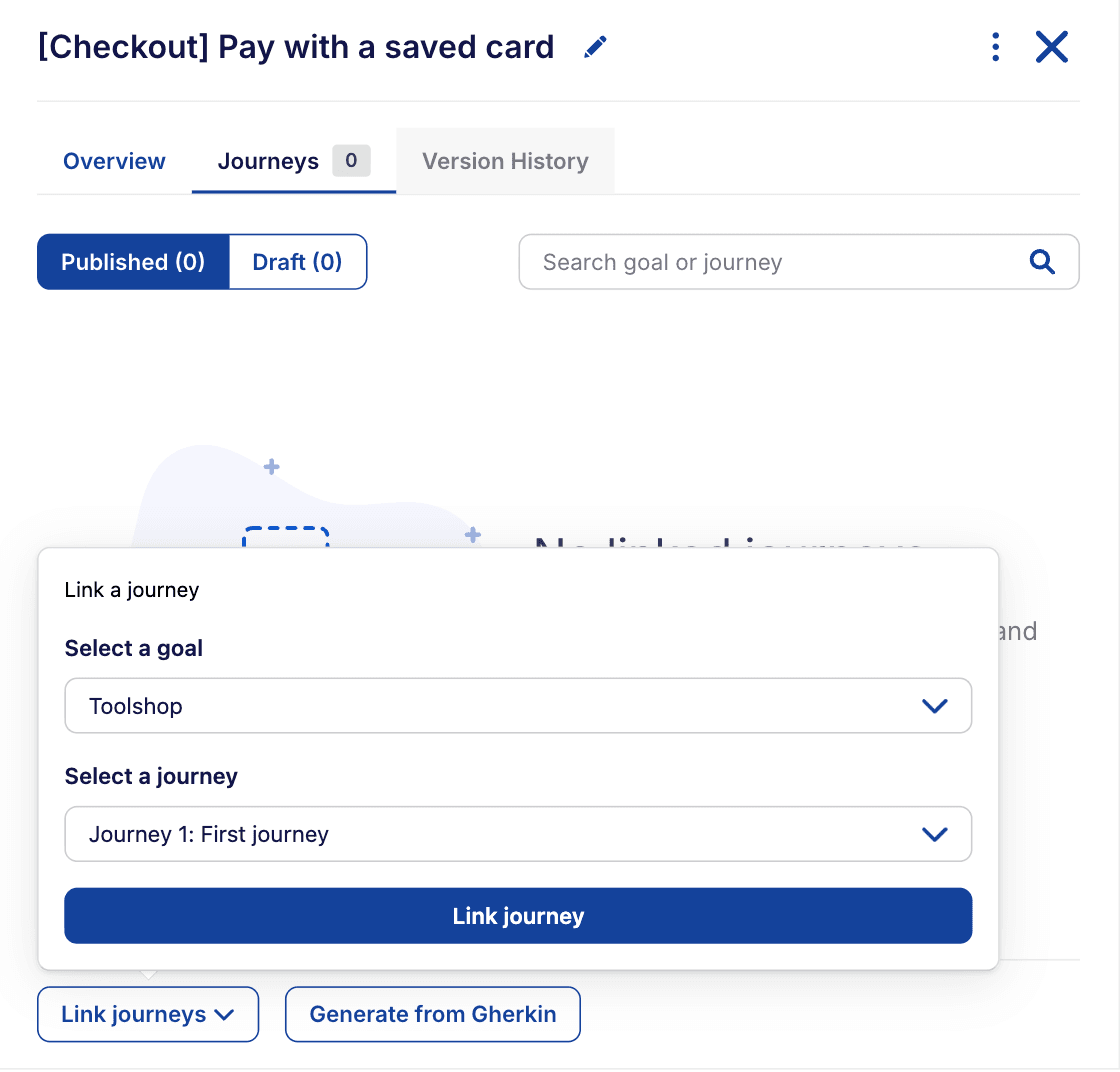
Linking journeys. Select Link journeys at the bottom of the tab and choose a goal under Select a goal. Then either pick one journey under Select a journey and select Link journey, or leave it on All journeys and select Link journeys to link every journey in that goal that isn't linked yet, drafts included. You can also start from the list, with Link journeys in a requirement's ⋮ menu. A journey can be linked to more than one requirement.
Unlinking a journey. Choose Unlink journey on a row. You're asked to confirm, because the requirement loses that coverage. The journey itself is untouched and stays in its goal.
# Draft and published journeys
Virtuoso journeys have a lifecycle of their own: a new journey starts as a draft and is published when it's ready. Execution plans only run published journeys, and an organisation can restrict publishing to project managers.
The Journeys tab shows the two separately so you can tell live coverage from work in progress. A requirement whose only linked journeys are drafts counts as covered, but nothing is testing it in a plan yet. Publishing happens from the journey, not from the requirement: open it in its goal and select Publish.
# Generating journeys from Gherkin
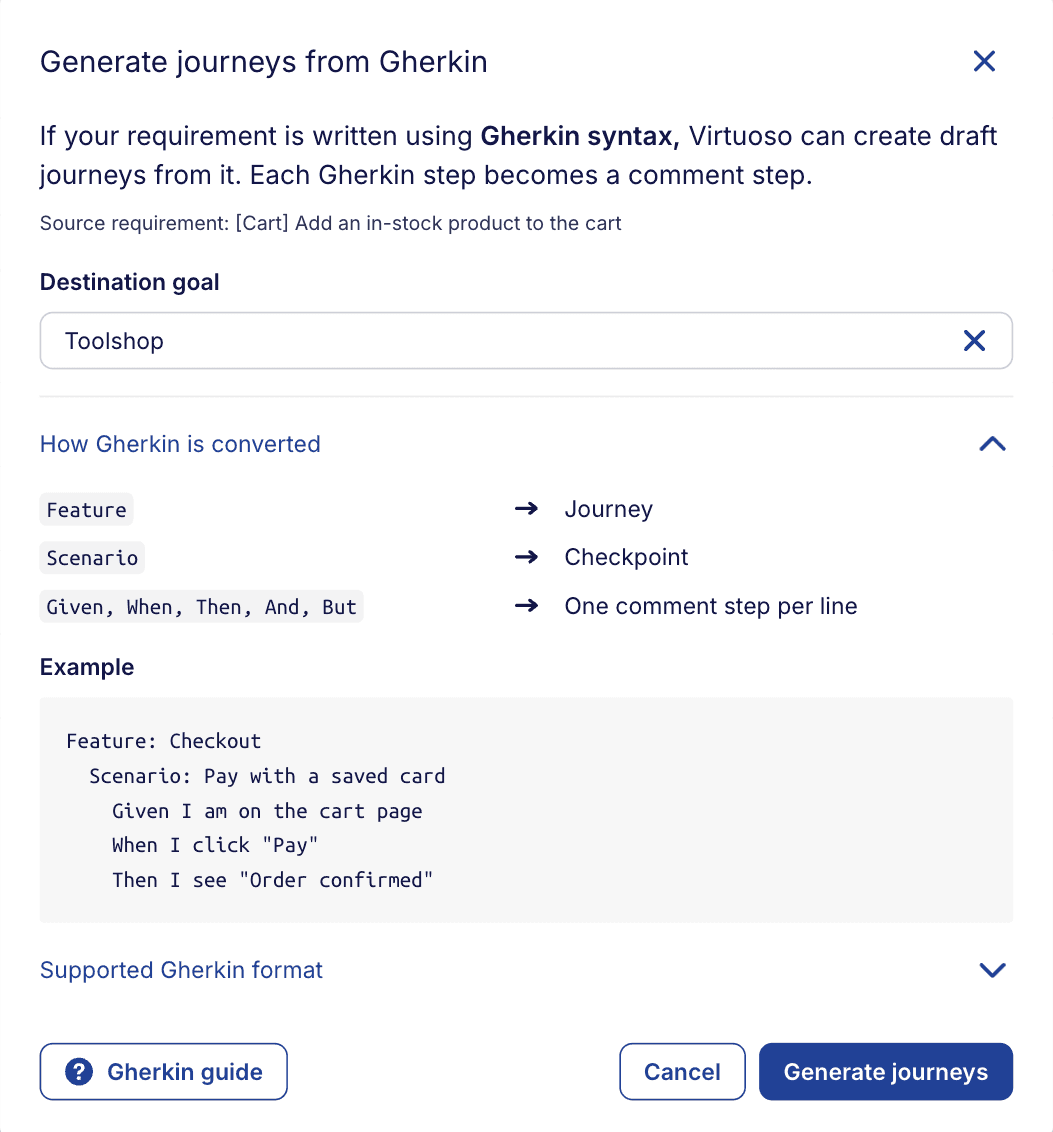
If a requirement's description is written in Gherkin syntax (opens new window), Virtuoso can create draft journeys from it, giving you a skeleton to build each test on.
- Open the requirement and go to its Journeys tab.
- Select Generate from Gherkin.
- Under Destination goal, choose the goal the journeys should be created in. The dialog also explains how Gherkin is converted and which format it supports, with a link to the Gherkin guide.
- Select Generate journeys.
The new journeys are created as drafts in that goal and linked to the requirement, and the Journeys tab switches to Draft so you can see them. If the requirement already has linked journeys, the new ones are added alongside them.
| Gherkin | Becomes in Virtuoso |
|---|---|
Feature | A journey, named after the feature |
Scenario | A checkpoint |
Each Given, When, Then, And or But line | A comment step in that checkpoint |
For example, this description:
Feature: Checkout
  Scenario: Pay with a saved card
    Given I am on the cart page
    When I click "Pay"
    Then I see "Order confirmed"
creates a journey called Checkout with one checkpoint, Pay with a saved card, holding three comment steps.
For the conversion to work:
- Start each feature with
Feature:and each scenario withScenario:. - Start each step on a new line with
Given,When,Then,AndorBut. - Only put free text on the lines immediately after the
Feature:line.
If the description has a syntax error, the dialog says so and lists where to correct it. A description with no Feature: line generates nothing.
Generate from Gherkin only appears for requirements with no linked sources, and you need permission to edit the project to use it. It's unavailable until the requirement has a description.
# Coverage
A requirement is covered when at least one journey is linked to it, and not covered when none is. The Coverage column and the Coverage filter both work on that rule, and it's the quickest way to find gaps: filter by Not covered and work down the list, starting with the critical ones.
Whether the coverage is any good is a different question, answered by the Latest status column and the figures on the requirement's Overview: how many of the linked journeys passed on their most recent execution, how many failed, and how many haven't run.
Latest status looks only at each journey's most recent execution. A journey that passed long ago but hasn't run since shows that old pass, so check the execution figures, or run the journeys again, before relying on it.
Even when every linked journey has run recently and passed, together they might not check everything the requirement asks for. Coverage shows that a journey is linked, not how much of the requirement it tests. With Touchstone, Architect works out the journeys a requirement needs from the requirement itself: see What Touchstone adds.
# Version history
Every change to a requirement's name or description creates a new version. Nothing is overwritten, and the full history stays available. Changes to the risk assessment, tags or linked journeys are saved straight away but don't create a version.
Open the Version History tab to:
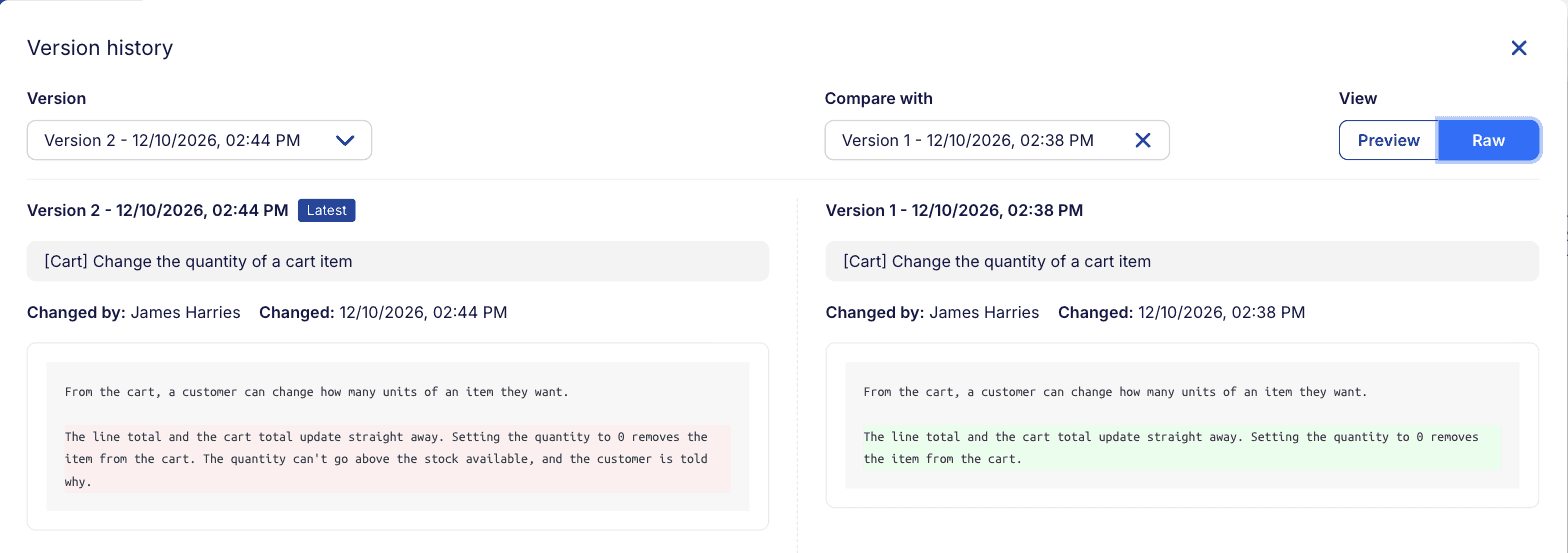
- Read any version. Pick it from the Version dropdown; the latest is marked. Each version shows who changed it and when, and can be viewed as a rendered Preview or as Raw text.
- Compare two versions. Select Compare. The two versions open side by side, and you can change either one: the version on the left under Version, and the one to compare it with under Compare with. Switch to Raw to see the lines that changed highlighted.
- Go back to an earlier version. Select Create new version from this data on any version other than the latest. This creates a new version with that version's title and description. The versions in between stay in the history, so the trail is never broken.
Data tables, environments and goals keep a version history in the same way.
# What Touchstone adds
Everything above is available in every Virtuoso project. With Touchstone, the Requirements screen also becomes the place where requirements are generated rather than only written:
- Requirements from your documents. Upload specifications, policies and domain material to the Knowledge Base, then Run Analyst to propose requirements from them, each with a risk assessment and links back to the sources it came from. Linked sources then appear as a count beside the linked journeys in the list, as a Sources tab on each requirement, and as a Source filter.
- Journeys from requirements. Run Architect turns a requirement into a journey structure, and Autopilot builds it into a runnable test against your application. Architect works from a description in any format, whereas Generate from Gherkin needs it written in Gherkin.
- Kept in step. When a source or a requirement changes, the requirements and journeys that depend on it are flagged for review in the Analyst, Architect and Autopilot tabs above the list, and you decide what to update.
- Release insights. A report grouping linked journeys by requirement risk, with their latest pass and fail outcomes for the period you choose, which can be exported as a PDF.
See Touchstone AI for the full picture.
# Terminology
| Term | Meaning |
|---|---|
| Requirement | A statement of behaviour to be tested, held in the project with its own description, risk assessment and history |
| Risk assessment | The requirement's priority: Critical, High, Medium, Low, or not set |
| Coverage | Whether a requirement has at least one linked journey |
| Linked journey | A journey attached to a requirement as a test of it |
| Latest status | How the linked journeys did on their most recent execution |
| Draft | A journey that has been created but not yet published. Plans don't run it |
| Published | A journey that is ready and runs in plans |
| Version | A saved state of the requirement's name and description. Every change to either creates one |