# Extensions
To help you achieve more complex and custom scenarios, Virtuoso provides a scripting interface, that lets you extend Virtuoso's natural language with JavaScript extensions and execute them as test steps.
# Extension scope and reusability
Extensions in Virtuoso can be created at two different levels: Organization and Project. Choosing the appropriate scope ensures the right balance between flexibility and reuse across your teams.
# Organization-level extensions
Extensions created at the Organization level are available to all projects within the organization.
Use organization-level extensions when:
- The logic should be shared across multiple projects
- You are building standardized utilities (e.g., formatters, helpers, common API wrappers)
- You want to maintain a single source of truth for common scripting logic
User accessibility
Organization-level extensions can be viewed and updated by any member of the organization.
# Project-level extensions
Extensions created at the Project level are available only within their current project.
Use project-level extensions when:
- The script is specific to a single project
- You are experimenting or iterating on new logic
- The extension depends on project-specific workflows or conventions
Moving extensions between levels
A project-level extension can always be moved to the Organization level if you later decide it should be reused across projects.
The inverse operation is not possible! Moving an extension from Organization to Project level would risk breaking any project that relies on it.
However, organization-level extensions can be "cloned" to the Project level and then edited as needed.
# Creating a language extension script
You can always access the language extension manager by clicking on the Extensions icon on the side-bar.
However, depending on whether you are in the context of a specific project or not, you will be accessing either the project-level or organization-level Extension Manager.
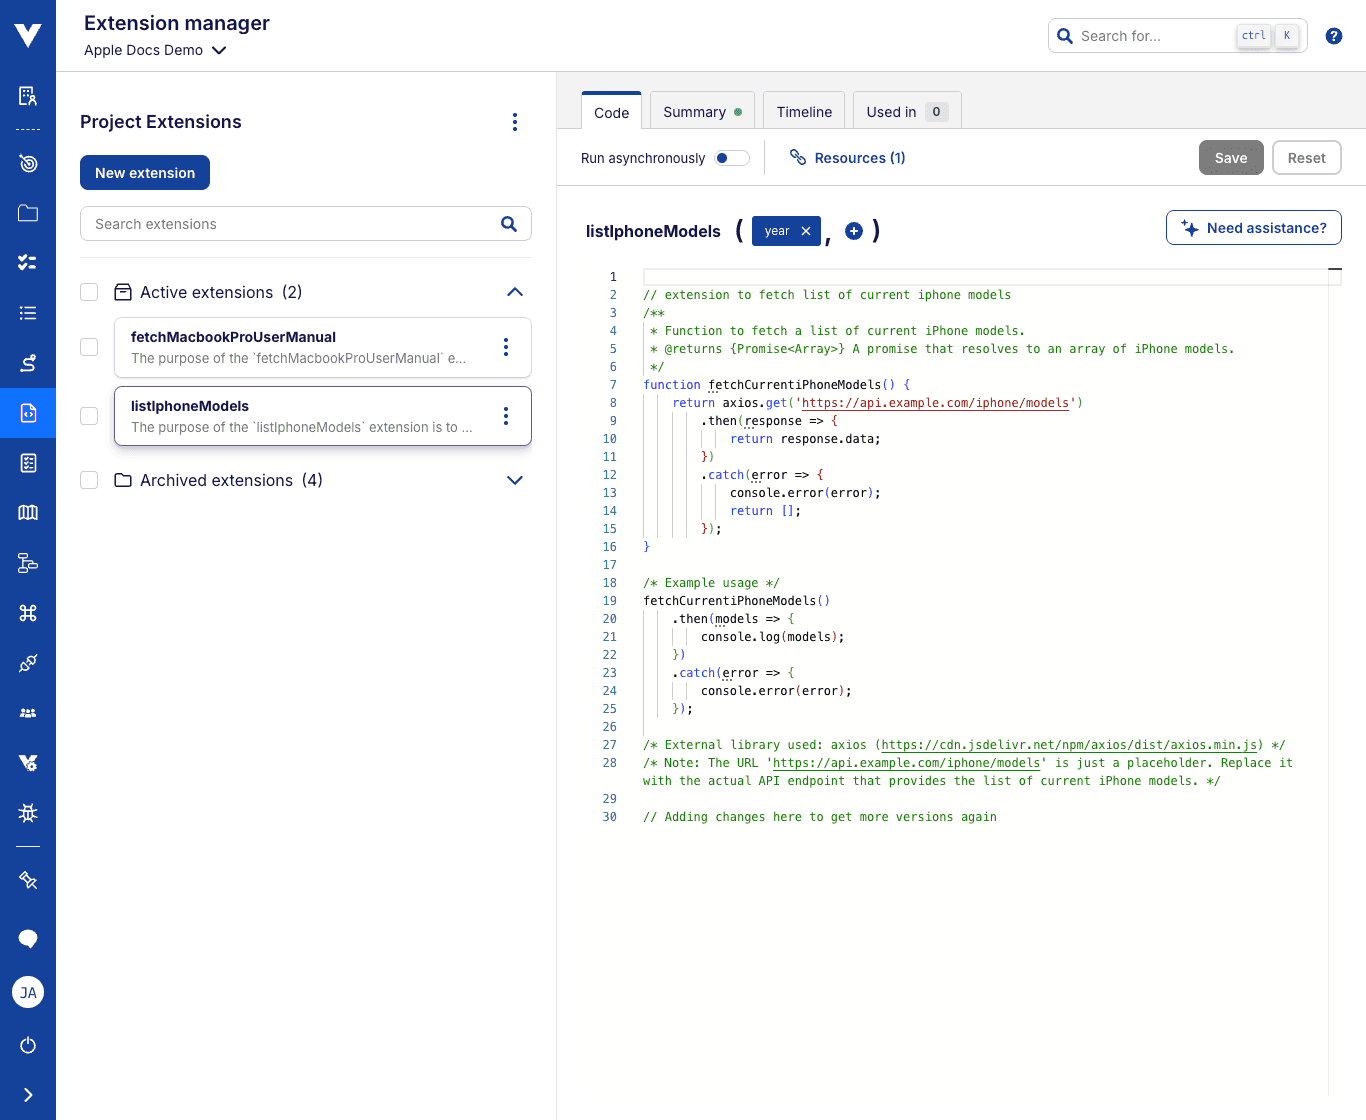
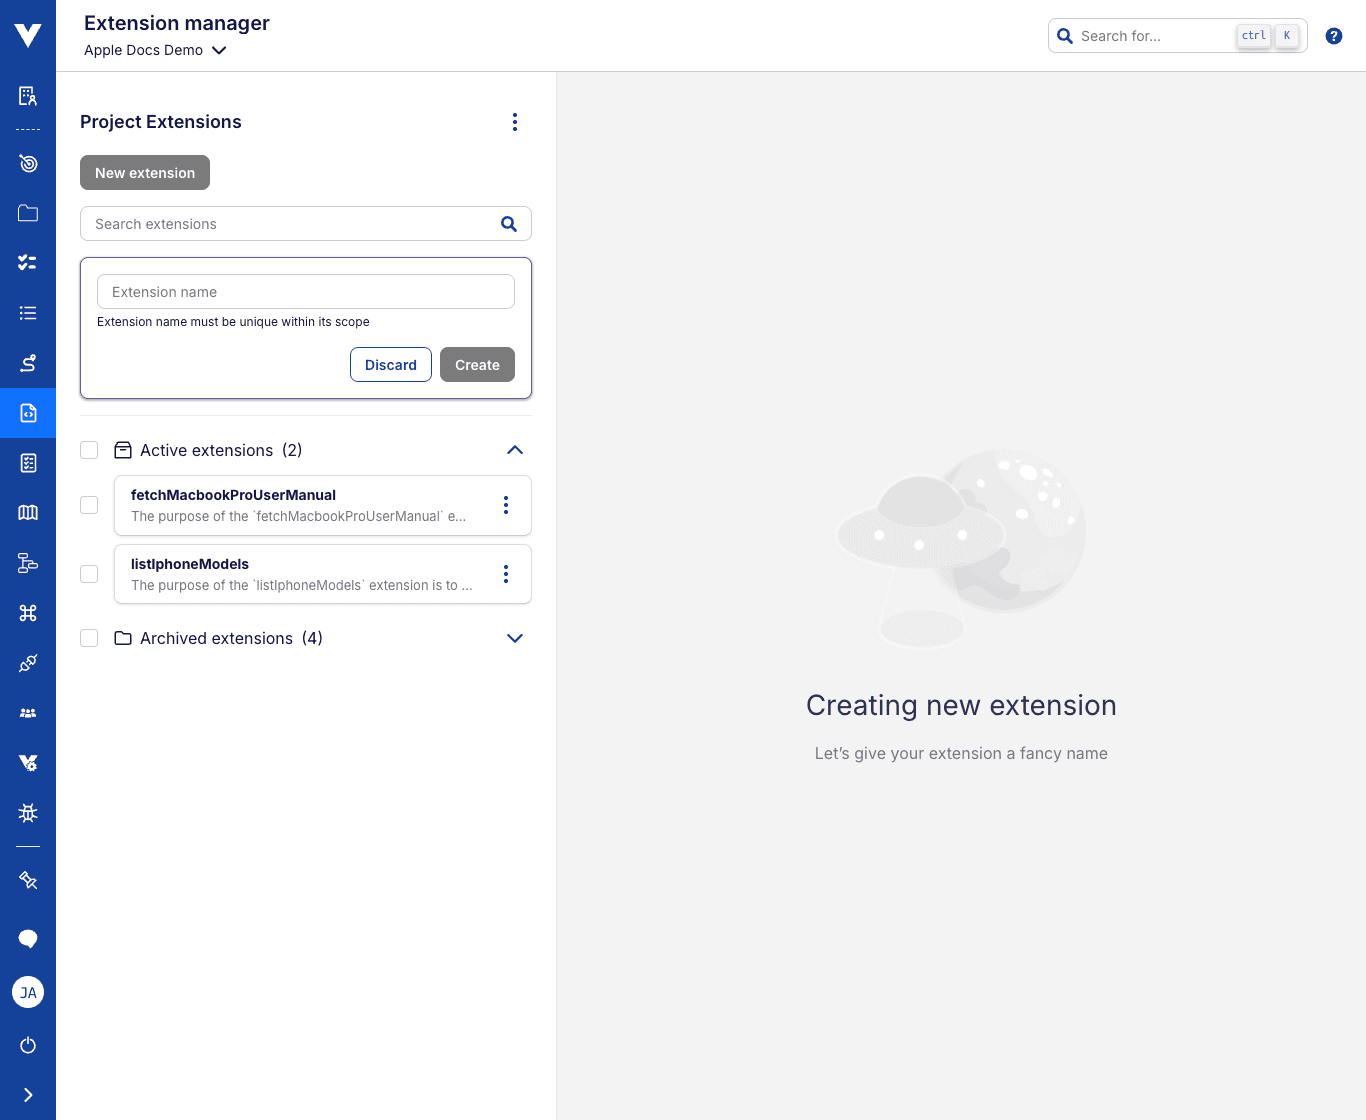
Once there, you can click on New extension, choose a name for it (needs to be unique within its scope), and click on create.
Note that you'll need to use this name to execute it in your journeys (i.e., this becomes the action of your natural language step).
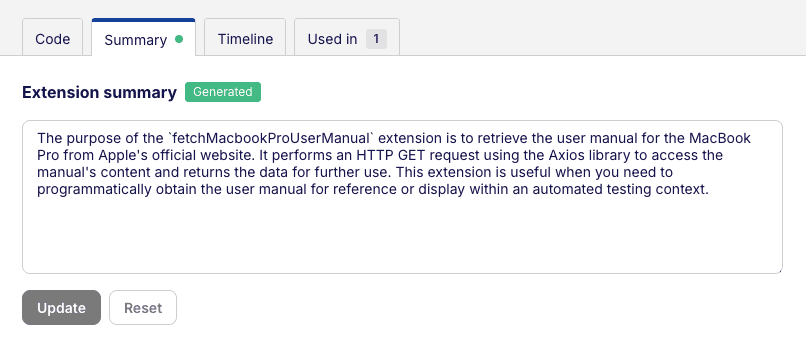
After creation, a summary will be automatically generated for the extension. This can be seen in each extension on the list to help users identify and understand what the extension does.
As with other AI generated content, it may not perfectly reflect what the extension does, or it may lack key details you wish to specify. In that case, navigate to the Summary tab and edit the text as you see fit. If you ever wish to revert to the generated summary, clear the Summary field and save; the original generated summary will become visible again.
Summary for older extensions
Extensions that existed before the summary feature was released may not get a generated summary immediately. If the extension is updated, or if it is used in a journey execution, the generation will be triggered.
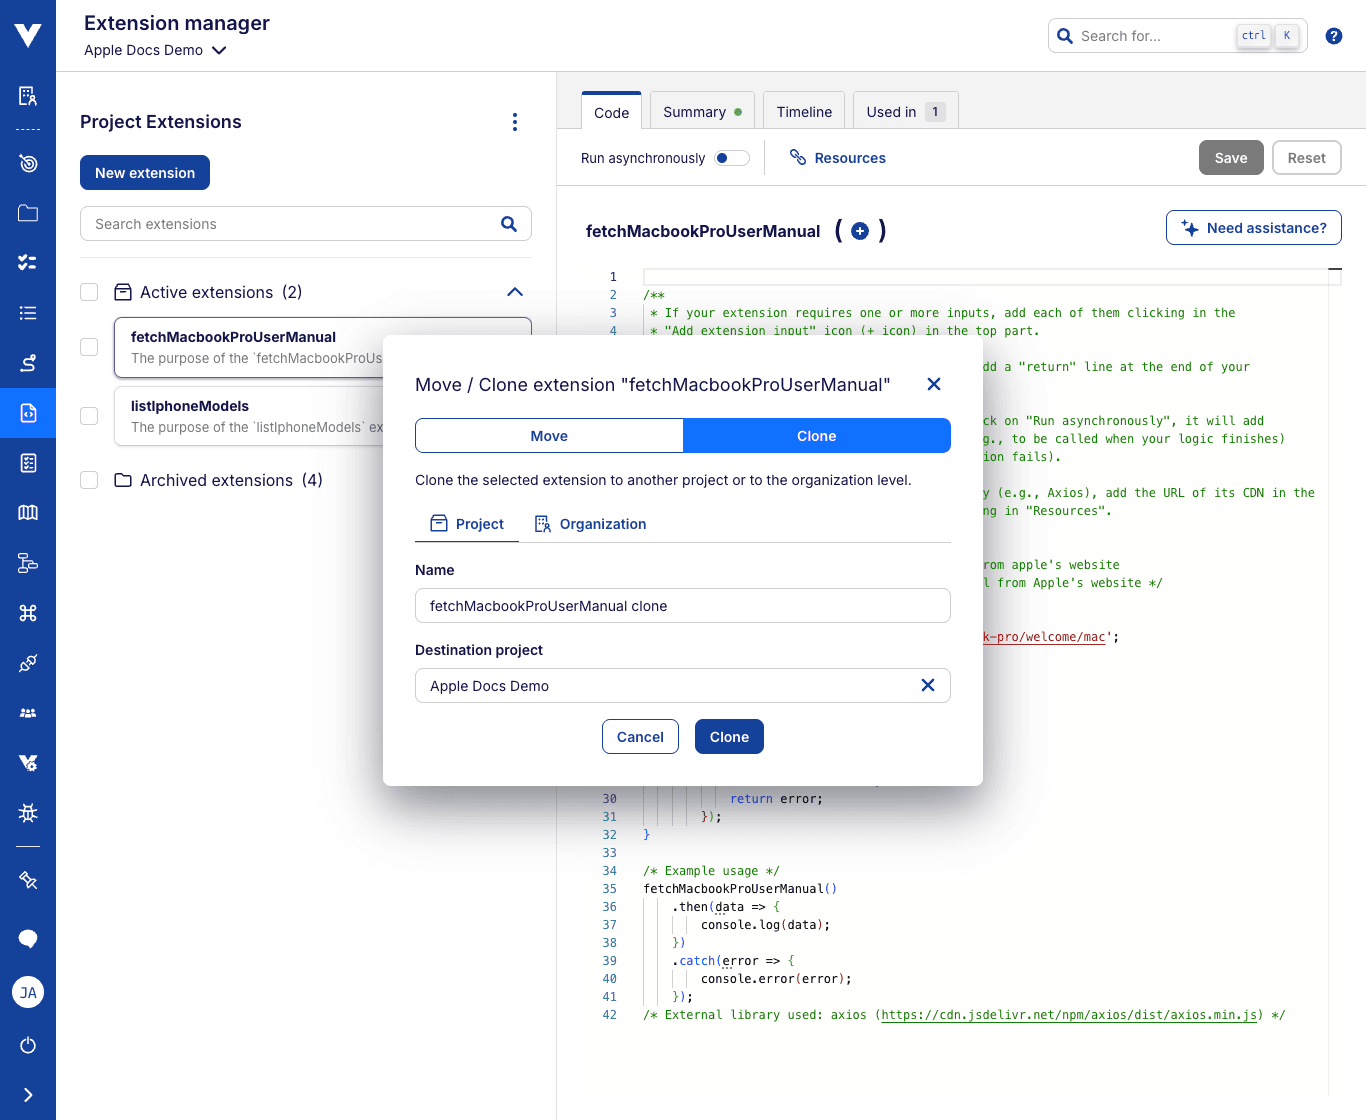
# Moving and Cloning extensions
An extension created for a specific project may later prove useful for other projects as well. In this case, you may want to move it to the organization level so that it can be reused. To move an extension, open the extension's context menu and click Move / Clone to open the modal where you can select the Move option confirm the action.
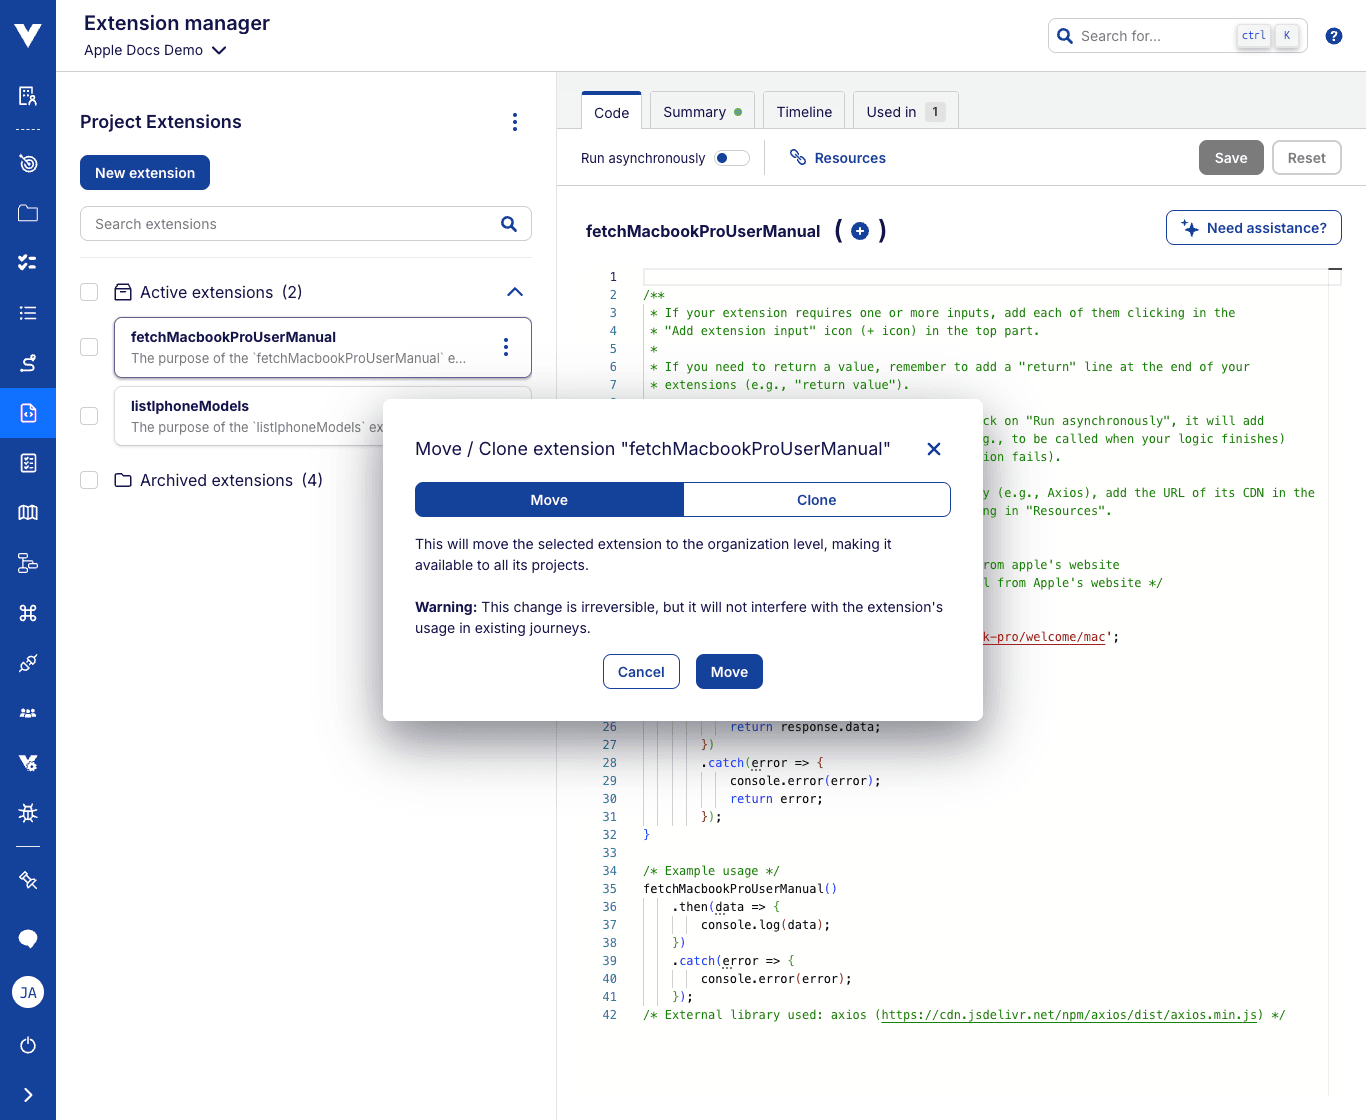
On the other hand, an extension created at the organization, cannot be moved to a specific project, as this would risk breaking any project that relies on it. It can, however, be cloned to the project level, which will create a copy of the original extension in the desired project. This way you can reuse the logic of the original extension without risking breaking any existing tests.
Use this feature also to copy extensions from Project level to Organization level and even between different projects.
To clone an extension, also start by opening the extension's context menu and click Move / Clone option. In the modal, select the Clone instead.
When cloning, the original name of the definition will be appended with the clone suffix to avoid name clashes. This name can be changed, as long as there's no other extension at the same level with the same one.
If cloning to the Project level, you must also select the destination project.
Duplicating extensions
You can use the clone feature to easily duplicate extensions in place! Simply open the clone modal and use the pre-filled settings.
This is useful when you want to create a similar extension without starting from scratch.
# What can I write in my language extension script?
You can write any script that you can normally execute on your browser console (e.g., Chrome DevTools (opens new window)).
This can range from interacting with the DOM, to making XHR calls using fetch().
When executing, your code will be auto-wrapped in a function like below, and so a return statement at the end of / middle of your script would be considered as what the function returns:
(function(){
  // your code will go here
})()
For example, if your extension is a simple script that returns two hard-coded numbers added together, the content of your extension should be:
return 2 + 2 // (notice the `return` statement)
Also note that failures in the script will cause the test step to fail.
Shortcuts
While writing your script in the editor, you have nearly full access to a Javascript IDE.
You can see a list of possible options you have by pressing F1 on your keyboard. Note that you
also have access to many shortcuts such as CTRL+S for saving.
# Asynchronous extension scripts
If your script is asynchronous (e.g., you make a call to an API, or use async/await in your script), you need to turn on the toggle
Runs asynchronously, and call done() in your script when your request completes.
You can store
the result of your asynchronous script by calling done with an argument (e.g., done(result)). For example:
fetch("https://www.spotqa.com/api/user/foo", {"method":"GET","mode":"no-cors"})
.then(response => {
  done(response.status) // means the value of `response.status` will be considered as script's output
})
If you want to throw an error in your async script, you need to call doneError(message).
You can call doneError either with a text string of the error, or by directly throwing
the error instance. Otherwise, any other error thrown in the session will be captured automatically
but the message will not be returned back to you. For example:
myAsyncFunction = async (myData) => {
    try {
      await asyncMethod(myData)
    } catch (e) {
      doneError(e)
    }
}
If you are facing any issues with unrelated errors being thrown while your script is running, this will automatically stop your script from running. To avoid this, you need to add this to the top of your script: window.onerror = () => ().
Asynchronous Timeout
Async scripts have a maximum time limit of 120 seconds to complete.
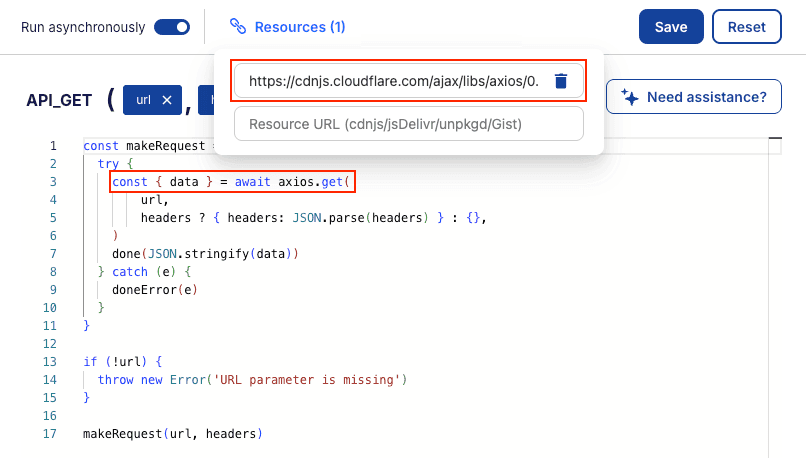
# Using external libraries
To extend the capabilities of the extensions beyond standard JavaScript, Virtuoso allows for the use of libraries available on the following CDNs:
- https://cdn.jsdelivr.net/
- https://gist.githubusercontent.com/
- https://cdnjs.cloudflare.com/
- https://unpkg.com/
To include an external library, click on Resources when editing an extension and paste the CDN URL (e.g., https://cdnjs.cloudflare.com/ajax/libs/axios/0.21.1/axios.min.js) of the external library. Click on the button Save to persist the changes for the extension.
Compatibility
The libraries you include must be compatible with the browser environment. A simple test you can do is to paste the content of the file pointed by the CDN URL in the browser console and see if it doesn't throw any errors.
For examples of extensions that use external libraries, browse the Extensions Library in our Knowledge Base (opens new window).
# Using your extension
In a checkpoint that you want to use your new script, you can write EXECUTE "extensionName"
to trigger the script execution. If the script name is not valid, you will get an error.
You can even call them using their name alone, for example:
performSomeAction
GET("https://api.com/v1") returning $data
# Tracking extension changes over time
When multiple users edit an extension's code over time, it can be useful to see the history of changes made to it. To do so, click on the Timeline tab above the extension's code editor.
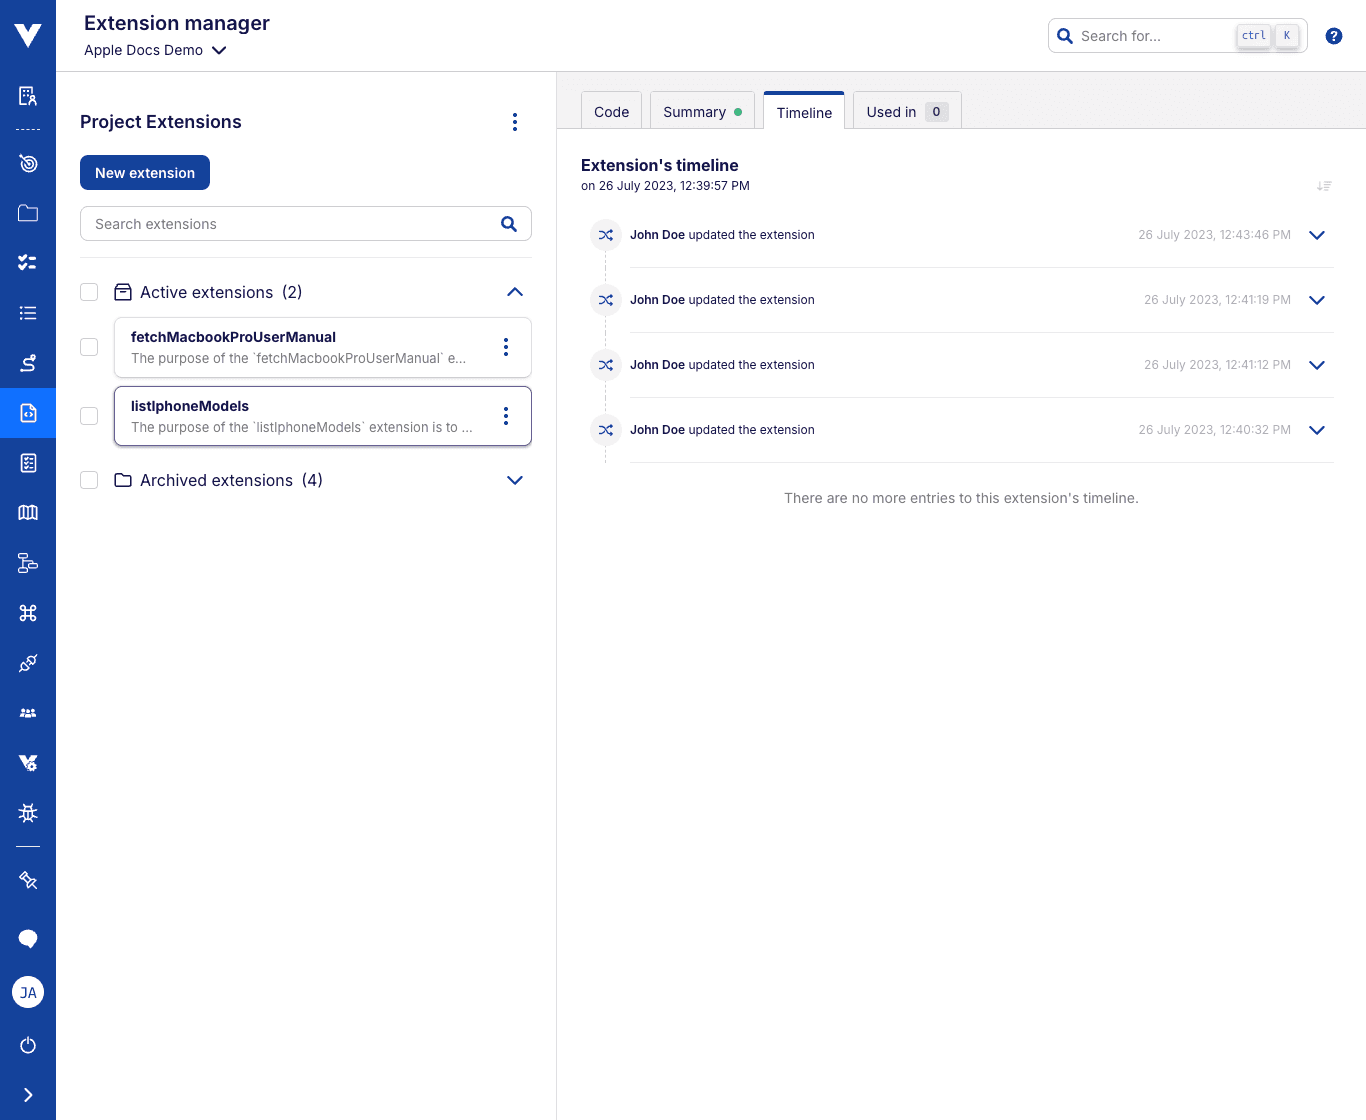
Here you'll see a list of changes to the extension, with the most recent ones being shown at the top. Each entry will show the user who made the change, and when. By clicking the entry, you'll be shown the full code of the extension at that point in time.
# Update extension with the entry in timeline
When there are changes made by multiple users on an extension, it may happen that the extension doesn't behave as expected. It is now possible to update the extension with the previous entry present in the timeline. To do so, click on the Update extension with this code button present below the desired entry.
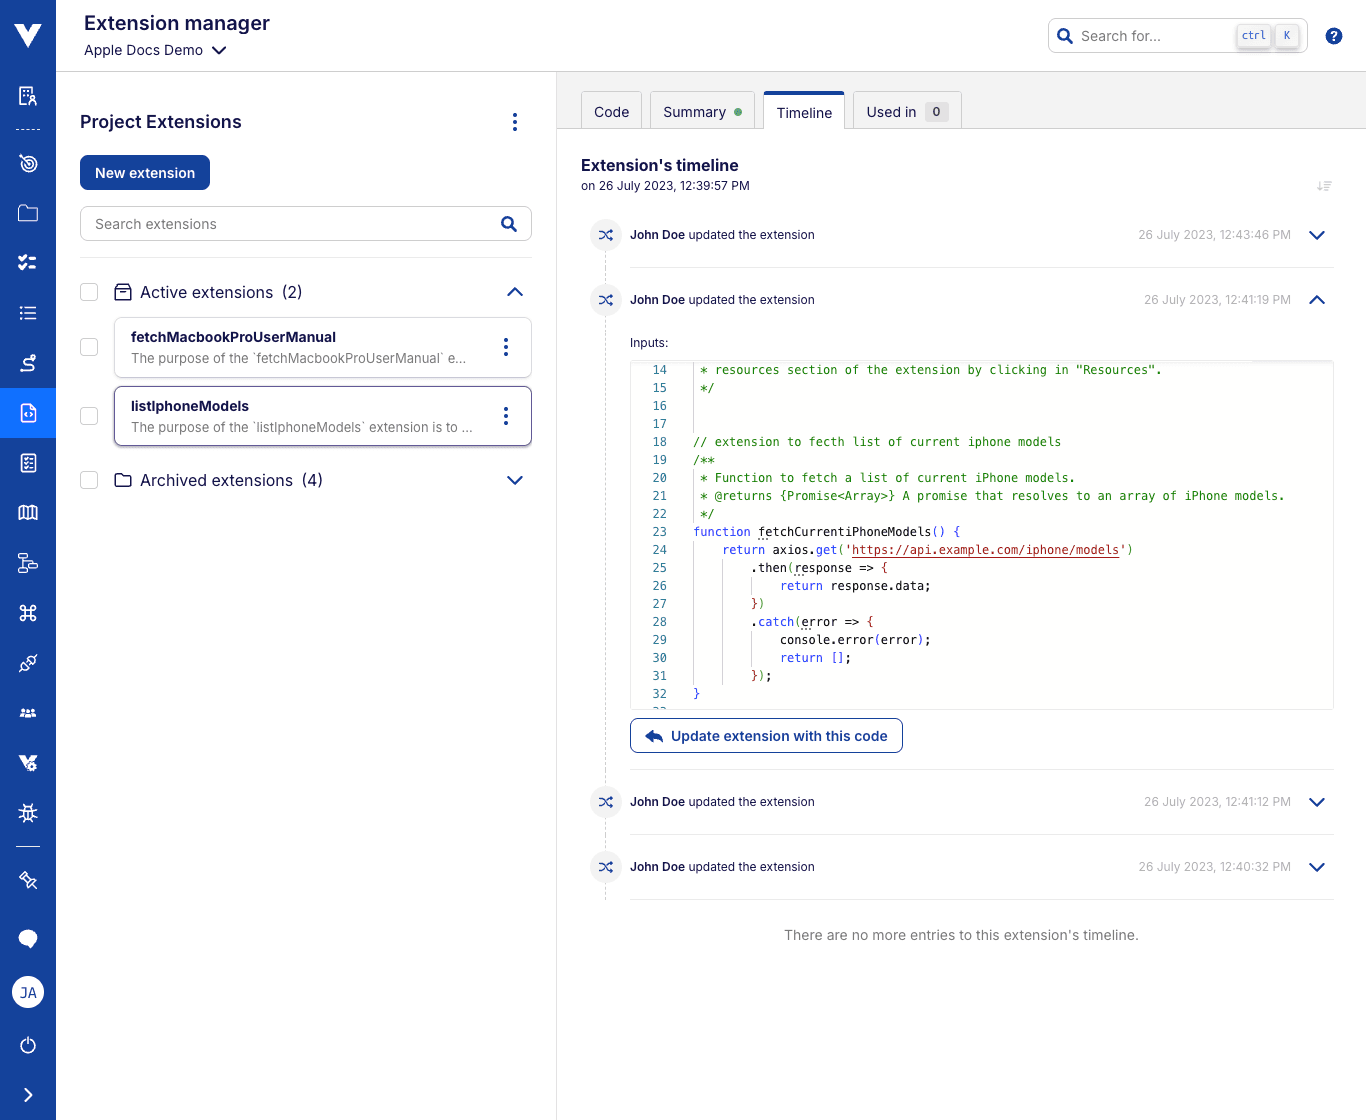
On confirmation, the extension will be updated with the full code, inputs, and resources present in the entry. The timeline will show the latest entry which is created by this action.
# Tracking current extension usage
An extension can be used in multiple projects and journeys as well as maintained by different users of the team. To make this management easier and help you understand the impact of the changes to the extensions, you can see the list of journey(s) where the extension is used. To do so, click on the Used in tab above the extension's code editor.
The list of journeys will be shown with the number of steps where the extension is used. Clicking on the journey name will open the journey and clicking on goal will take you the goal page.
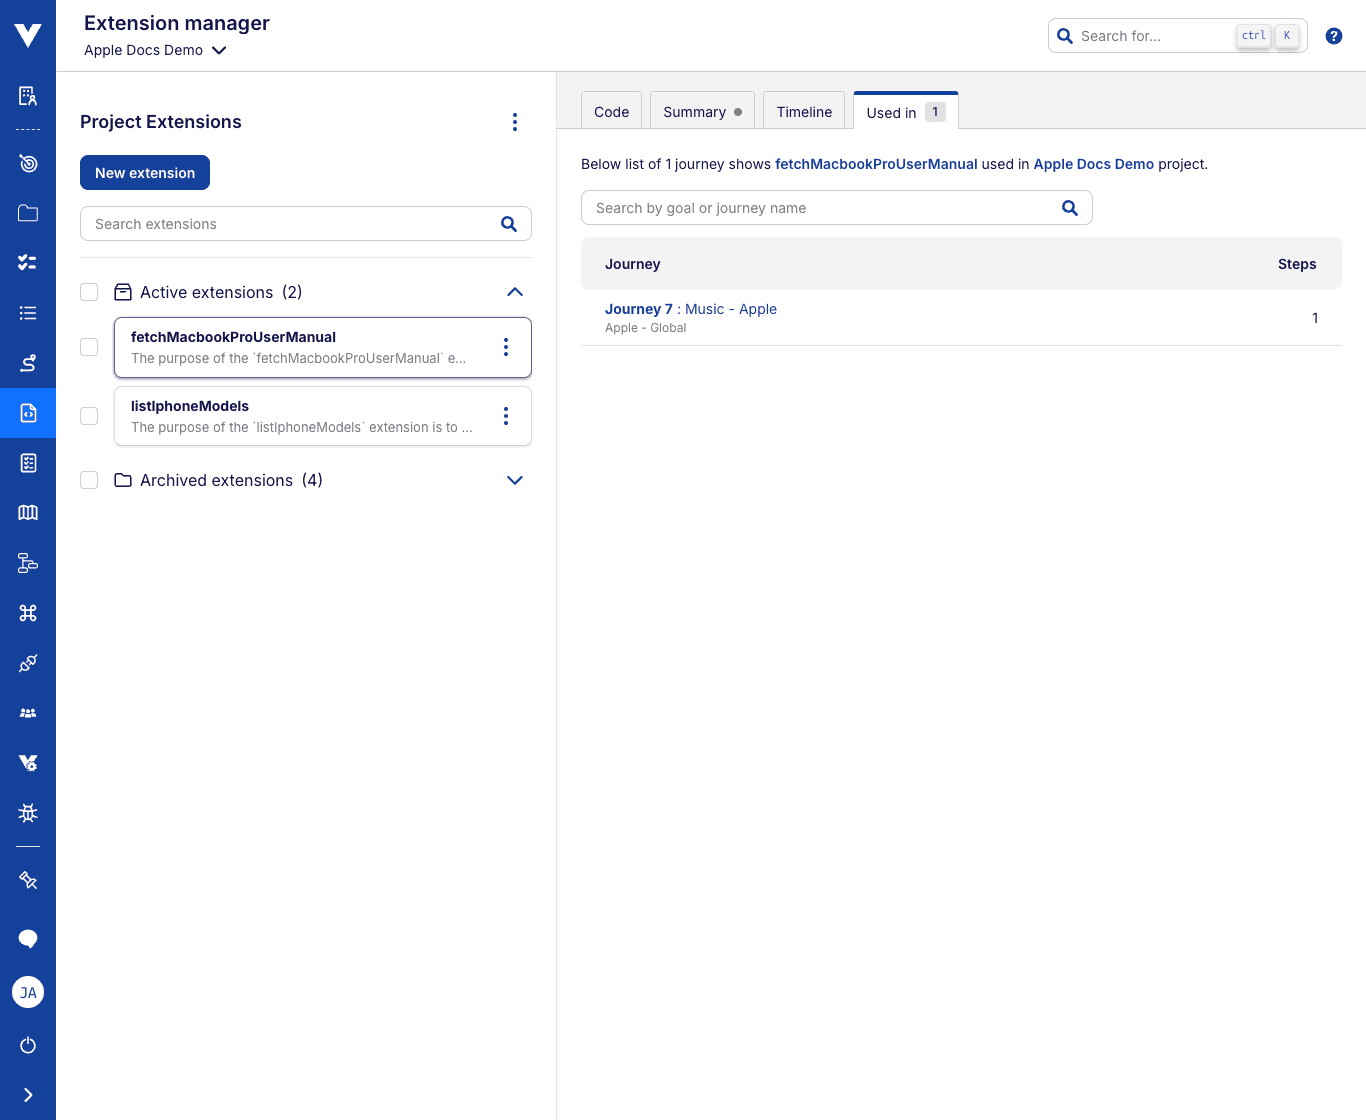
Here you will see the list of journeys with the number of steps where the extension is used. Clicking on the journey name will open the journey.
Extensions used in projects without granted access
If an extension is used in a project where you don't have access, you will not be able to see the list of journeys where the extension is used. There will be additional information on top mentioning how many projects this extension is used in.
Limited organization-level extension usage report
When accessing an organization-level extension, the usage tab will only display the total counts of journeys and projects where it is used, without listing the specific journeys or projects.

# Example extensions
In this section we look at number of common scripts you may want to write.
# Click an element using javascript
document.querySelector('.my-selector > .foo').click()
# Remove an element by query selector
document.querySelector('.my-selector > .foo').remove()
# Remove an element by XPATH
function getElementByXpath(path) {
  return document.evaluate(path, document, null, XPathResult.FIRST_ORDERED_NODE_TYPE, null).singleNodeValue;
}

getElementByXpath('/html/body/div/div[1]/input').remove()
# Remove multiple elements by query selector
[...document.querySelectorAll('.element-foo, #barID, input[title="foo"]')].map(node => node.remove())
# Using the result of a store element test step
You can use the store element details test step to find an element in the context of a Virtuoso extension, and then perform operations with that element.
Before calling your script add a store test step to capture the element details, and then pass that variable into storedElement parameter of your extension.
function getElement (selectors) {
  let element = null
  for (const selectorDetails of selectors) {
    switch (selectorDetails.type) {
      case 'CSS_SELECTOR':
        element = document.querySelector(selectorDetails.value)
        break
      case 'XPATH_ID':
      case 'XPATH':
        element = document.evaluate(selectorDetails.value, document, null, XPathResult.FIRST_ORDERED_NODE_TYPE, null).singleNodeValue
        break
      case 'ID':
       element = document.getElementById(selectorDetails.value)
        break
      default:
        continue
    }
    // if we found a valid element we don't need to keep searching
    if (element) return element
  }
  throw new Error('Found no suitable selector: ' + JSON.stringify(selectors))
}

const { selectors } = JSON.parse(storedElement)
const element = getElement(selectors)
From this point you can then perform operations over the element, for example clicking on it by adding a line after element.click().
# Validating native input messages
Sometimes, you may want to validate messages produced via native browser features, such as the native form validation (opens new window) on an <input type="email" required> field. Since these validations are produced by native browser features rather than by the target website, assertion commands cannot be used to validate these messages. You can however use Javascript to validate them. For example:
var element = document.querySelector(elementSelector)

var badValidation = null
var passedValidation = 0
function validationHandler(e) {

   if (e.target.validationMessage !== expectedMessage) {
       badValidation = 'Expected validation message to be: \`' +
       expectedMessage + '\`, but it was: ' + e.target.validationMessage
   } else {
       passedValidation++
   }
}

element.addEventListener('invalid', validationHandler)

var isValid = element.form.reportValidity()

if (isValid) {
   doneError('Form was valid, but it was expected to be invalid')
   return
}

setTimeout(() => {
   if (passedValidation && !badValidation) {
       done()
       return
   }
   if (badValidation) {
       doneError(badValidation)
       return
   }
   doneError('Element was not validated')
}, 200)
This also needs the corresponding test steps to use the script:
Write "foo" in field "bar"

Store value "The value entered for 'bar' is invalid. 'foo' is less than five characters." in $expectedMessage

Store value "#barCssIdentifier" in $elementSelector

Execute validateFieldError
# Make GET request async
fetch("https://www.spotqa.com/api/user/foo", {"method":"GET","mode":"no-cors"})
.then(response => {
  // you can do something with the response data if you wish to (otherwise the .then() is not needed)
  done()
})
Async request
This is an asynchronous request. Note that done() needs to be called or an error needs to be thrown. Otherwise the test step will not resolve.
# Make POST request async
fetch("https://www.spotqa.com/api/project", {
  method: 'POST',
  body: JSON.stringify({foo: 'bar', spot: 'QA'}), // data can be `string` or {object}
  headers:{
    'Content-Type': 'application/json'
  }
}).then(() => done(), e => { throw e })
Async request
This is an asynchronous request. Note that done() needs to be called or an error needs to be thrown. Otherwise the test step will not resolve.
# Using Virtuoso's variables
Consider an example scenario where you'd want to take as input 3 arguments quantity, price and priceWithTax, such that you calculate the total value using quantity and price, and make sure that the total value does not exceed the price with tax. You may also want to use the total value (output of your script) into a variable, so that you can check it in following pages.
To do this, you need to create three input arguments in the script manager quantity, price and priceWithTax. Note that at the time of execution, these variables need to be available - either through previous steps in the journey, or mapped as input arguments, e.g., using 42 as quantity, $value as price, $total as priceWithTax. Otherwise, an empty string will be used as the default value for any unmapped argument.
Variables in script input
Although variables are denoted with $ in the natural language syntax, when using them in the script editor and the input section only the name of the variable shall be used (i.e., value and not $value).
var totalValue = quantity * price

if (totalValue > priceWithTax) {
    throw new Error(`Total value ${totalValue} cannot be larger than total with tax which was ${priceWithTax}`)
}

return totalValue
# Accessing nested variable fields
In an alternative scenario, you may for example receive a JSON response from an extension or API-call, which you store into a variable (for example $itemOrder):
{
 "quantity": 2,
 "price": 10,
 "priceWithTax": 11
}
You can access each field of this variable directly, for example, write $itemOrder.price in "Price".
You can also use expressions to access and transform this information, for example with store value ${$itemOrder.quantity * $itemOrder.price} in $totalValue you can compute the total value by combining two fields of the response.
# Opening a PDF File using scripts
Refer to the Extensions Library in our Knowledge Base (opens new window) for a ready-made extension that handles this.
# Using the AI-based Extension Assistant
Whether you are a tester who is not familiar with writing code but have a requirement that cannot be expressed in individual natural language steps, or you have development experience but want to speed-up the process of writing an extension, you can use our assistant. If you have a clear idea of what you want to achieve, you can use one of our AI-based bots and grab the JavaScript code that it will suggest for you.
From the extension editor, click on the Virtuoso bot that is placed in the top right part of the extension editor. This will open a side panel with an input box where you can explain to our bot what you wish to implement in JavaScript (e.g., Create a function that formats a date in yyyy-MM-dd). Now by pressing ENTER or clicking on the Send icon, it will think of a possible solution to your problem.
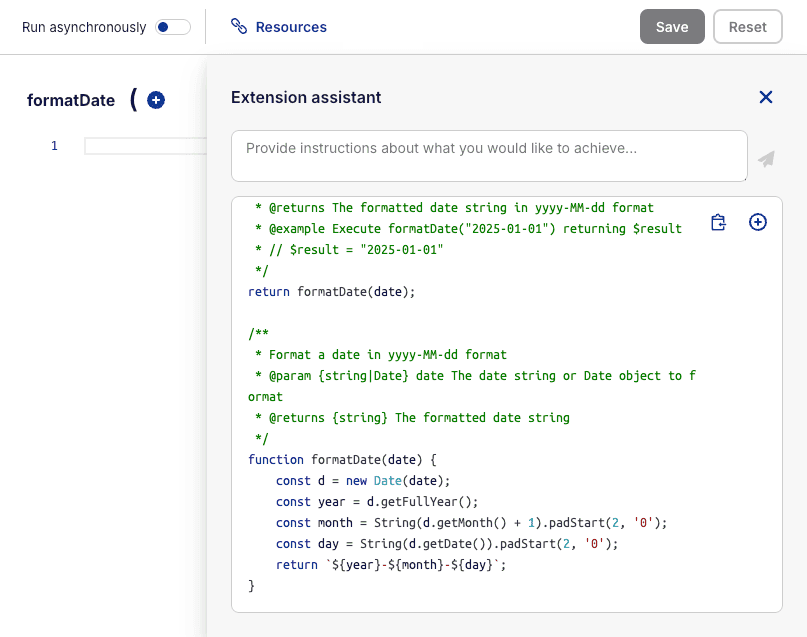
Once you have generated a solution, you can now either copy the code by clicking on the Copy icon or directly fill your extension with the generated code by clicking on the Append icon.
# Considerations when using the AI-based Extension Assistant
Even though it is smart, our assistant occasionally makes mistakes, just like most AI-based technology. Please check the suggested code after including it in the extension to ensure that it carries out your objective.
# Basic use case
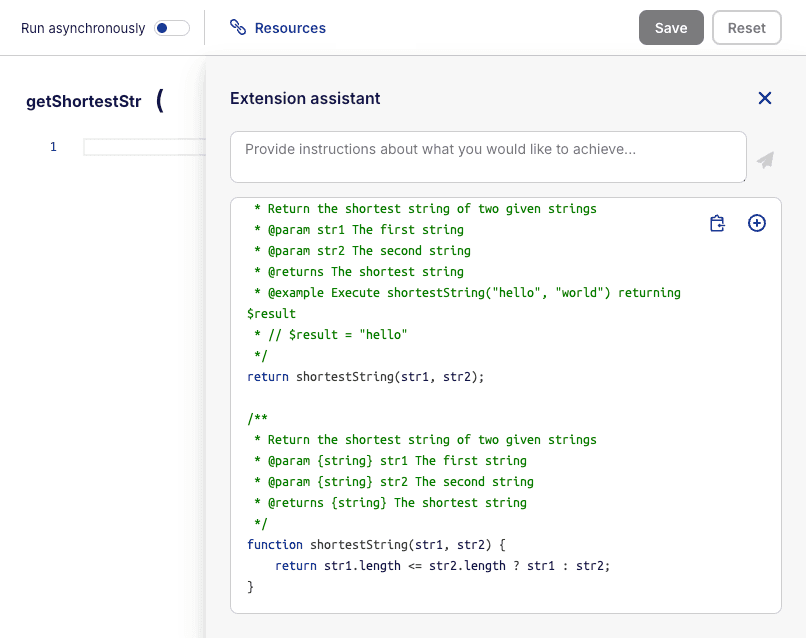
Let's take the following prompt as an example:
Create a function that returns the shortest string of two given strings
- Copy and paste the above prompt and press
ENTER, it should give you a suggestion like this:
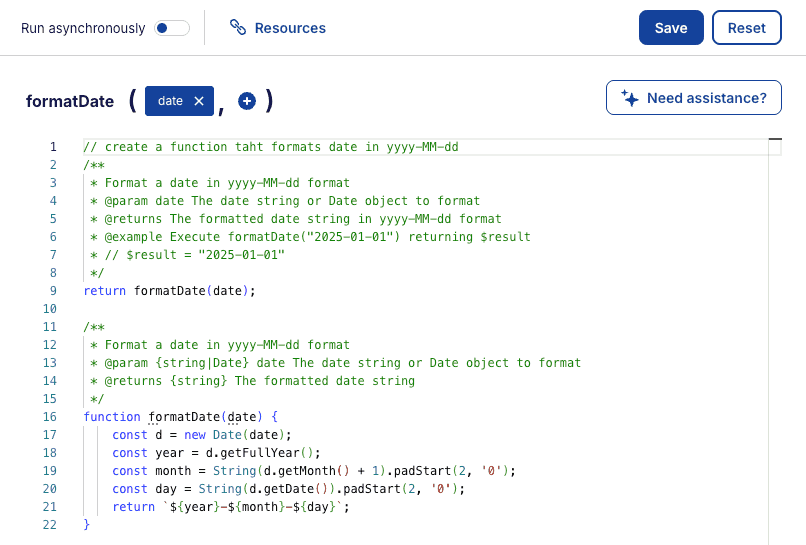
- Append the suggestion to your extension. Now add the parameters
str1andstr2to our extension, they will be used in your tests as the input for the extension. Click on the plus icon next to the extension name to add them:
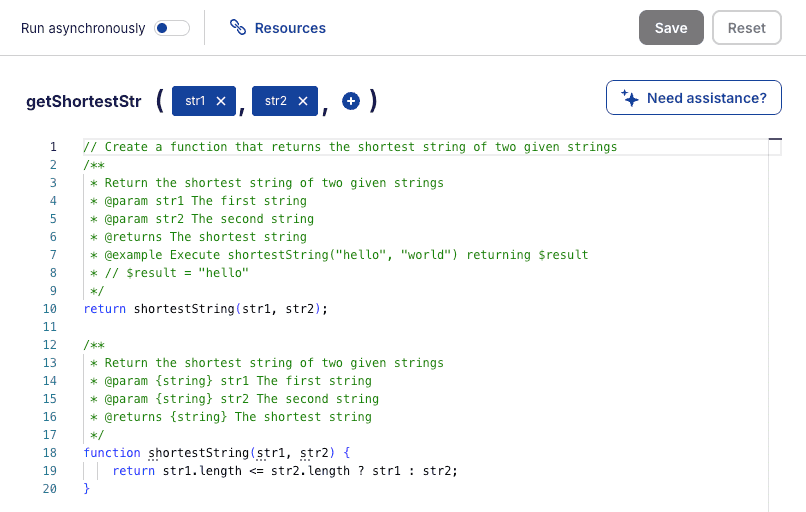
- Last step is to ensure the function is called with the given parameters and
returnthe result. In this example the needed line was already added by the Extension Assistant, but in case it wasn't, ensure the code contains a line like this:
return shortestString(str1, str2)

- Now your extension is ready to be used in your tests like this:
execute getShortestStr("foo", "fuzzy") returning $result
# More advanced use case
On the other hand, your extension might require a bit more setup to be ready depending on its complexity. For example, your extension might depend on external libraries, be asynchronous, etc. For those cases, you can follow this example that covers all of those topics:
Create a function that takes a zip file url as input and returns a list of file names in the zip file using axios
- Copy and paste the above prompt and press
ENTER, it should give you a suggestion like this:

- Append the suggestion to your extension. Now we have a function that needs to receive a parameter, let's name it
url. To add it click on the plus icon next to the extension name:
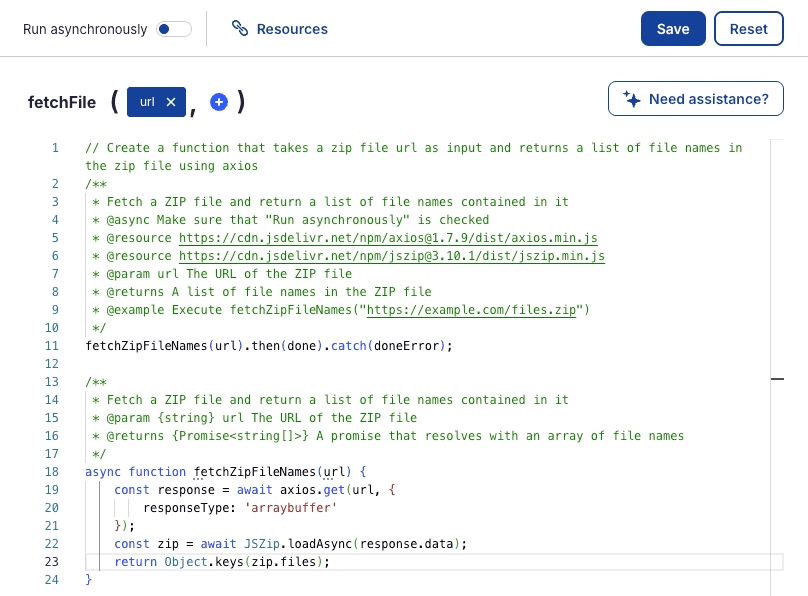
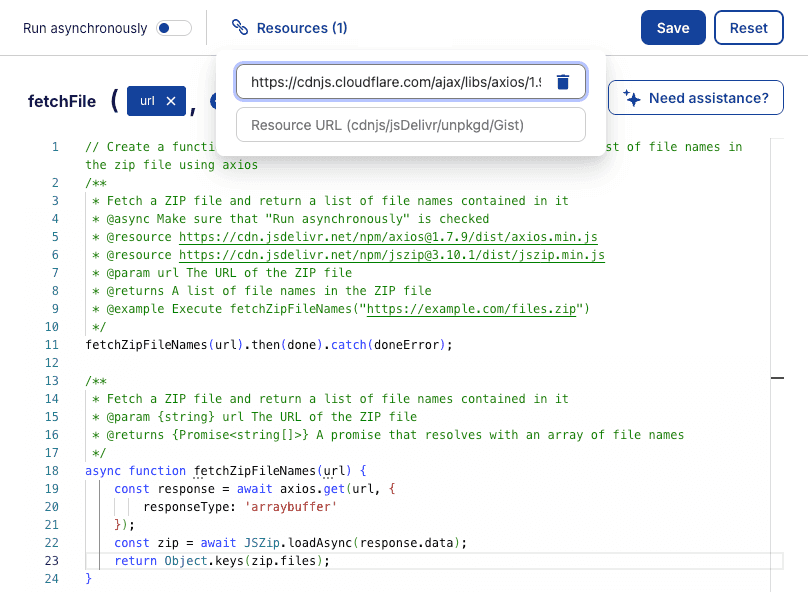
- Our extension uses Axios and JSZip libraries, these need to be added in the
Resourcespart, here we will paste the CDN URLs for these libraries (see Using external libraries):
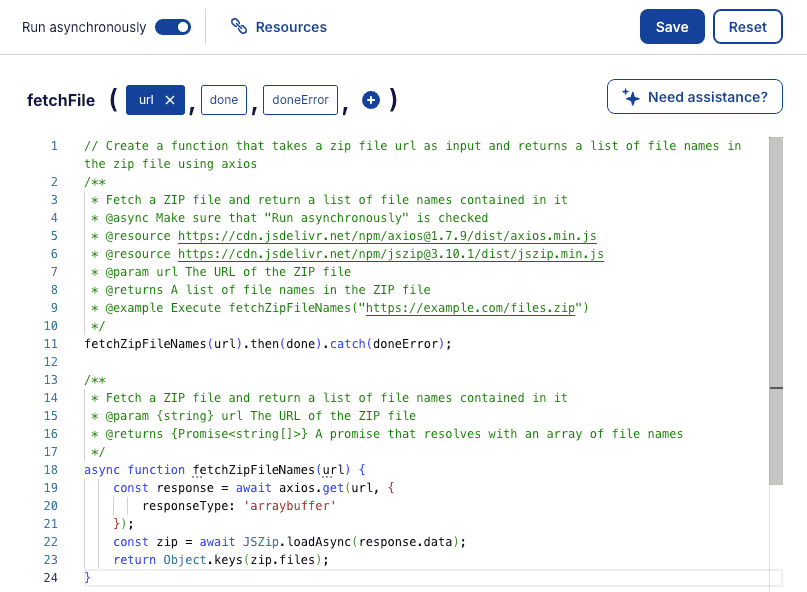
- Now, given our extension is asynchronous (e.g., uses promises, async logic), mark the
Run asynchronouslyoption (see Asynchronous extension scripts). This will add two new parameters:done(to handle success cases) anddoneError(to handle error cases)
- Finally, we have to call our function with the parameters we added (e.g., to return the result and be reusable as part of your test steps). Ensure the code contains a line similar to the one shown here to call the function, and return its result (e.g., the list of file names) or fail (e.g., an error happens):
return fetchZipFileNames(url).then(done).catch(doneError)
In our example only the return was missing from the line already generated.
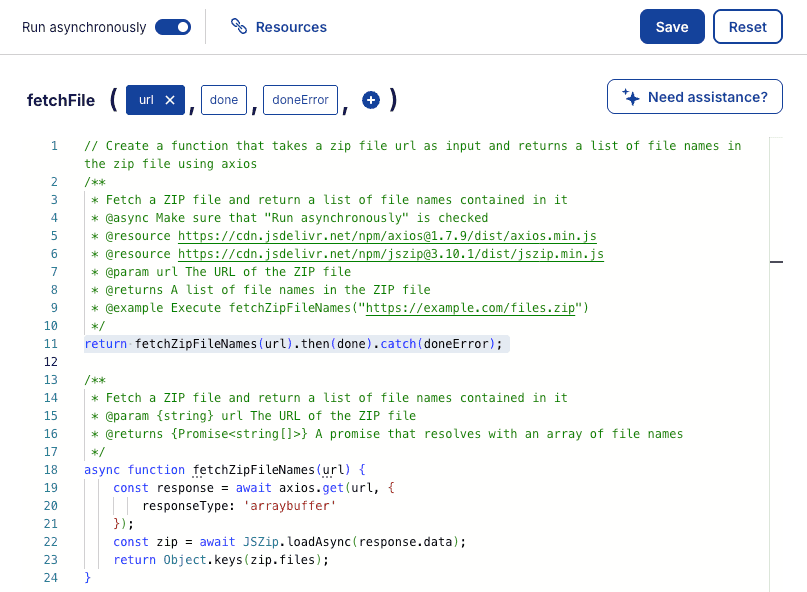
- Now you can use this extension in your tests like this:
execute fetchFile("file url") returning $fileNames