# Adding a checkpoint and test steps
After creating your first goal, you can augment the test with new steps and checkpoints. Let's walk through this:
- Open a journey in the Goal view;
Users visiting the same journey
If other users are accessing the same journey as you, their avatars are shown near the journey name. In the above image, the user can see that someone with initials "IU" is also on the same journey authoring page.
Click one of the buttons below the existing checkpoints:
2.1. Click on
Add checkpointto open up the form to either create a new standalone checkpoint, or reuse an existing one (see shared checkpoints below):If you wish to create a new checkpoint, type its new name and click create or press enter.
To reuse an existing checkpoint, type a hint of its name or number, and once it shows up in the list, click on its name to select it. The label on the confirm button will change from "Create" to "Attach" (note that a checkpoint cannot be inserted more than once in a journey, including the first one).
2.2. Click on
Add library checkpointto open up the form to reuse an existing library checkpoint.Add the test steps (see Natural language syntax for the available commands).

Adding test steps
You can create new test steps by mousing over an existing one and clicking on the Add step button. The button shows the position where test step will be created.
# Empty journey
A journey can exist with no checkpoints. When you open one, the authoring area shows an empty-state banner prompting you to add the first checkpoint, alongside Add checkpoint and Add library checkpoint buttons.

While a journey is empty, actions that need something to run are disabled — each shows a tooltip explaining why:
Run,Restart,Reset, andPreviewon the journey toolbar and context menu.ExecuteandExecute advancedfrom the journey list actions.Start live authoringand the live-authoring settings.
The Interactive tab is also hidden until the journey has at least one checkpoint; opening a journey that is empty lands you on the Summary tab.
Live authoring auto-off
If you delete the last checkpoint while live authoring is on, Virtuoso automatically stops the live session and closes the interactive panel — the same as turning live authoring off manually. Add a checkpoint to start it again.
# Inline Step Editing
Inline Step Editing allows you to make quick modifications to your test steps directly from the journey view.

When you hover over a test step, the button appears, allowing you to directly modify the step within the journey view. This feature enables quick adjustments to the step's type, hint, or other properties without needing to open the step details panel.

By clicking the edit button, you can make inline changes and save them by pressing Enter or clicking Save button
This functionality is particularly useful for making minor tweaks or corrections on the fly, ensuring that your test steps are always up-to-date with minimal interruption to your workflow.
Inline Step Editing limitations
When you change the type of an existing step (e.g., from Click to Write), all pre-existing selectors will be removed. If the step has specific data or conditions set up, you will need to re-enter it after changing the step type.
Sometimes, you may need to reset the element selectors if the changes made using inline editing do not target the correct element. To do so, open the step details panel and click on Reset element.
# Test step details
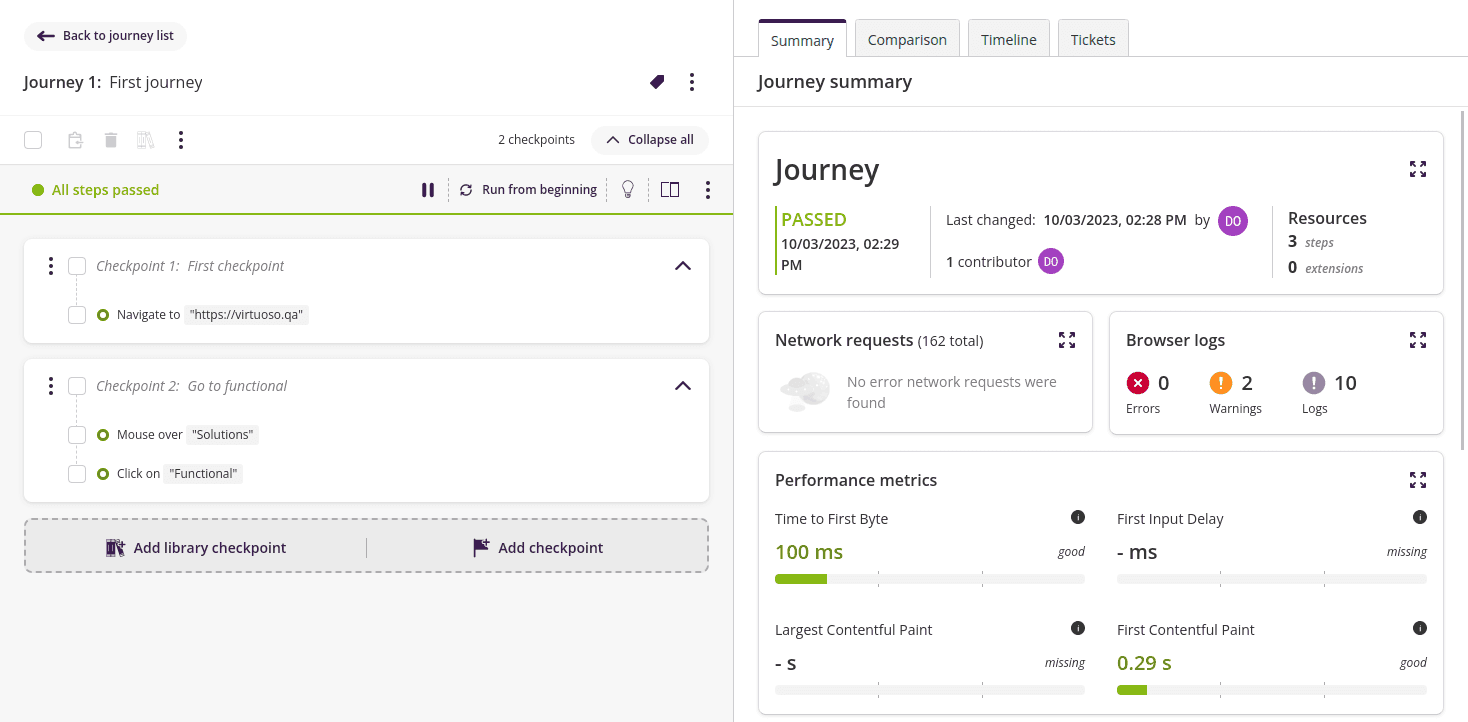
Once a test step is created, you can click on the test step to open the step details on the right side of the screen.
This panel is composed by the following tabs:
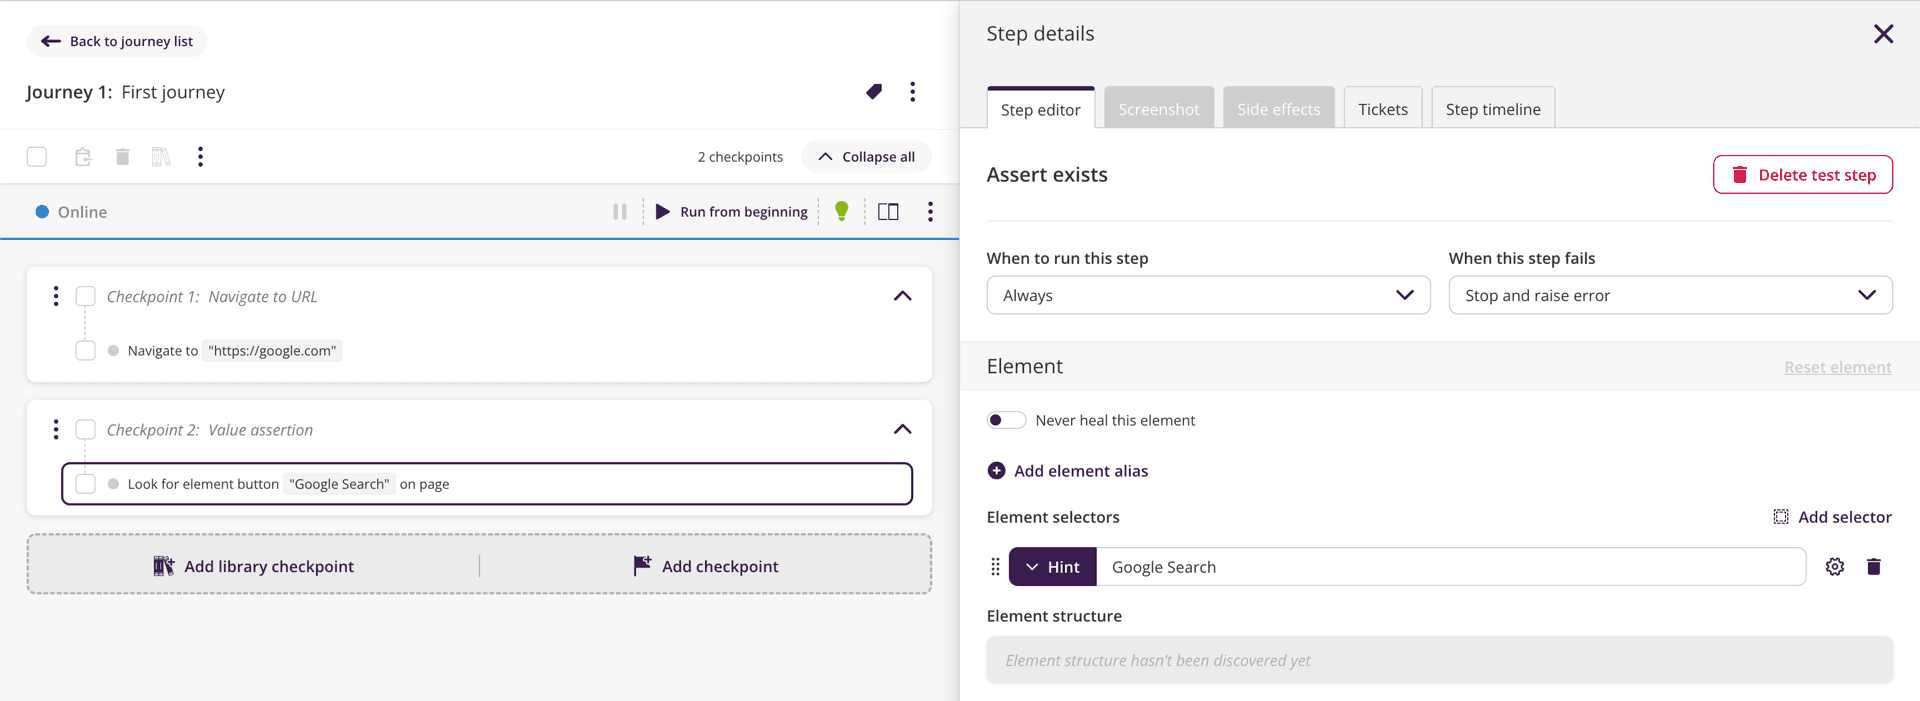
Step editorhere you can edit the details of the command that Virtuoso will use for this step such as data/variable used by the command (more on this in the Test step data section below), element selectors, or other options such as what to doWhen this step fails.Screenshothere you will see a screenshot from the page after the test step was executed at least once, and if the instruction targets an element (e.g.,click on "Images") you can switch to theBefore element interactionto see the state of the page before clicking on the element;Side effectsshows execution contextual observations that may be relevant to you (e.g., a value used by a variable);Step timelineshows the changes, jobs and comments associated to the test step (see Timeline for details).
Test steps added but not executed yet
Virtuoso will fill in some information for your step just after creating it depending on the natural language command used to create the step. After executing the step for the first time, Virtuoso will guess more information about the step such as the element structure, the element selectors, or any other information that the test might generate after executing it. Usually, you will not need to edit the test step details manually.
Side effects are not available for big execution reports
If an execution has over 1000 test steps in total, the side effects are not shown in the execution report to reduce the load on the browser (e.g., the side effect tab will not show the variable used and other side effects).
As a workaround, you can access the information that is not available in the execution report on the goal view while accessing a journey, if that is the latest execution of the goal version, or execute a subset of the journeys failing to reduce the number of test steps below this threshold.
Big side effects data is being truncated
To reduce memory required by the bot executing your journey, we truncate the side effects of data shown in the execution report. The limit is 500K characters when data is created by the current step, and 10K characters when previously created data is being used. Applying the limit described above results in adding a ... (truncated) suffix to the value shown. Data used to execute your steps is kept intact.
Note, that during the execution, the bot always uses the full data.
# Element alias
By default, Virtuoso shows an element selector in the natural language representation of your steps (e.g., Click on button "Home"). But sometimes, you may wish to represent them differently (e.g., when the element selector is an ugly Xpath).
Test steps using an alias are represented with a different style in Virtuoso and will show a title indicating it:


# Executed test step indicators
If a test step is executed already, each test step row will update its status denoted by the circle on the left that will change its color (e.g., green for a passed status, red for a failed status, etc.).
In addition to that, there are other indicators that can be shown in the test step row: step events, side effects, healing, etc. You can set whether to show or hide them by toggling its visibility, to do that, click on the journey context menu and click on Show execution indicators.
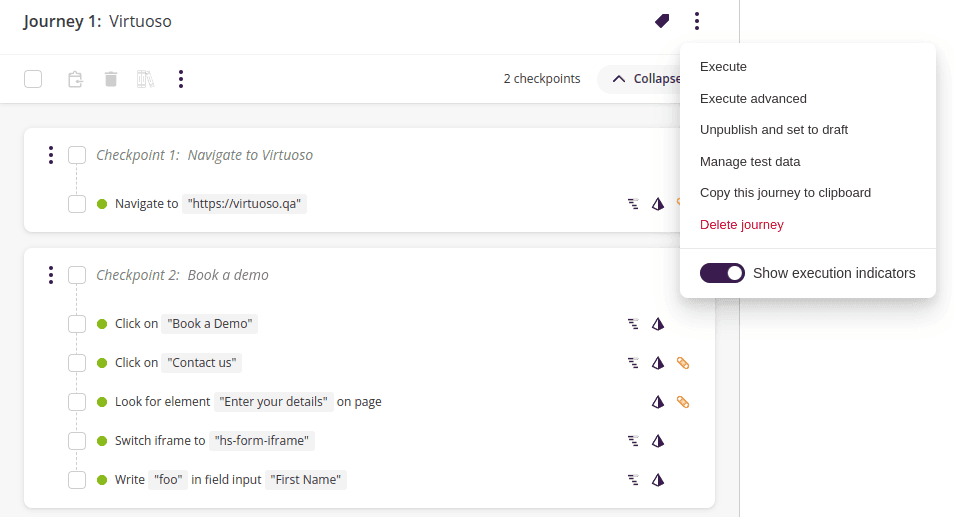
Note that the indicators will change depending on the version of the goal you have selected in the top bar version selector as they refer to the execution tied to that specific version (e.g., keep this in mind when reviewing past versions of your goals).
# Conditional Step Execution
To allow you to create flexible and dynamic test scenarios, Virtuoso offers the flexibility to conditionally execute test steps based on specific criteria. There are three options available for conditional execution:
Always: This option ensures that the step is always executed during the test, regardless of any conditions.
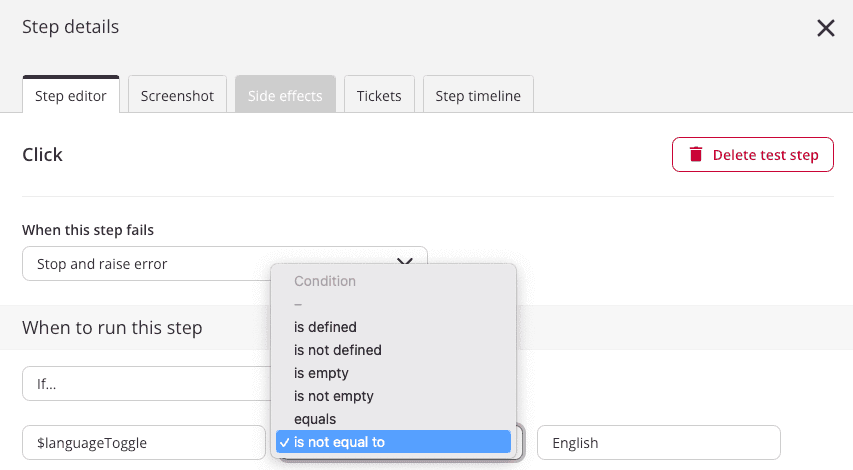
If...: With this option you can define simple conditions using an intuitive and self-explanatory interface to determine whether the step should be executed. You start by specifying a variable using the syntax
$variable. Then, there are six operator choices available for defining the condition:- is defined: When selecting the is defined operator, the condition will evaluate to true if the variable is defined and has a value. By using the is defined operator, you can execute a step based on the presence of a specific variable.
- is not defined: The is not defined operator functions as the inverse of the is defined operator. It evaluates to true if the specified variable is not defined or does not have a value. This operator allows you to execute a step when a particular variable is absent or empty.
- is empty: The is empty operator will execute the step if a variable is defined, but has no value. Note that the step will fail if the variable is undefined.
- is not empty: The is not empty operator will execute the step if a variable is defined, and has any value. As above, the step will fail if the variable is undefined.
- equals: The equals operator allows you to compare the values of two variables, or the value of a variable against a fixed value. If the values are equal, the condition will evaluate to true, and the step will be executed.
- is not equal to: Similar to the equals operator, the is not equal to operator compares the values of two variables, or the value of a variable against a fixed value. If the values are not equal, the condition will evaluate to true, and the step will be executed.
Supported syntax
To define a condition variable, you can optionally use the dot notation to access an object's property ($variable.prop1.prop2). For using the bracket notation, please use the "Advanced" option explained bellow. When using a fixed value as the condition's right operand, it has to be either a number (e.g. 42.5) or a string (e.g. English).
- Advanced: This option allows you to execute the step based on the evaluation of a JavaScript (JS) expression. If the JS expression evaluates to a truthy (opens new window) value, the step will be executed. Otherwise, it will be skipped. The "Advanced" option requires more technical knowledge, but covers some edge cases not supported by the "If..." option.

These conditional execution options provide you with precise control over the flow and behavior of your tests, allowing you to customize the execution based on variable values and their relationships. For more detailed information and examples on working with variables, please consult the Variables Guide.
It's important to note that these conditions affect both live authoring and regular executions. This means that you can test and validate the behavior of your conditions in real-time during the authoring process and ensure they function as intended during execution.
To make it easier to identify steps with applied conditions, Virtuoso includes an indicator icon next to their names. This visual cue helps you quickly identify which steps have conditional execution logic associated with them, making it easier to navigate and understand your test flow.

Additionally, the result of evaluating a condition will appear in the side effects tab. This provides you with visibility into the outcome of the condition evaluation, allowing you to verify if the expected conditions are met or if any adjustments are needed. The side effects tab displays the condition's evaluation result, providing insights into how the condition influenced the execution flow.

WARNING
Regardless of the condition type you choose, it will be evaluated in the context of all variables available at the time of execution. Be cautious when using variables that are too large, as high memory usage may slow down or break the execution. To mitigate this, you can erase the big variables after they are no longer needed:
store value "" in $bigVariable
# Test step data
Many page interactions use some form of data. For example, the value you write into an input field, or the URL of the page to navigate to. This data can come from fixed values (raw text), or dynamically such as variables, JS expressions, or test data values (from test data tables).
You can manage the data used by your step using the Data section of the step editor:

On top of the section, notice the source of data which will be used in your step. You can change what kind of data you want Virtuoso to use, by clicking on the corresponding section and providing the corresponding values.
In the screenshot above, you will notice a checkmark next to Use value, meaning that Virtuoso will pick up that setting when executing the step. Depending on the type of step and the settings configured in this section, the checkmark indicates which value will be used. For instance, if you have both an expression and hardcoded value set up in your step, the value of the expression will be used instead of the value. In this case, if you want your step to use the explicit value, you need to remove the expression.
# Using fixed values
When choosing this option, Virtuoso will use the raw string provided as the value for executing the step.
# Using variables as test step data

When using this option, Virtuoso will try to infer the value of the variable from the execution context. The following precedence applies from top to bottom:
- a variable that was set up previously during the execution by using a
Storecommand; - supplied dynamically from the API call triggering the execution (
initialDatain the execution request); - test data value if the journey has a test data table assigned, and a column name is matching the variable name;
- and lastly, to an environment variable with the same name, if available.
A default value can also be provided in case none of the mentioned dynamic values could be found.
Note: when an expression is set on a step, Virtuoso will use the value of the expression over the variable or fixed value.
# Using data-driven values as test step data
If you choose to use values from test data tables, you will need to assign a data table to the journey, and pick a column from the ones available in that table.
If your journey has a test data table assigned, and you choose a column to use with the test step, Virtuoso will assign a variable name that matches the JavaScript-compatible interpretation of the column name (replacing spaces and special characters by underscores).
The precedence presented on Using variables as test step data still apply, so double check if the previous test steps are not overriding the generated variable value (or if that specific variable is not being provided as initialData for the execution, applicable only for API calls or Flow executions).
# Using JavaScript expressions as test step data
JavaScript (JS) expressions will work similarly to variables, but instead of directly inferring the value from the execution context the expression will be evaluated as a standard JS expression.
For example:
- If you previously stored the value
123in variable$fooa JS expression$foo * 2will evaluate to246. - If you have an environment variable
$userNamewith the valueJohn,$userName + 'Doe'will evaluate toJohn Doe.
Note: As stated above, JS expressions will take precedence over variables and fixed values, even if the expression itself contains the same variable that is defined on the variable section.
# Reordering tests
You can change the order of your checkpoints and steps by hovering over them and using the drag handle that appears on their left side to drag and drop.
Note that when reordering checkpoints, you won’t be able to move the first checkpoint, nor drop any checkpoint before it.

When reordering steps, you will be able to drag and drop steps within the same checkpoint, or between different checkpoints.

Reordering tests will allow you to keep all the information that Virtuoso stores about checkpoints and steps (including the history and healing information), without having to recreate them.
# Tagging checkpoints
You can tag checkpoints to organize your tests further and to quickly find them when adding a shared checkpoint. For example, when some checkpoints may target a specific feature, you can add a tag with that feature name and then mark the checkpoints that interact with it. Later, when trying to reuse those checkpoints, you can write the tag name to locate those checkpoints.
To tag a checkpoint, hover the mouse over it and click on Manage checkpoint tags to open the tag manager. From there you may create new tags or search and select pre-existing ones. This works just like tag journeys but in this case you tag checkpoints.

# Shared checkpoints
Journeys from the same goal can share one or more checkpoints (set of test steps).

On a shared checkpoint, any change to its test steps will be replicated in all other journeys where it's shared. In practice, they are all the same checkpoint. E.g., if you add a test step such as Click on "Images" to a shared checkpoint, that test step will be added in the same position on every journey that uses it.
# Sharing a checkpoint
Checkpoints can be shared following one of these two methods:
# Reuse an existing checkpoint
You can choose to reuse a checkpoint while adding a new one to the journey by typing a hint (name, checkpoint number, or tag) of an existing checkpoint, and selecting it from the list.

# Create a new journey reusing another’s checkpoints
This method allows you to create a new journey that will share all the checkpoints up to a point with the original journey.
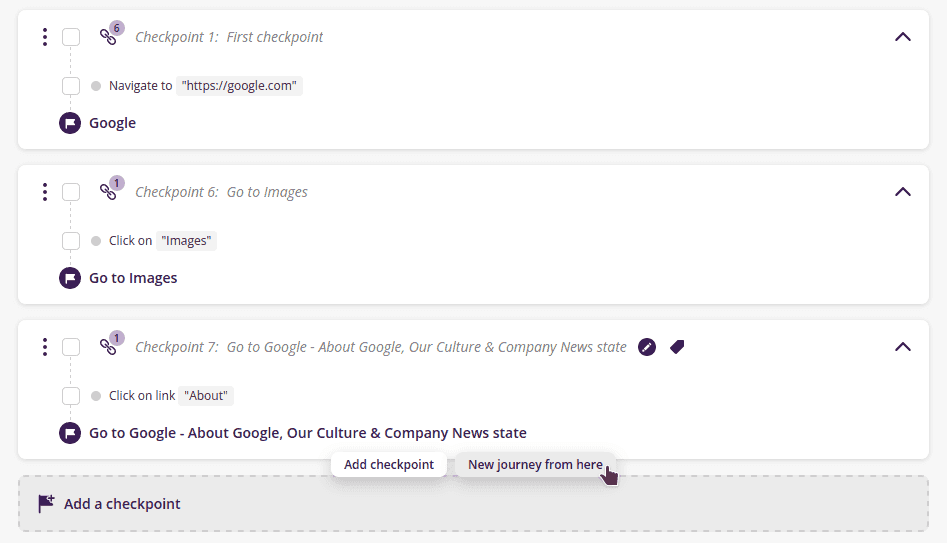
- Move your mouse pointer after the checkpoint you want to share and click on
New journey from here;
- Enter the title for the new journey and click on
Save;
The new journey will share all the checkpoints between the first checkpoint and the checkpoint where you clicked on New journey from here in the original journey:

Unsharing a checkpoint
You can unshare a checkpoint by clicking on the icon next to the Shared in N other journeys text next to the checkpoint name.
# Splitting and merging checkpoints
You can split an existing checkpoint into two pieces, and merge two sequential checkpoints into a single one. This allows you to organize your tests quickly, breaking longer journeys into smaller and more manageable checkpoints, or joining small checkpoints into a single one during journey authoring.
For example, the checkpoint below includes steps to navigate to the login page, before clicking on a "Forgot password" link:

If we wanted to reuse the checkpoint navigating to login page only, we could manually create a new checkpoint and move the second step to produce two checkpoints:

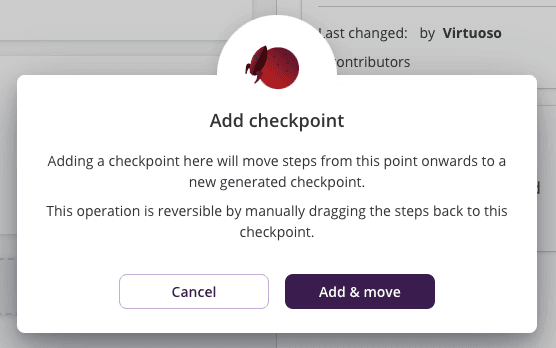
The "Add checkpoint" button provides a shortcut to automatically perform these steps. To use it, first place your cursor between the steps that should start and end the new checkpoint and click "Add checkpoint":

Confirm the operation by clicking "Add & move" on the dialog that appears.
Shared checkpoints
When using "Add checkpoint" inside a shared checkpoint, the change will be performed in all the journeys that contain the checkpoint to be split. Both the original checkpoint, now with less steps, and the new checkpoint will be shared by the affected journeys.
Checkpoints can also be merged using the "Merge checkpoints" button which will migrate the steps back into the first of the two checkpoints.

Shared checkpoints
Merging checkpoints cannot be performed on a shared checkpoint.
Following these steps allows you to write custom tests, augmenting the ones generated by Virtuoso. Learn more on the interactive steps creation process with Live authoring.