# The new journey authoring experience beta
The new journey authoring experience is a redesign of how you build and edit journeys in the Journey view. It keeps everything you can already do in the classic (legacy) experience, but changes how several of those actions are surfaced, and expands a few of them.
# Turning it on
- Open your Profile page.
- Find the Journey authoring section.
- Switch on Use new journey authoring experience.

The setting is remembered in your browser, so it applies per-device and only to you — turning it on won't change anything for your teammates. You can switch back at any time by turning the toggle off.
# What's different
# Selecting checkpoints and steps
In the classic experience, a selection checkbox is always visible next to every checkpoint and every step, and the bulk actions sit permanently in the toolbar.
In the new experience, selection is a mode you turn on:
- Click the selection (checkbox) button in the toolbar to enter selection mode. Checkboxes then appear next to checkpoints and steps.
- A selection actions bar appears at the bottom while you're in selection mode, with bulk actions for whatever you've selected — for checkpoints (copy, tag, convert to library checkpoint, unshare) and for steps (copy, set on-failure handling, set conditions, reset elements, delete).
- While selection mode is active, the run, pause, continue, fix, autopilot and preview controls are temporarily disabled — selection mode is for organizing and editing structure, not for running.
- Close the selection actions bar (the ✕ on it) to leave selection mode and get those controls back.
The result is a cleaner editor when you're just writing steps, with selection tools available on demand.
# Adding steps, checkpoints and other actions between steps
In the classic experience, you hover over a step to reveal its authoring controls (add step, add checkpoint, run from here, and so on).
In the new experience, hover over the gap between two steps to reveal an actions button there. Opening it gives you a menu with the actions available at that position:
- Run from here
- Add a step
- Add a checkpoint, or add a library checkpoint
- Merge with the next checkpoint
- Split the checkpoint
- Start a new journey from here
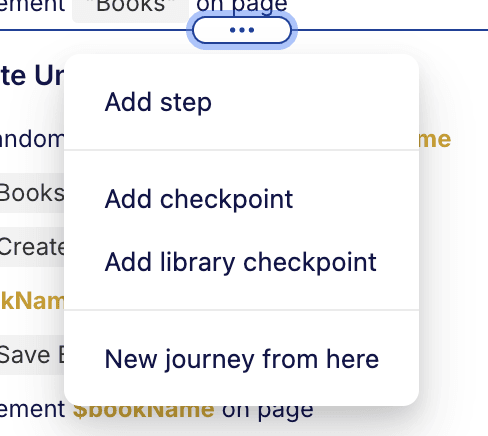
The menu only lists the actions that make sense at that gap (for example, merge only appears where merging is actually possible).
# Adding and removing pauses (breakpoints)
Classic mode lets you toggle a pause from a step's hover controls and marks paused steps with a dashed line.
In the new experience, every step has a pause toggle on its left. It appears when you hover the step, and once a pause is set the toggle stays visible as a marker — so you can see your pauses at a glance.
- Click it to add or remove a pause on that step.
- For a step inside a loop, a normal click sets the pause on every iteration; shift-click sets it for the current iteration only.
# The journey toolbar
The run controls are consolidated into a single compact toolbar with a live status indicator that shows whether the bot is offline, online (a session is ready), running, paused, errored or passed. Starting a session, running the journey, pausing, continuing one step or many, and fixing an element are all driven from here, alongside the autopilot, live-authoring settings and preview controls.
# The top of the page
When you're viewing a journey, its identity and navigation move out of the panel header and up into the page header:
- Journey name and tags sit at the top of the page. The journey number and title appear as the page title, with a tag icon beside them when the journey has tags.
- To see a journey's tags, hover over the tag icon next to the name — its tags are listed in a popup.
- To add or manage tags, open the context menu (⋯) at the front of the journey's name and use the tagging option there.
- To go to the parent goal, click the linked goal name shown just below the journey title. This replaces the "Back to journey list" button.
This is presentation only; the actions available are the same.
# Quick reference
| Task | Classic experience | New experience |
|---|---|---|
| Open a step's options | Click the step row | Click the step "pill" |
| See a journey's tags | Listed in the panel header | Hover the tag icon at the top of the page |
| Add/manage journey tags | Journey actions menu | "⋯" menu at the front of the journey name (top of page) |
| Go to the parent goal | Goal name is the page title | Linked goal name below the journey title |
| Select checkpoints/steps | Checkboxes always visible | Turn on selection mode first |
| Bulk actions | Always in the toolbar | In the selection actions bar (selection mode) |
| Add step / checkpoint, run from here, merge, split | Hover controls on a step | Actions menu in the gap between steps |
| Add / remove a pause | Step hover controls | Pause toggle on the left of each step |
| Pause across loop iterations | Step hover controls | Normal click = all iterations; shift-click = current iteration only |
| Convert to library checkpoint | One checkpoint at a time | Multiple checkpoints at once |
| Edit steps of a locked library checkpoint | Steps disabled until unlocked | Steps viewable; unlocking still required to change them |
# Switching back
Everything you author in the new experience is the same underlying journey — there's no migration and no separate copy. If you turn the Use new journey authoring experience toggle off, your journeys appear in the classic layout again, unchanged.
← API Manager Overview →